Welcome to Hivelocity! Whether you have a dedicated server or a virtual server, the myVelocity customer portal gives you full control at your fingertips. This guide will walk you through all the portal’s features and tools, helping you manage your server efficiently and securely. From powering your server on or off, reinstalling your operating system, and accessing the remote console, to adjusting a wide range of management settings, the myVelocity portal provides everything you need to manage your servers with ease.
Getting Started: Your Servers Overview
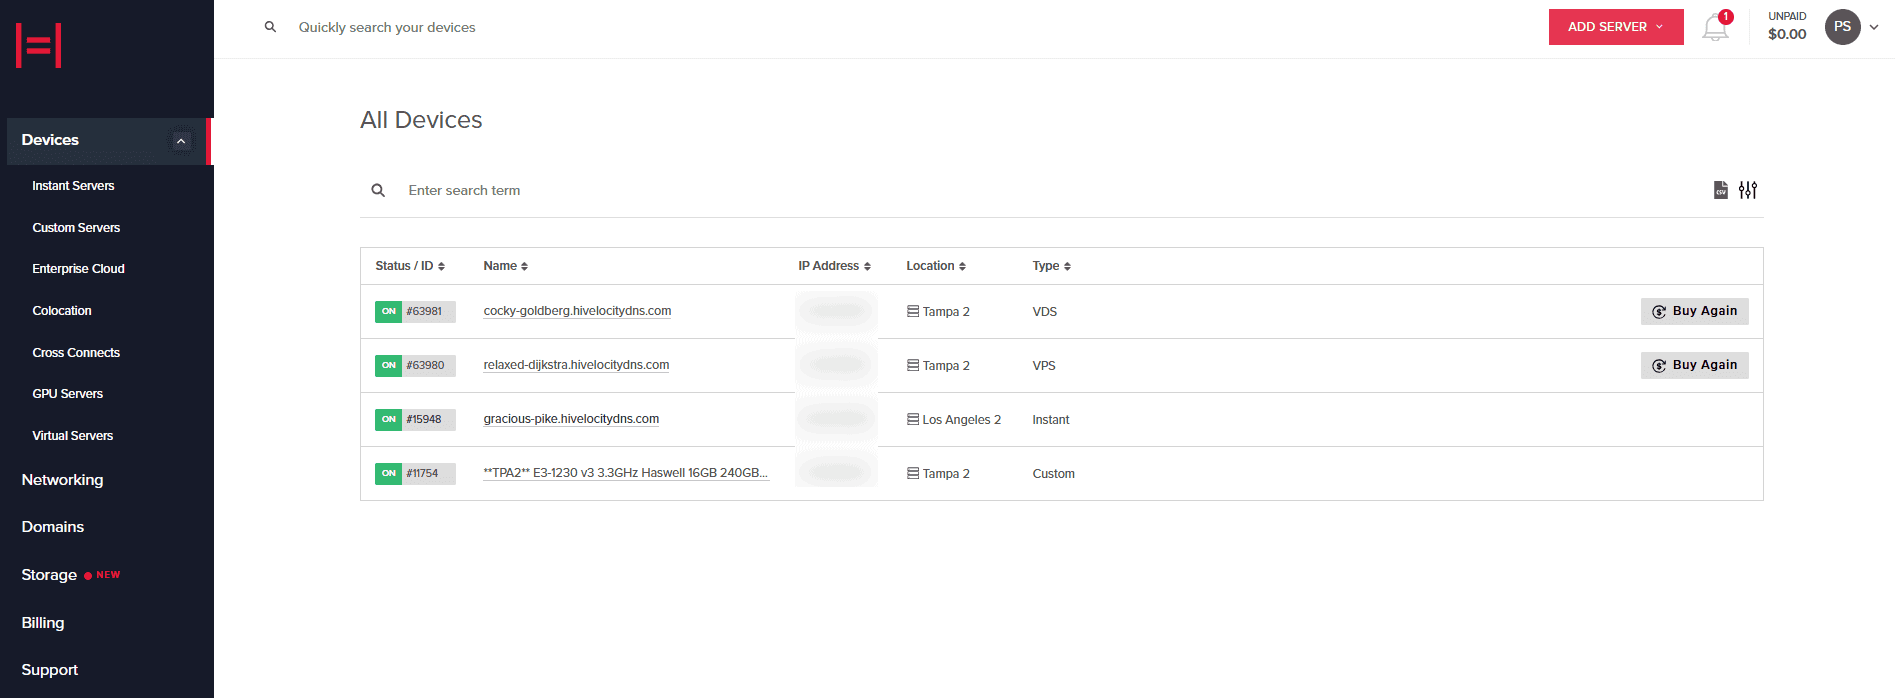
First thing you will want to do is login to the myVecloity customer portal. The first page you’ll see is the main Devices page, where all your active devices currently in service are displayed. This view will provide you the basics regarding all your existing servers, including device ID, IP address, location, and type.
The menu provides easy access to all management tools, including filtering by server type, Networking, Domains, and Billing, allowing you to quickly navigate and manage other aspects of your hosting account.
Device Overview
Device pages generally provide the same set of features, though certain differences may appear across server types. Given this overlap, we will break down the devices based on their type, dedicated and virtual.
Dedicated Servers
Device Details
From the device list, select your server, which will navigate you to the Device Details page. This page contains the following vital information:
- The ability to restart, power off or on, reload the server with a new OS, and use a virtual console to control it via the browser.
- A temporary password and username, available for the first few days after you purchase a dedicated server.
- The dedicated server hardware details.
- The public IP, including your IPv6 IP, if applicable.
Interfaces
The Interfaces page of your server includes information regarding your primary assignments, interfaces, routing vLANs, and utilizing any secondary IP assignments. In this section you will be able to break a bond, create a bond, and perform IP & vLAN routing.
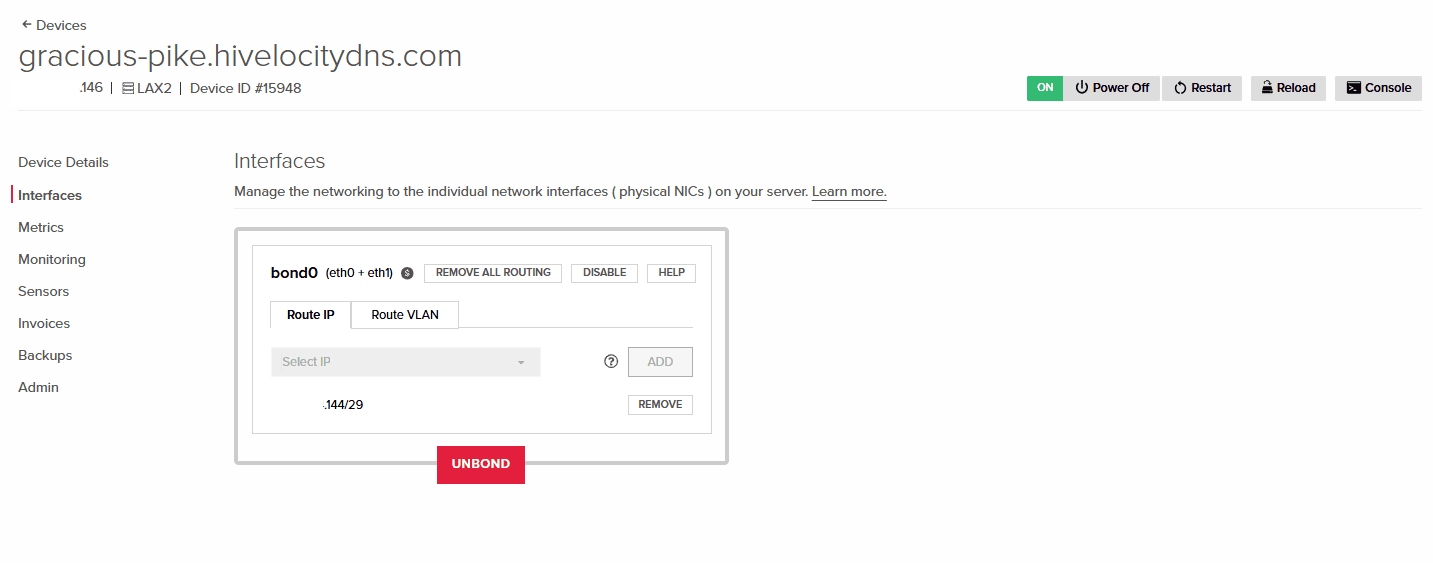
Interfaces Page
Interfaces & vLANs
For in-depth information regarding virtual local area networks (vLANs) & VPS Networks refer to our dedicated article below.
Metrics
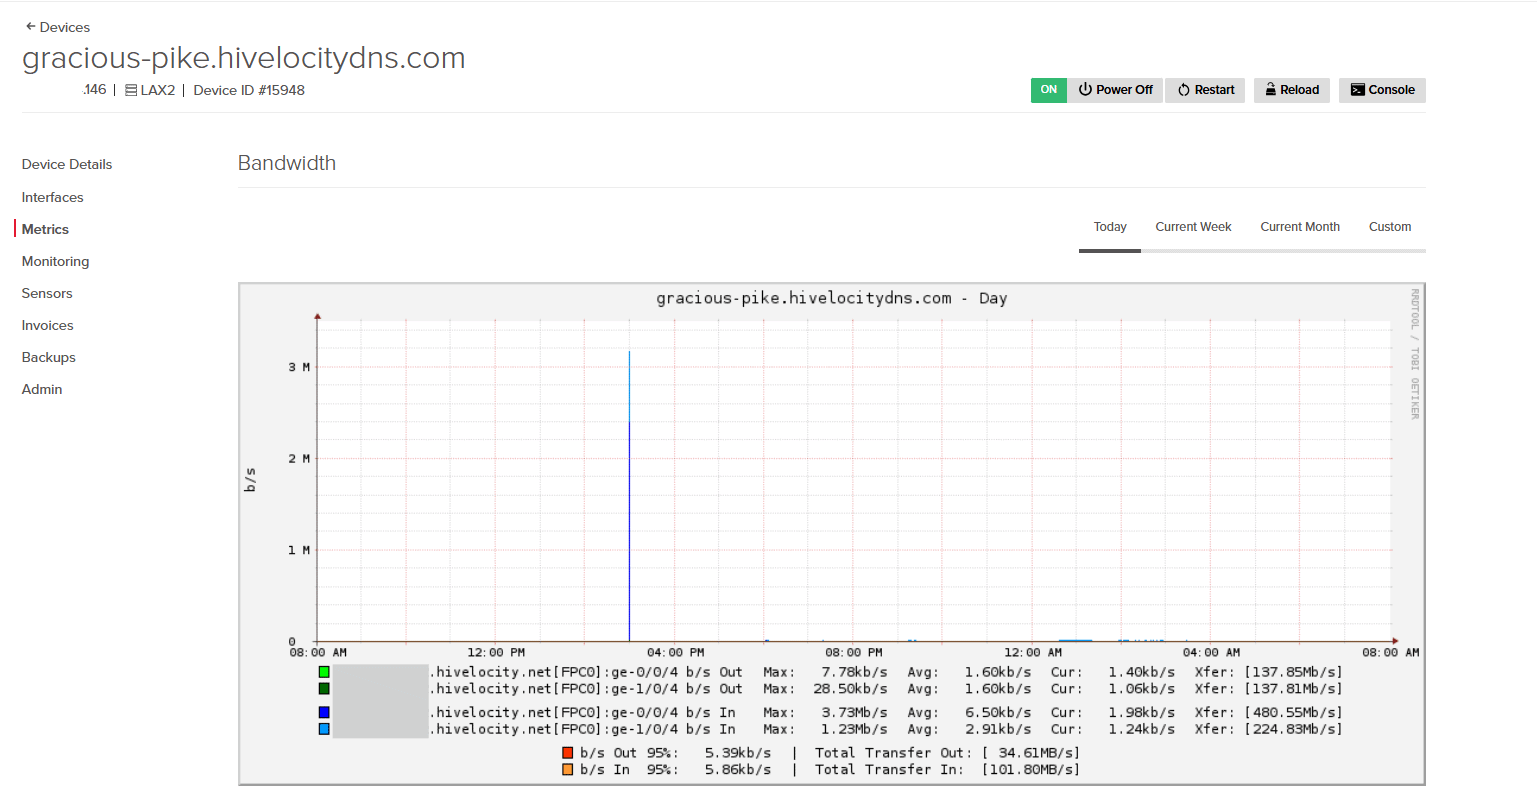
The Metrics Page of your server includes information involving bandwidth from various time points and an overview of your Managed Services (Subscribed devices only) which will provide further in-depth details regarding your server status.
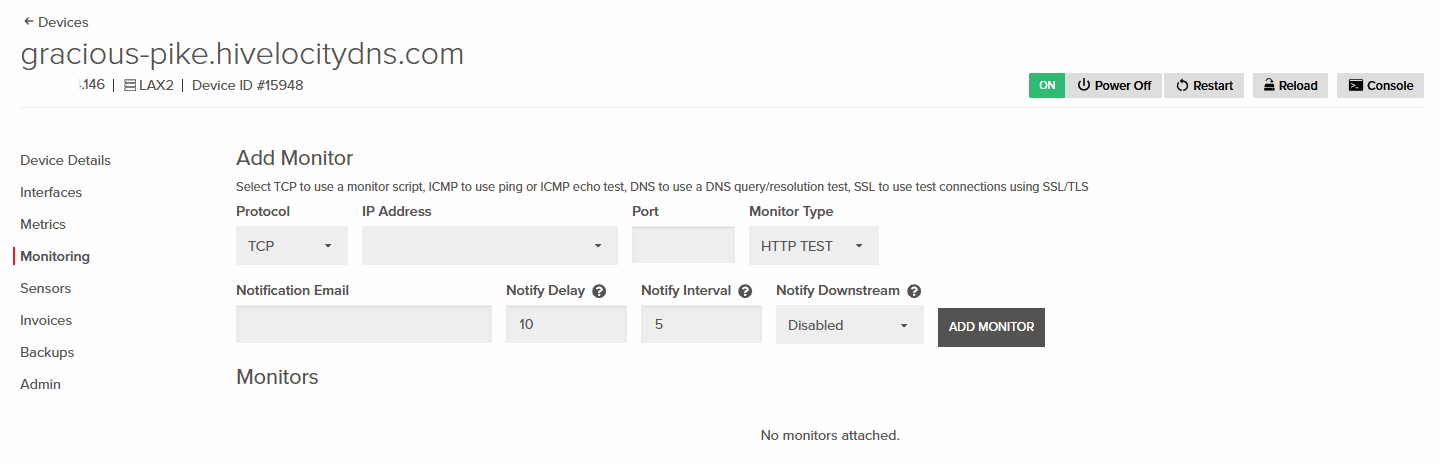
Monitoring
The Monitoring page allows you to choose TCP to run a monitor script, ICMP for a ping or echo test, DNS for a query/resolution test, and SSL for connection tests over SSL/TLS. This feature can be very useful because it gives you visibility into the health and reliability of your server.
Sensors (IPMI / Console)
The Sensors page provides information regarding temperature and voltage on top of allowing you to connect to IPMI, which is a full remote view of your server to provide you control on the unit. The IPMI feature is very useful as it allows remote control of your server in instances when the connectivity on the server has been impaired.
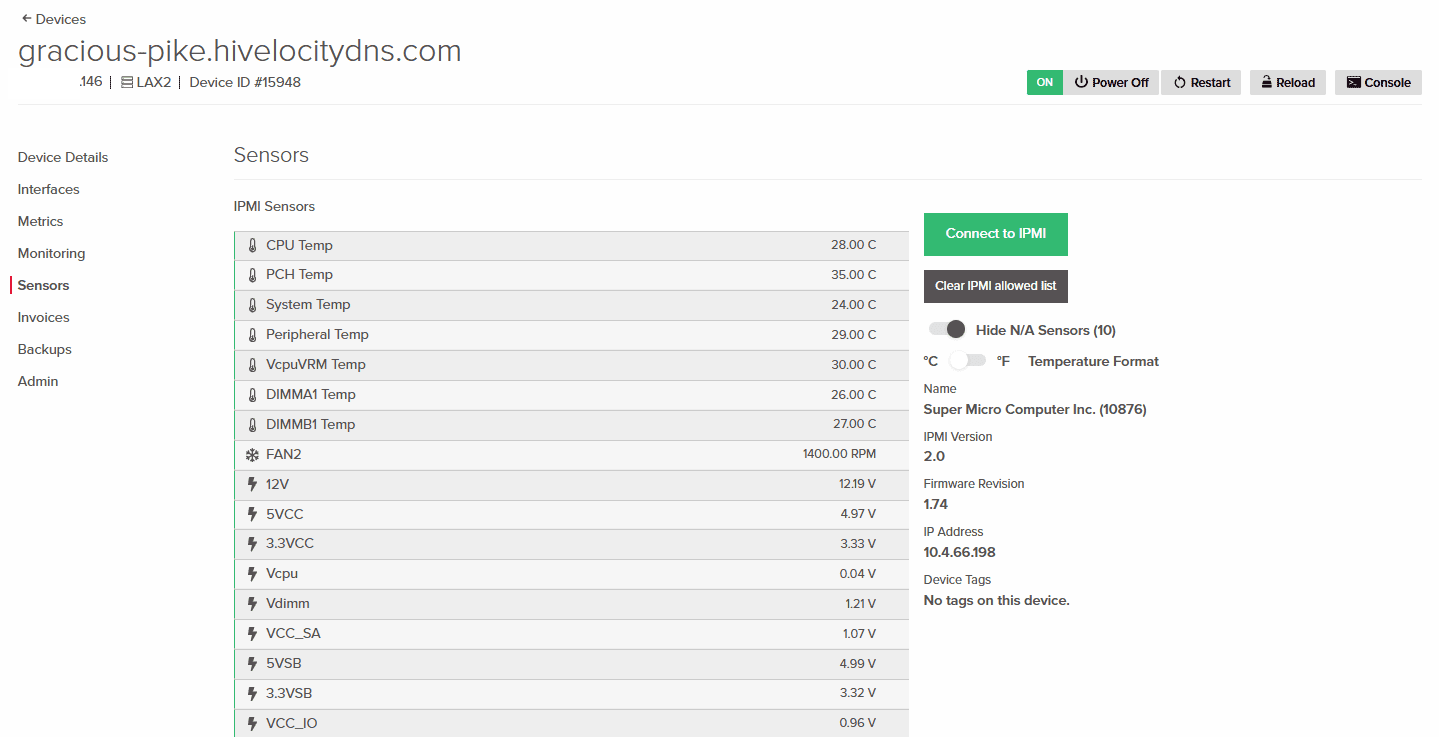
Accessing IPMI / Console
IPMI allows you to manage a server remotely at the hardware level, even if the OS is down. You can power cycle, view the console, mount ISO images, and troubleshoot issues from anywhere. An article explaining the process is available below.
Mounting ISO Images Using IPMI
Information on how to mount an ISO image onto your server is available below.
How To Navigate the Supermicro IPMI Interface and Mount a Virtual Image
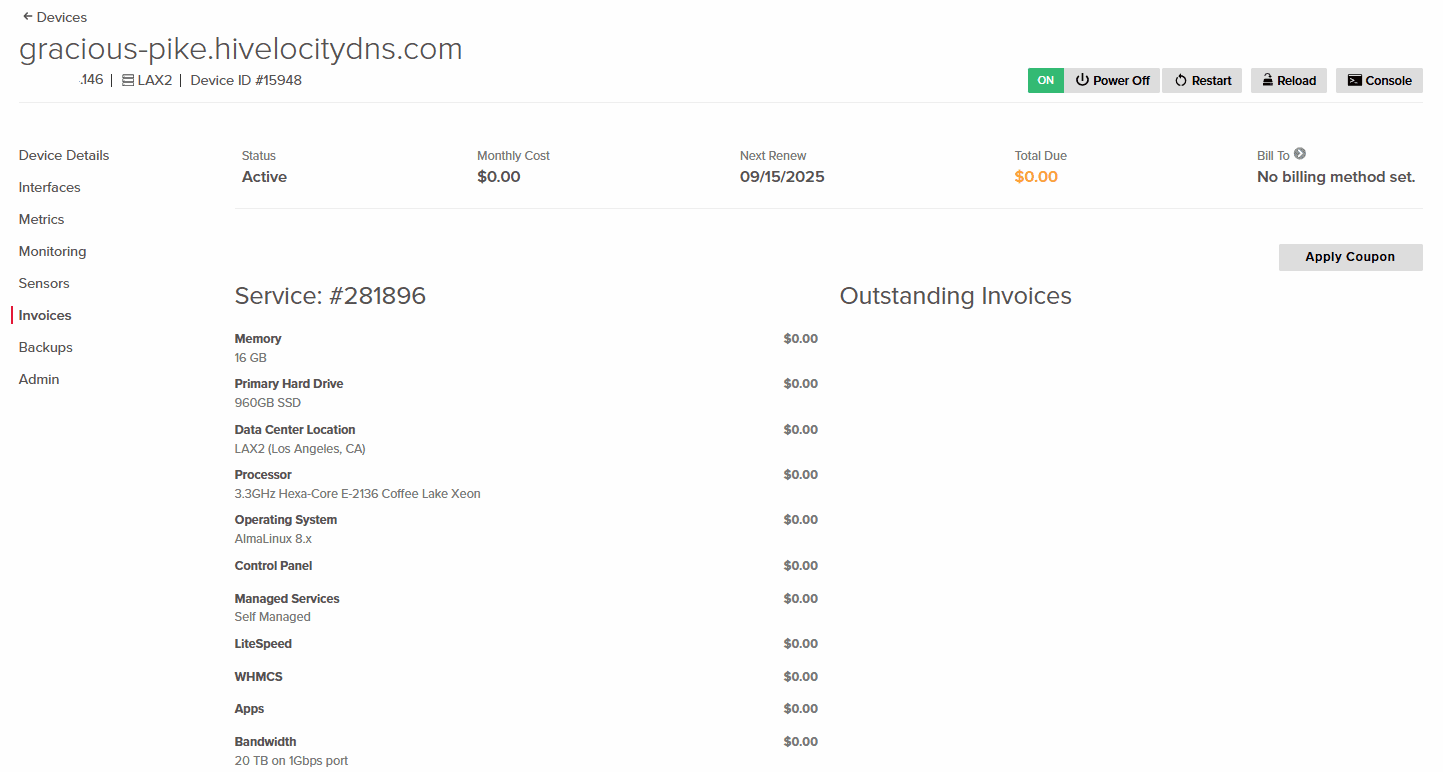
Invoices
The Invoices page allows you to view current service status, renewal dates, total due payments, and outstanding invoices. From this section you will be able to make payments as well and apply any coupons you might have.
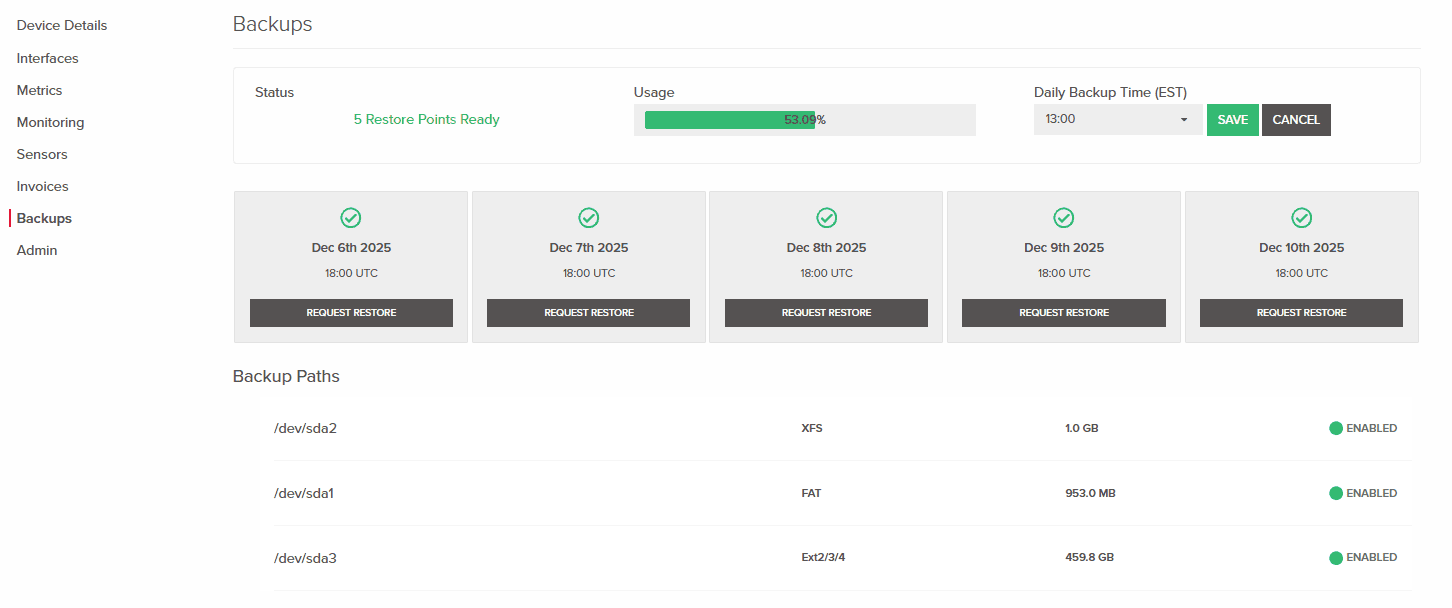
Backups (Rapid Restore)
The Backups page will allow you to sign up to the Rapid Restore backup service. When utilizing the service you will be able to view recovery point status and request specific recovery when needed. Pressing the Sign Up button will open a form for you to fill out so that the team can begin deploying the service.

Requesting a Restore Point Recovery (Bare Metal Restore)
The Rapid Restore service once active is available in the Backups tab with all the available recovery points and their status. Once ready, press on the Request Restore button for the recovery point of choice.
Admin
The Admin page includes the option to set a hostname for your device, create a custom device name for easier device recognition within the portal, and the ability to cancel your device and related services.
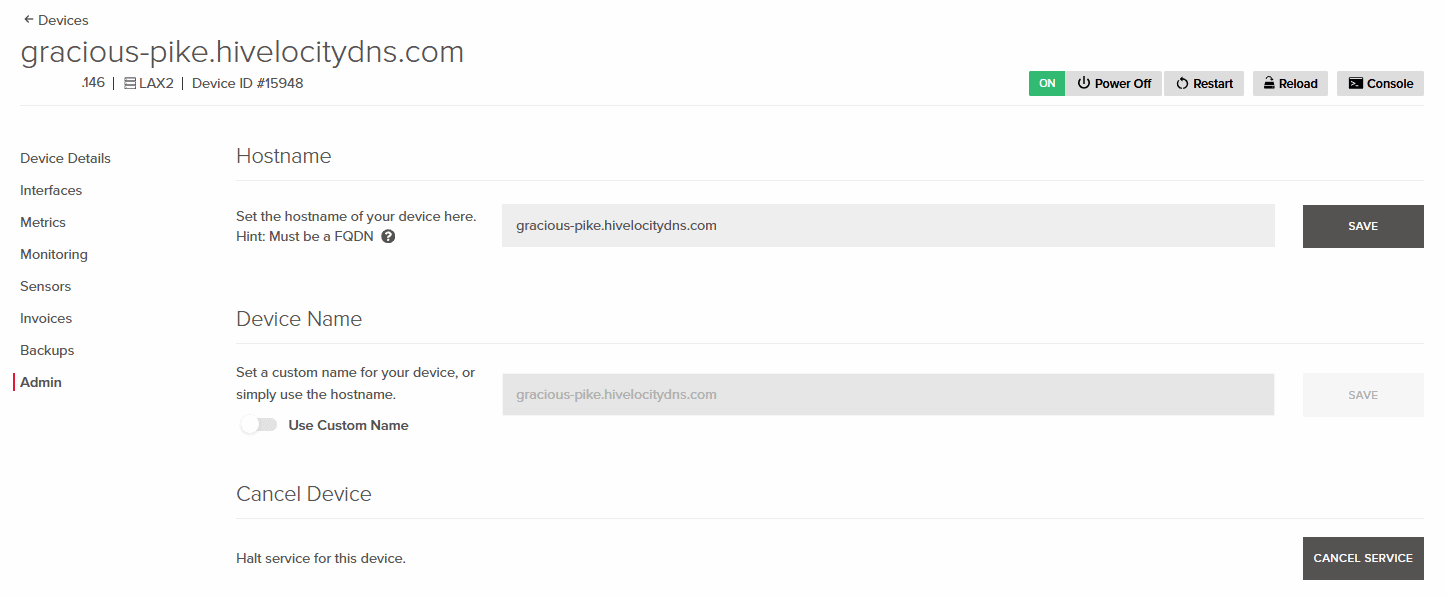
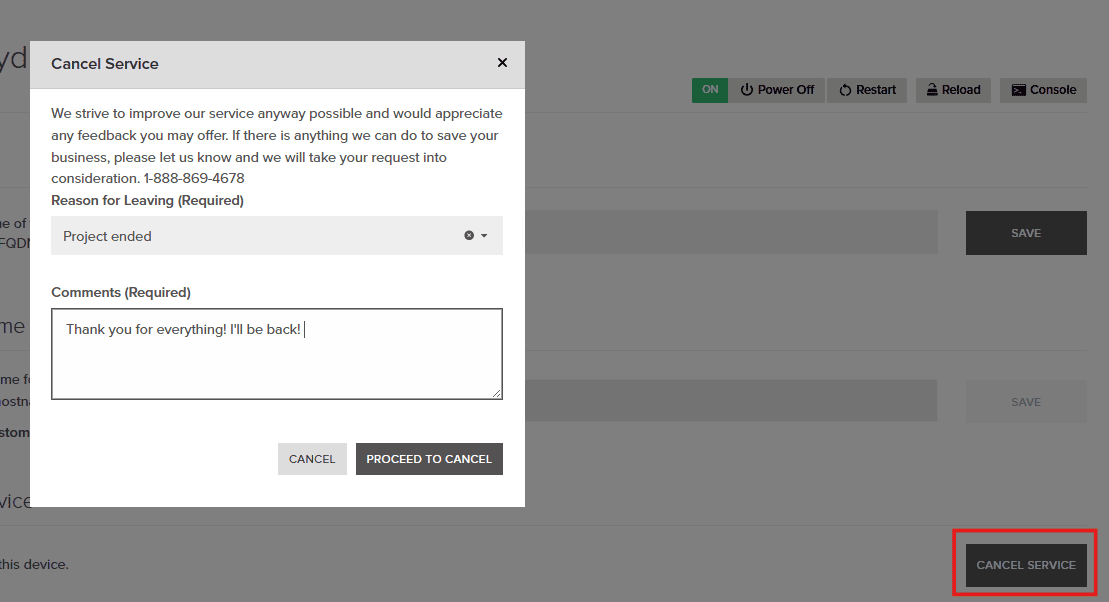
Requesting Service/Device Cancellation
If for any reason you require to halt services for a device and perform a cancellation request, you can simply navigate to the Admin tab to press on the Cancel Service button.
Virtual Servers
Device Details
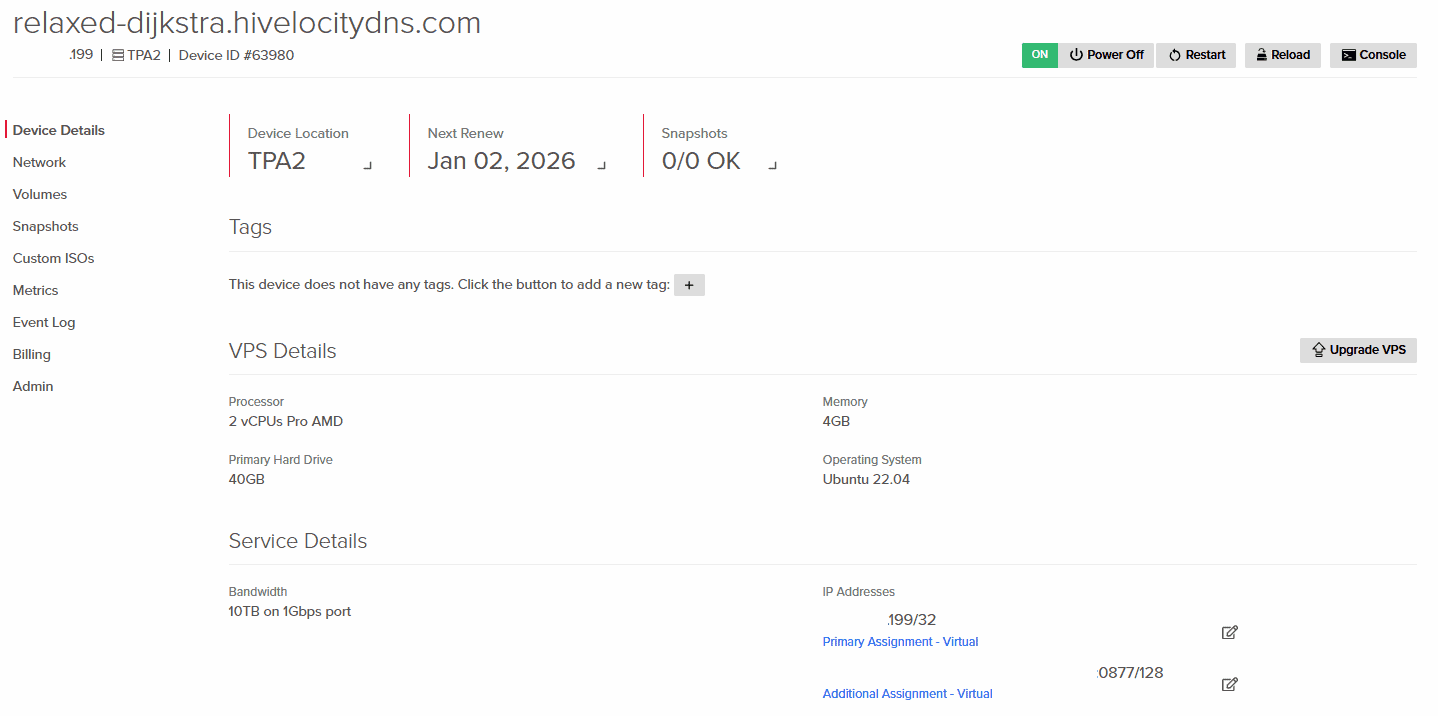
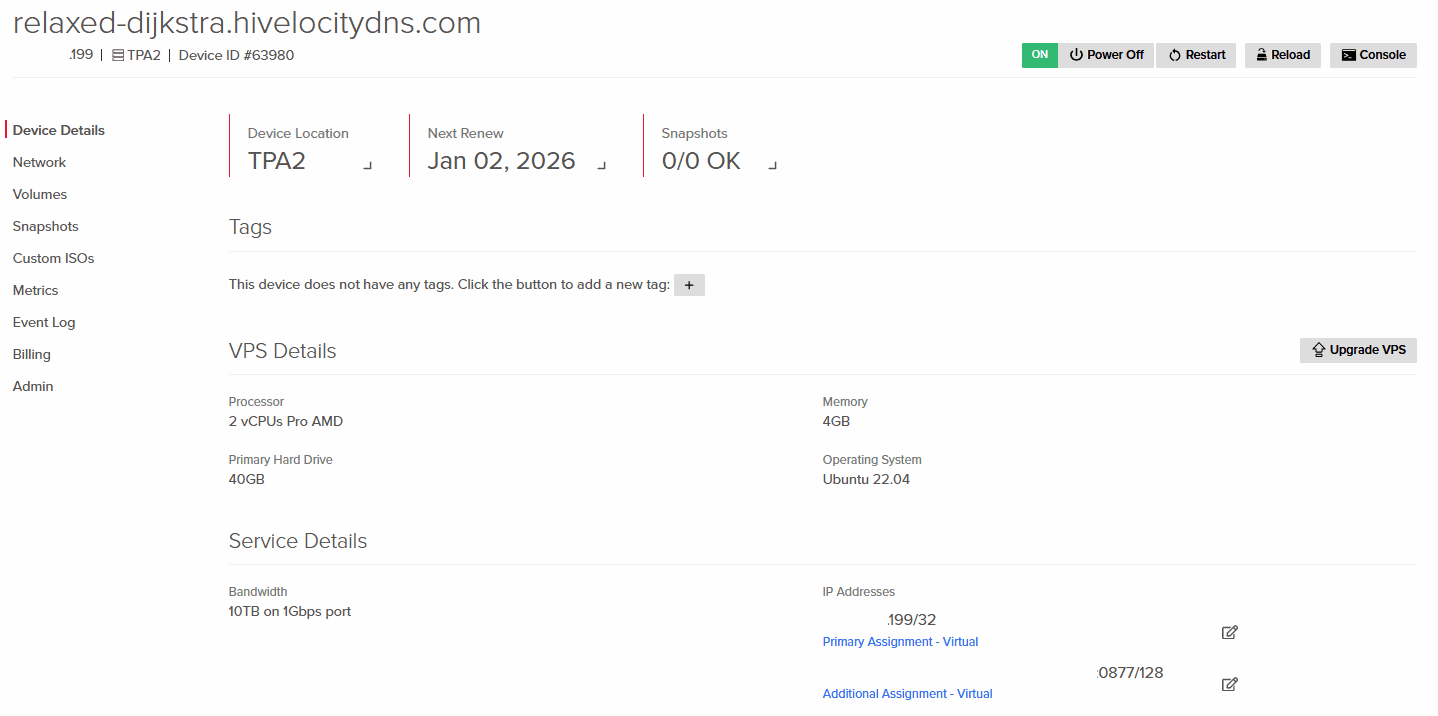
Once you’ve navigated to the virtual server of choice, the Device Details page will be displayed. This page contains vital information regarding your virtual server.
This page contains the following important information:
- The ability to restart, power off or on, reload the virtual server with a new OS, and use a virtual console to control it via the browser.
- Virtual server hardware details.
- The public IP, including your IPv6 IP, if applicable.
- A temporary password and username available in the first few days after you purchase a virtual server.
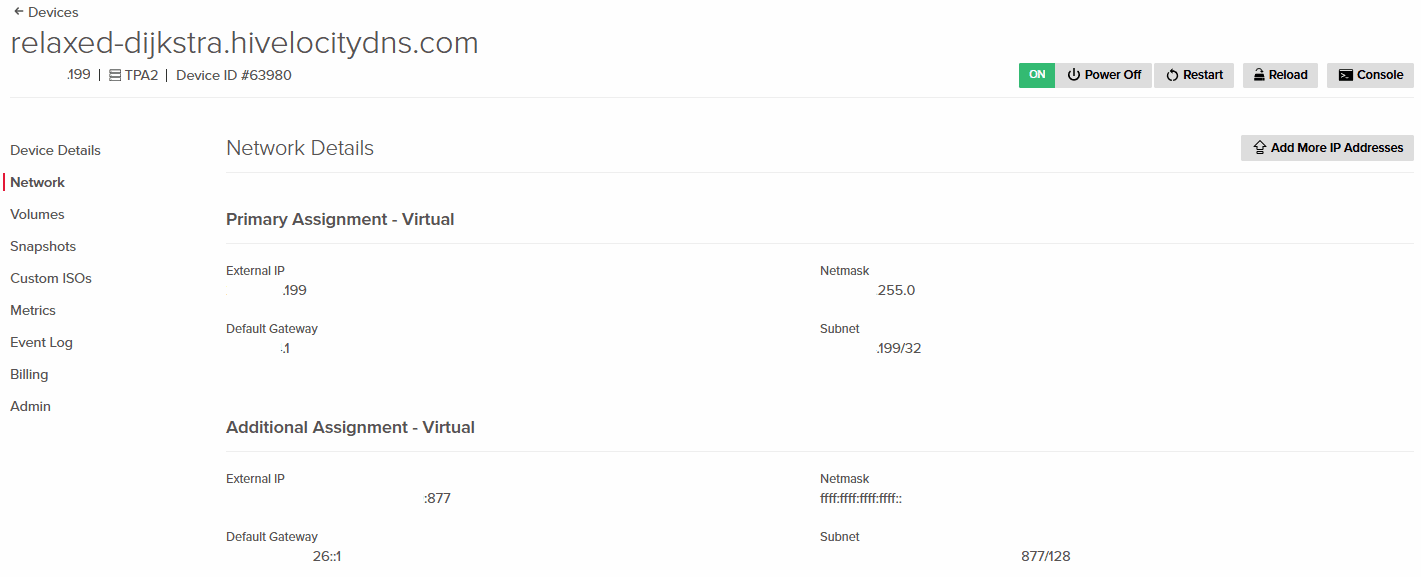
Network
The Network page of your virtual server includes critical information regarding your Primary assignment and any additional IP assignments such as IPv6. The information on this page includes the following items:
- External IP
- Default Gateway
- Netmask
- Subnet
For in depth information regarding virtual local area networks (vLANs) & VPS Networks refer to our dedicated article.
Requesting additional IP addresses can also be done by pressing the “Add More IP Addresses” at the top right of the page.
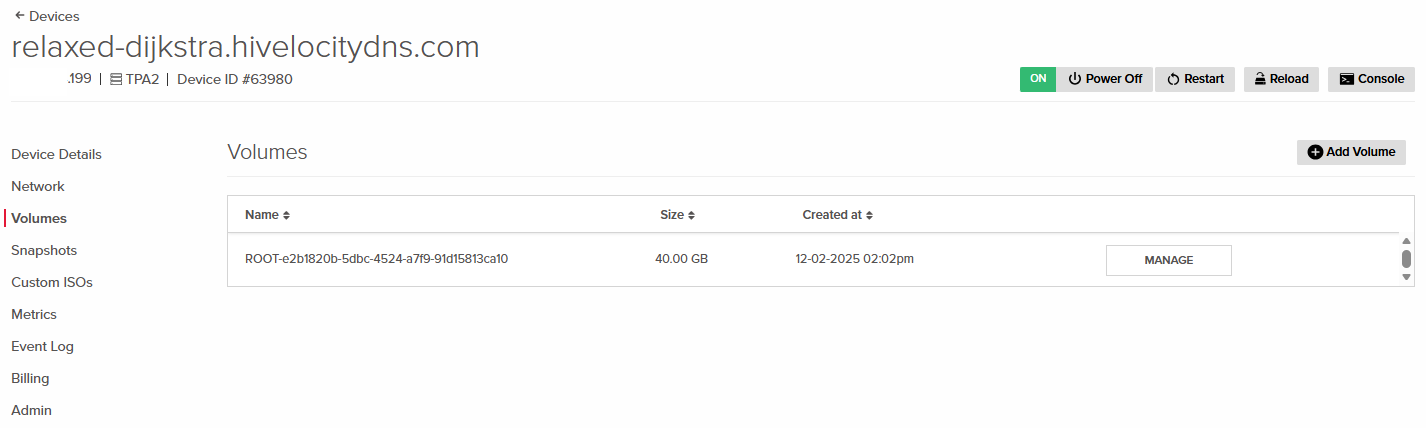
Volumes
The Volumes page of your virtual server contains information involving the disk space you’ve purchased and assigned to your system. The information on this page includes the following items:
- The disk size being occupied.
- The time of disk creation.
- The ability to add a disk or more as needed.
- The ability to create a snapshot of a specific disk.
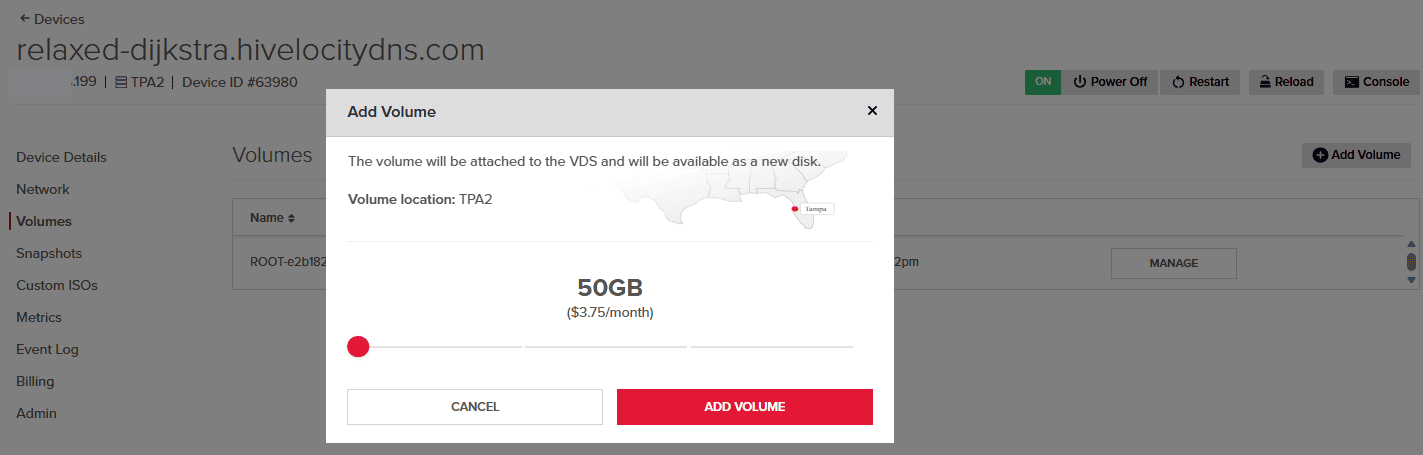
Adding A New Volume
Adding secondary volumes in addition to your existing root volume is simple. Within the Volumes tab press on the Add Volume button and complete the necessary form based on the required storage size.
Once the volume has been added, review it within the OS for further partitioning and processing. If the volume is not visible, proceed to fully power off the instance followed by powering it back on.
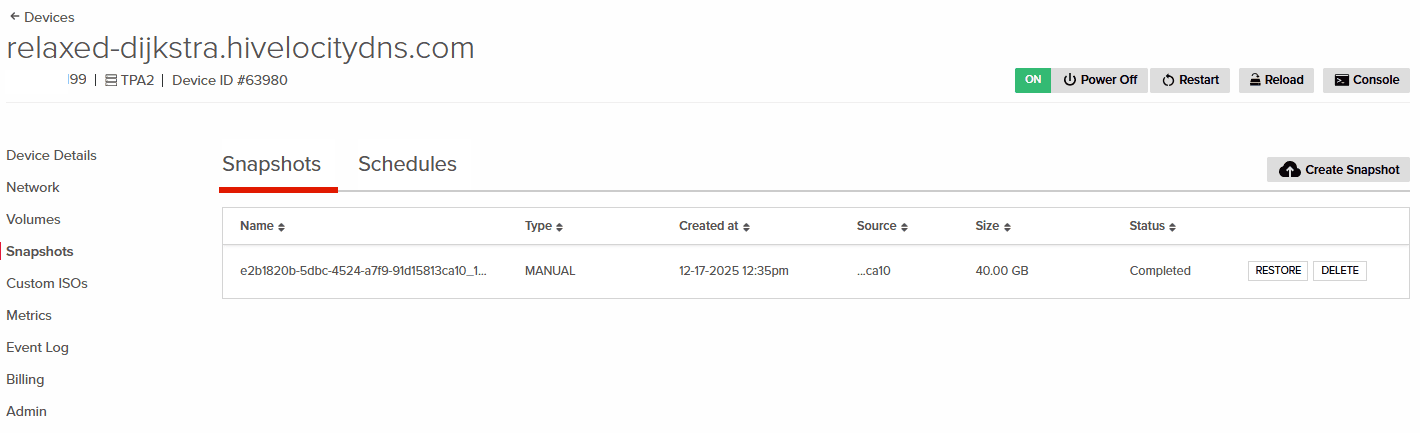
Snapshots
The Snapshots page of your virtual servers includes all existing snapshots and any existing schedules along with the ability to create snapshots as needed. A VPS snapshot is a point-in-time copy of a virtual server’s disk state, allowing quick rollback or recovery if changes or failures occur. It’s commonly used before updates or configuration changes.
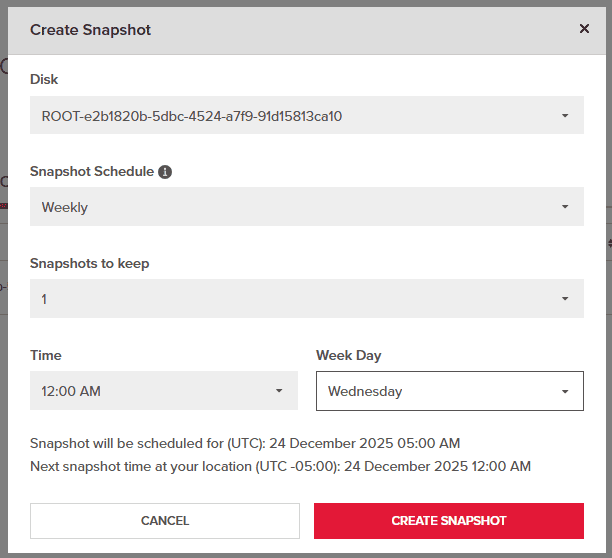
Creating a new Snapshot
Creating a snapshot is simple and recommended to be done with a schedule in mind. Each snapshot type is strictly limited to a single occurrence, ensuring that only the most recent data is retained.
- Within the Snapshots tab press on the Create Snapshot button.
- Select the Disk you wish to perform the snapshot with.
- Configure the Snapshot schedule based on the required type of schedule.
- One-time snapshot will take a single snapshot.
- Daily will take a snapshot every day at the specified time.
- Weekly will take a snapshot every week on the specified day and time, including the day in the week.
- Monthly will take a snapshot every month on the specified day and time, including the day in the month.
- The number of snapshots to keep, 1 or 2, based on your needs.
- The time you wish to execute the snapshot job.
- Once the task is complete you will be able to view the new schedule in the Schedules tab within the Snapshots tab.
The topic is also covered in the article below.
Custom ISOs
The Custom ISOs Page of your virtual server allows you to upload and use ISOs as needed. An ISO is a single file that contains an exact image of a bootable disc, such as an operating system installer. It’s commonly used to install or recover operating systems on servers and virtual machines.
Information relating to Custom ISOs can be viewed in the article below.
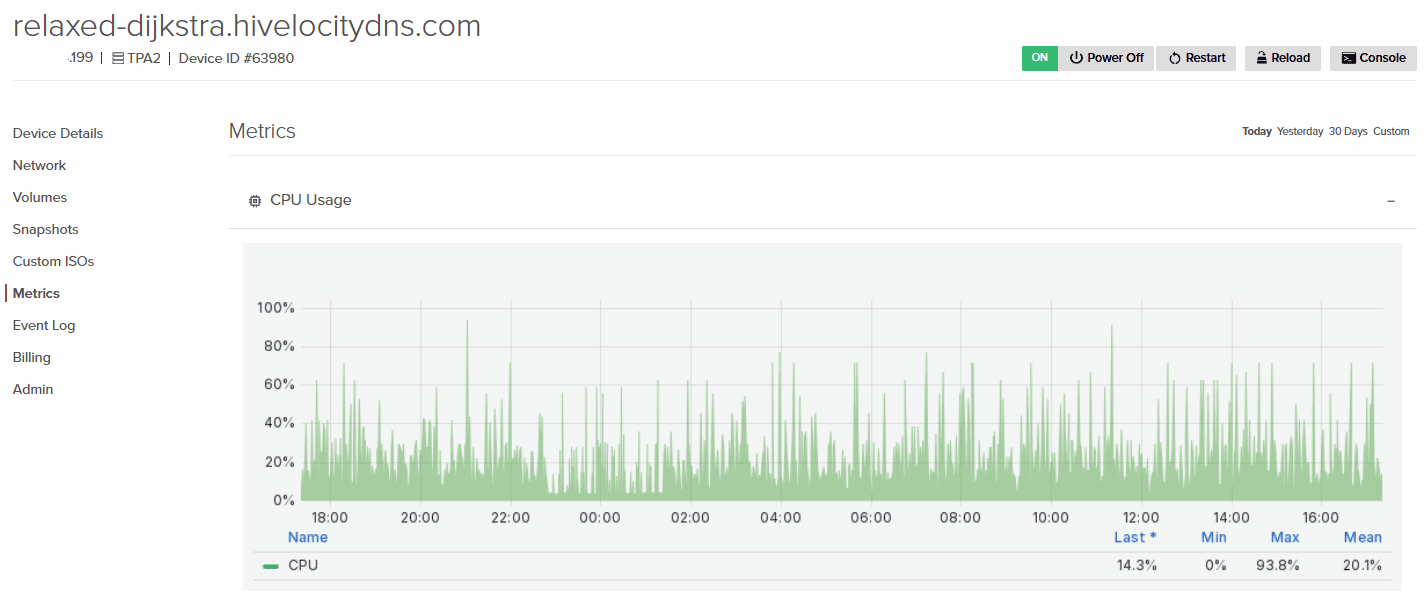
Metrics Tab
The Metrics page of your virtual server includes information involving server load, CPU, memory, disk, and network utilization in various time ranges for you to evaluate usage.
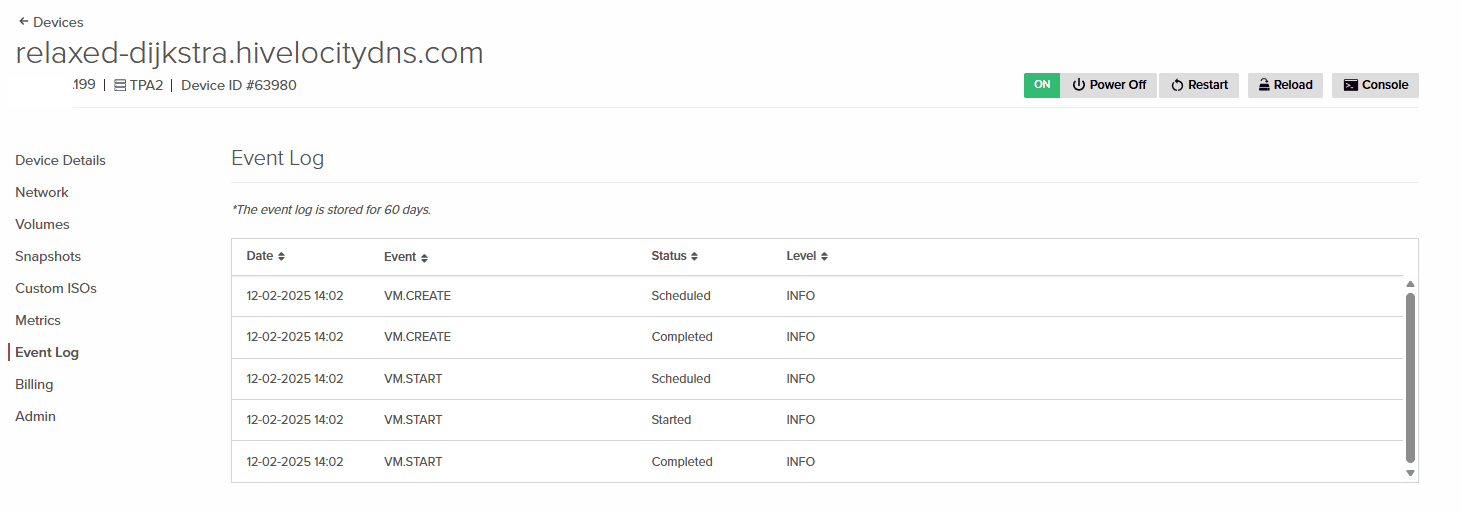
Event Log
The Event Log page shows all activity related to your virtual server, including actions such as starting or stopping the instance and other system events. This information helps you confirm whether any actions were performed by you or your team and allows you to review the date and time of those actions when troubleshooting is needed.
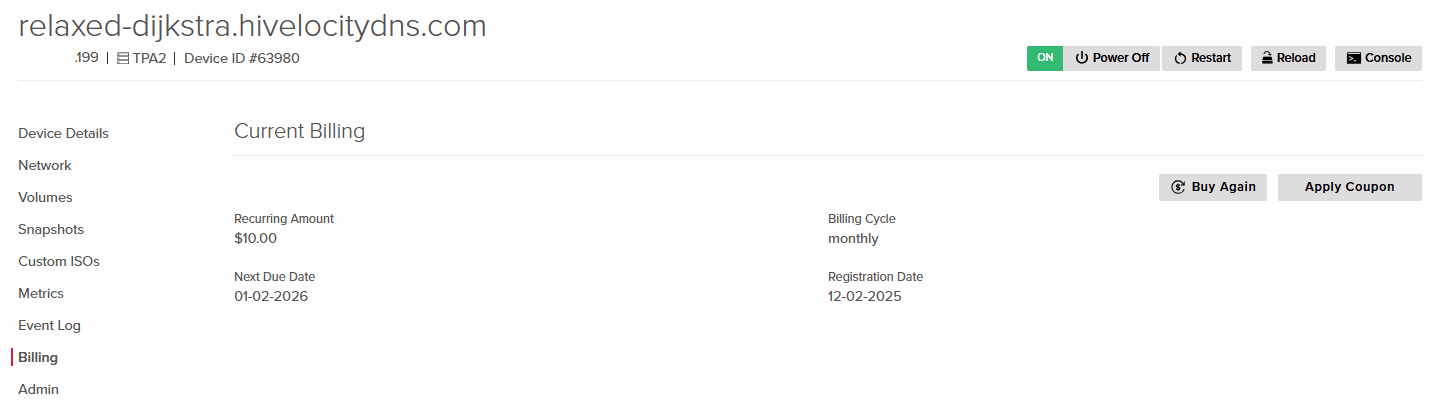
Billing
The Billing page of your virtual server includes information relating to any payments and dates that are pertaining to your services.
Information that can be found on the page includes:
- Your recurring billing amount.
- Your next due date.
- Your billing cycle.
- Your registration date.
For any Billing related concerns, please reach out to the Billing Department during working hours for assistance. Available Monday – Friday 9:00 AM – 5:00 PM EST. you can contact them by creating a ticket via billing@hivelocity.net, the myVelocity portal, or by calling 888-869-4678 Ext. 3.
Admin Tab
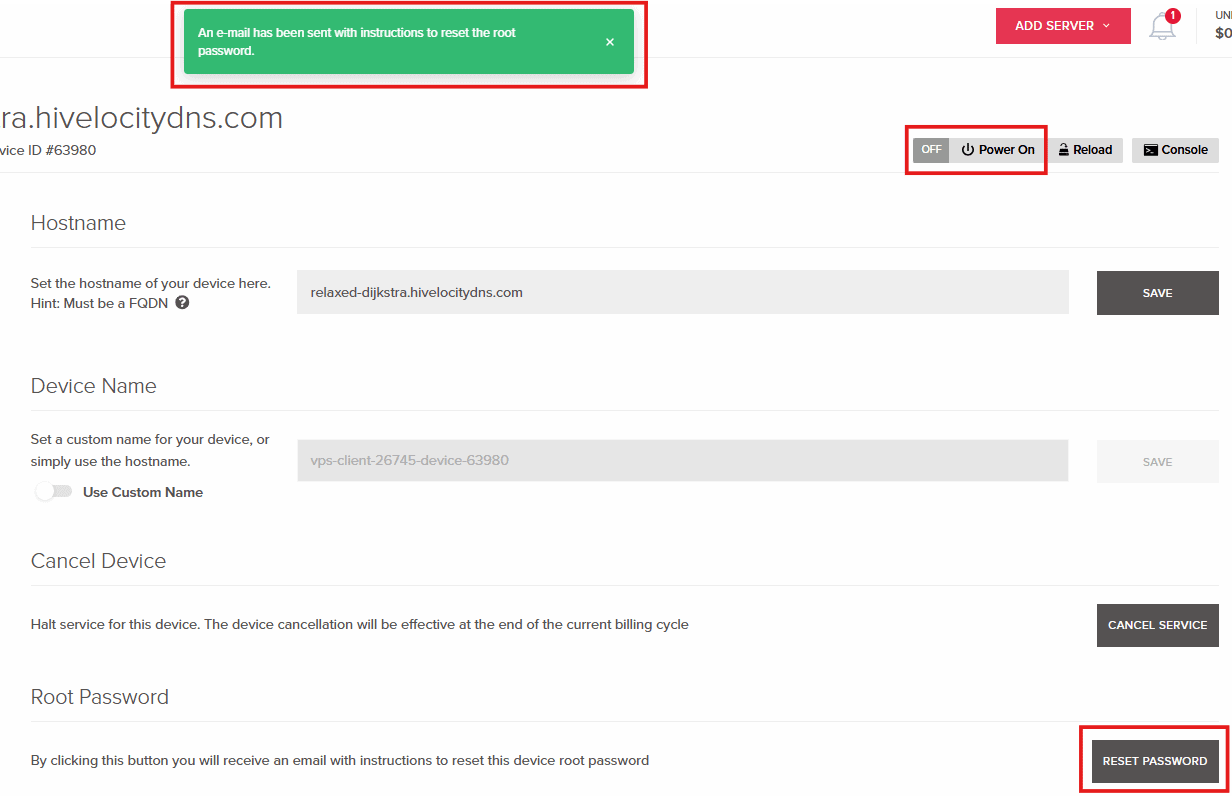
The Admin page of your virtual server includes the option to set a hostname for your device, create a custom device name for device recognition, the option to cancel your device and halt services, and reset your virtual server root password.
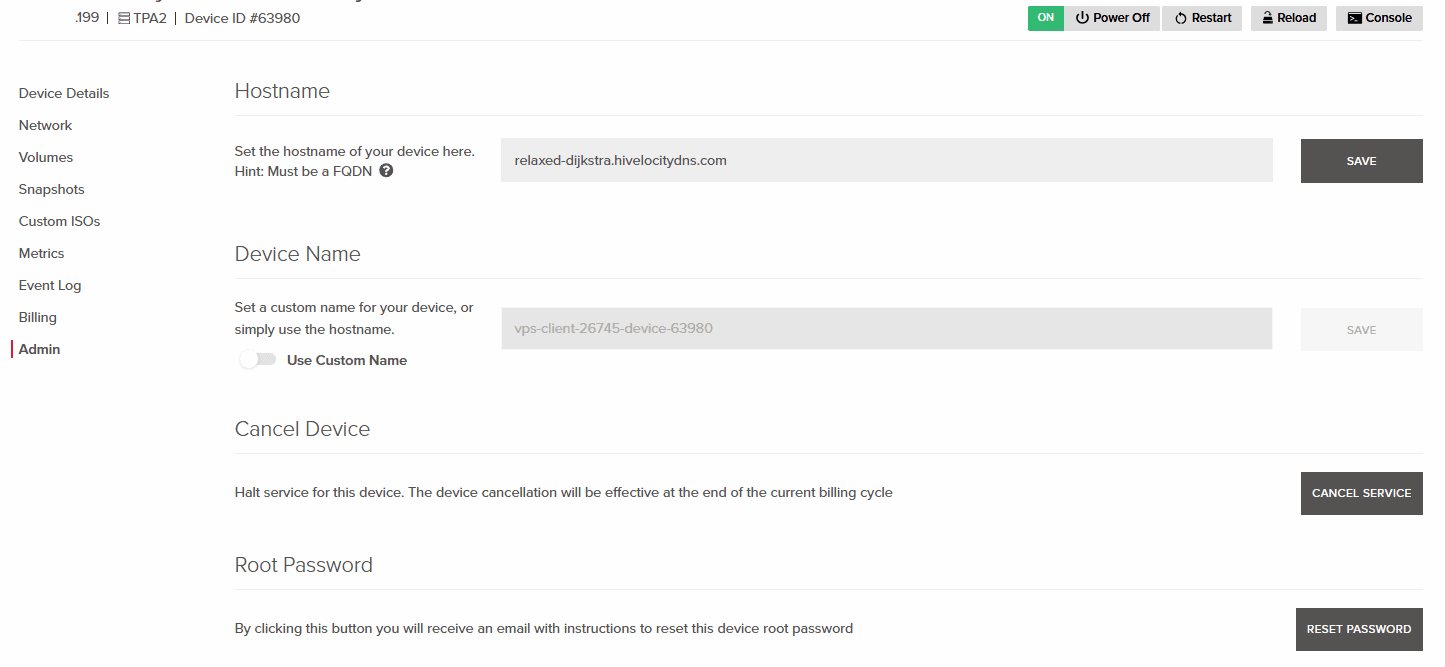
Resetting Virtual Server Root Password
Resetting the password can be done via the Admin page by pressing the “Reset Password”. Shortly after you will receive a message on screen stating, “An e-mail has been sent with instructions to reset the root password.” . A few minutes later an email will be sent to include those details.
Note that for this process you will need to power down the virtual server first.
Networking
Use this navigation menu within the Networking page to access and manage your networking resources from one place. Each section allows you to configure, monitor, or review different aspects of your network and related services.
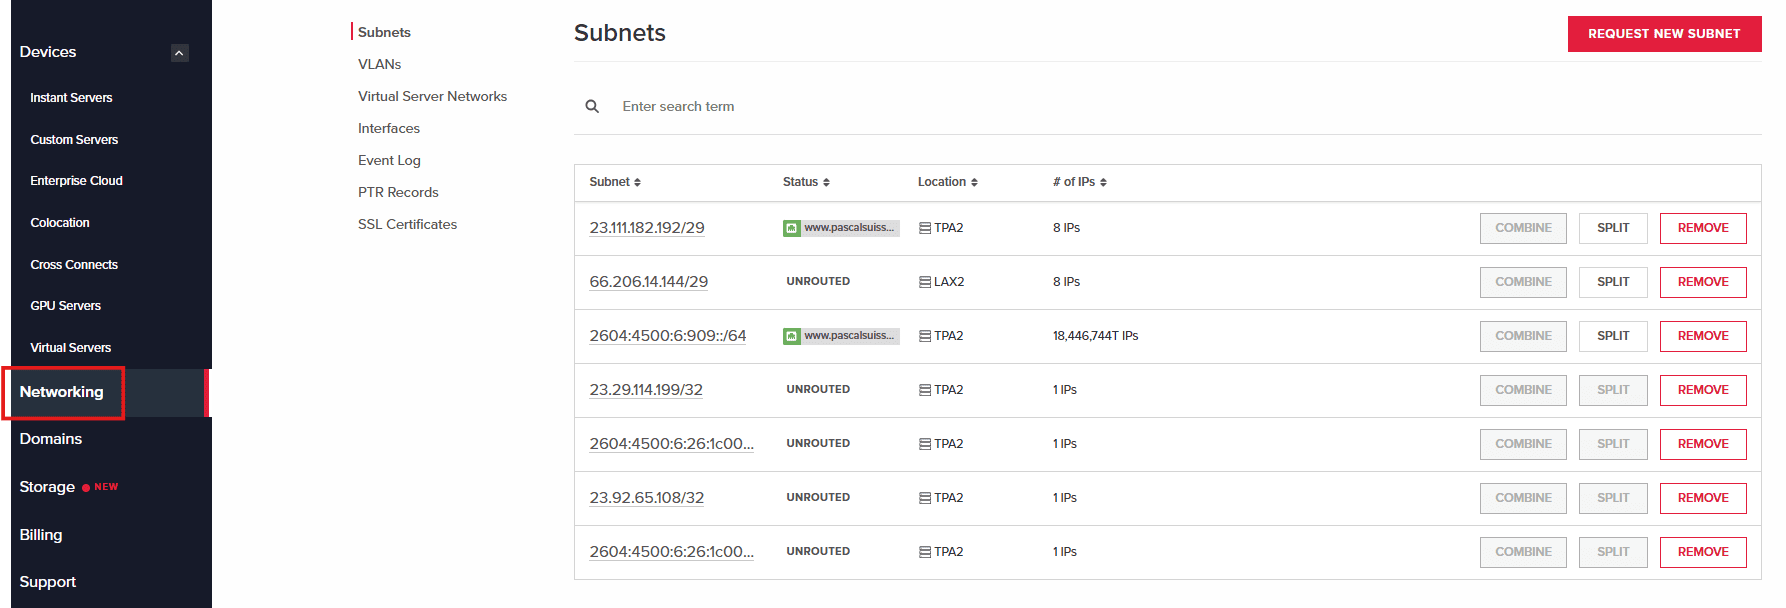
Subnets
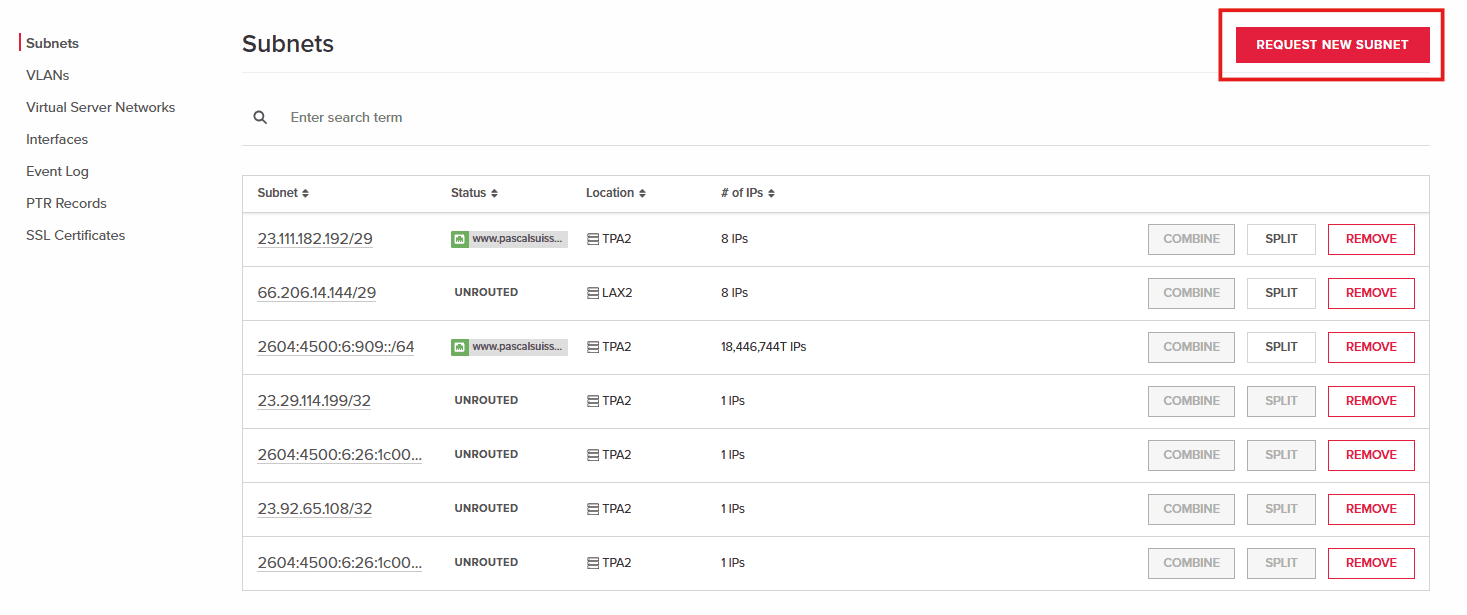
The Subnets page allows you to view your overall subnets available across all of your devices. You will be able to gather their current routing, location, number of IPs and the ability to request, split, or remove a subnet.
Requesting a New Subnet
A subnet is a smaller segment of a network created from a larger IP network to improve organization, security, and traffic management.
- Requesting a new subnet can be done within the Subnets page as per the image below, using the Request New Subnet button.
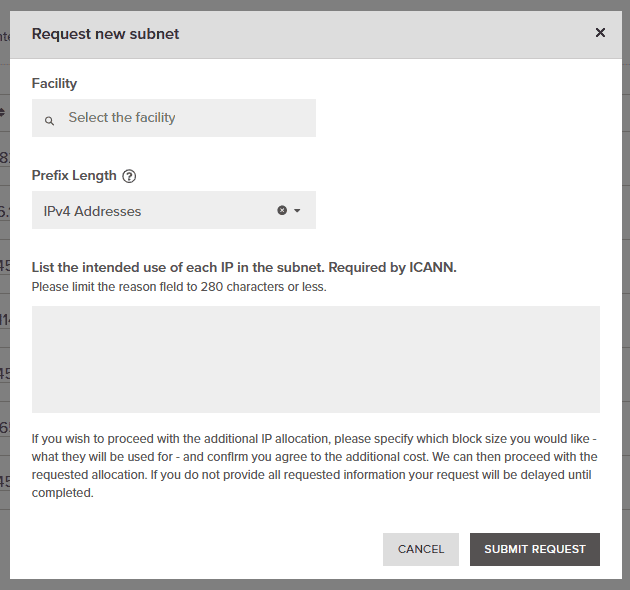
Requesting a New Subnet - Fill out the “Request New Subnet” form by filling out the facility, prefix length (Pricing included) and the reason for the request. Once the request has been sent, the Networking team will review and respond accordingly within the newly created Support ticket.
Splitting a Subnet
Splitting a subnet divides a larger network into smaller, more efficient segments. For example, 192.168.1.0/29 can be split into two /30 subnets making them ideal for point-to-point links. Note that splitting a subnet requires removing the subnet from the device involved.
- Navigate to the device you wish to split the routed subnet.
- Select the Interfaces tab and press on the Remove button. This will remove the routing of the subnet to the device to allow you to split the subnet.
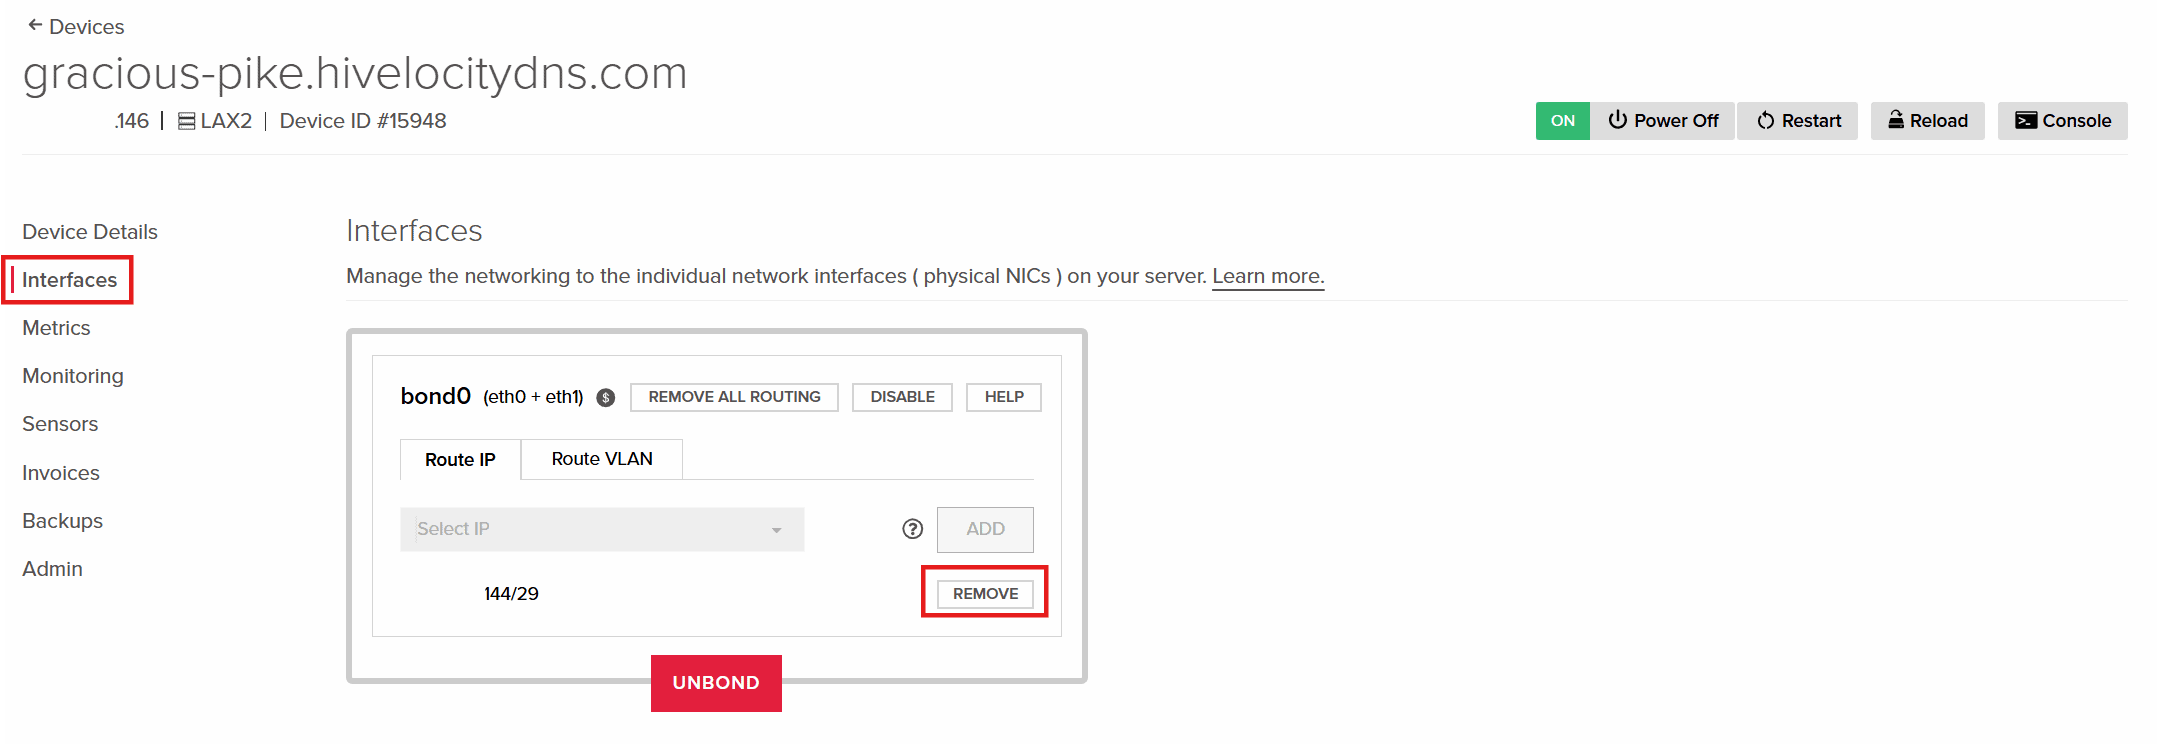
Removing a Subnet Routing Prior to Splitting - Confirm the request “Are you sure you want to remove the IP from this Port?” and an automated task will begin to work in the background.
- Proceed to the Networking page and into the Subnets tab to review the unrouted subnet.
- Press on Split for the involved subnet to perform the subnet split and confirm in the following popup message.
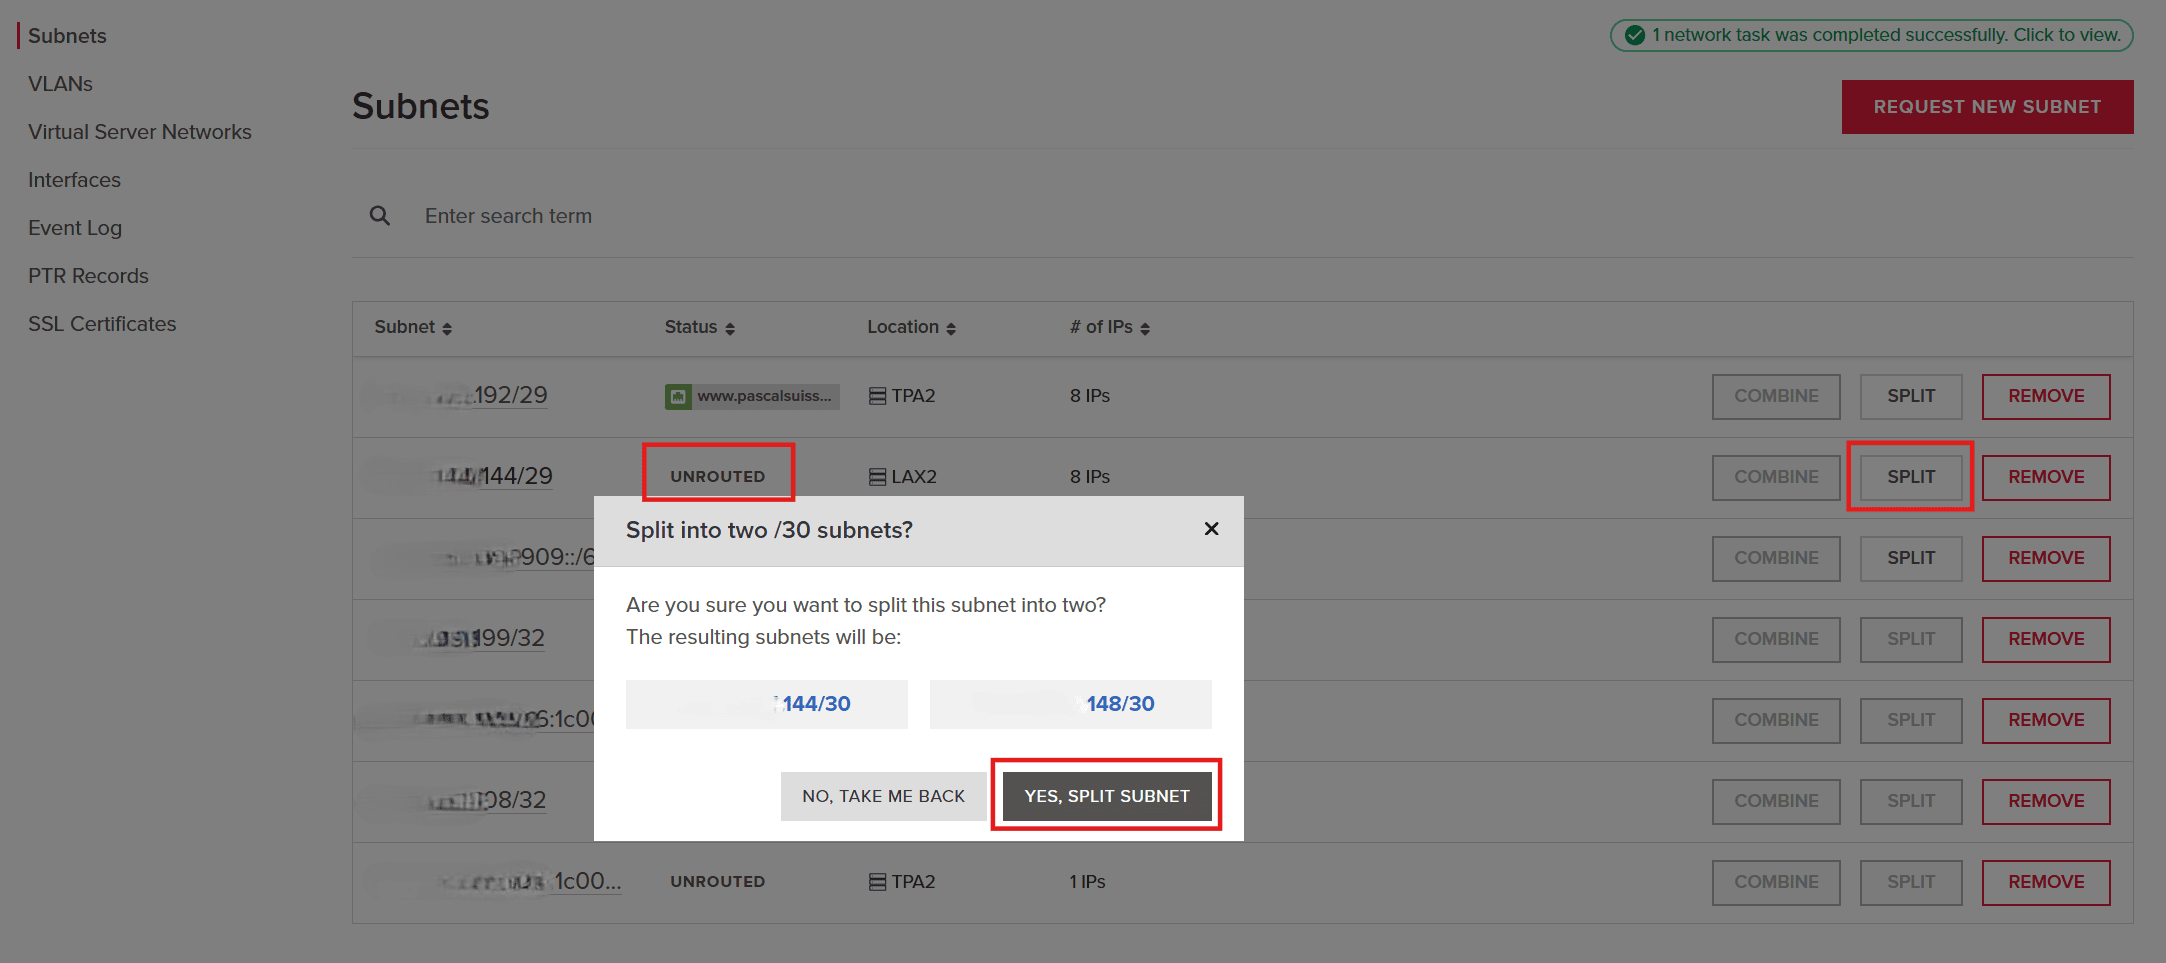
Splitting the Subnet - Once the task is done the two new subnets will appear in the list for further usage.
Routing a Subnet/Split Subnet
Once you have an available subnet either from your pool or after recently splitting an existing one, you will be able to route it to an available port, IP, or vLAN.
- Proceed to the Networking page and into the Subnets tab to review the unrouted subnet.
- Press on the subnet link to review its settings. For this example, we will route to an existing bonded port on one of the devices.
- Select the device/port you wish to route the subnet and press the Add button.
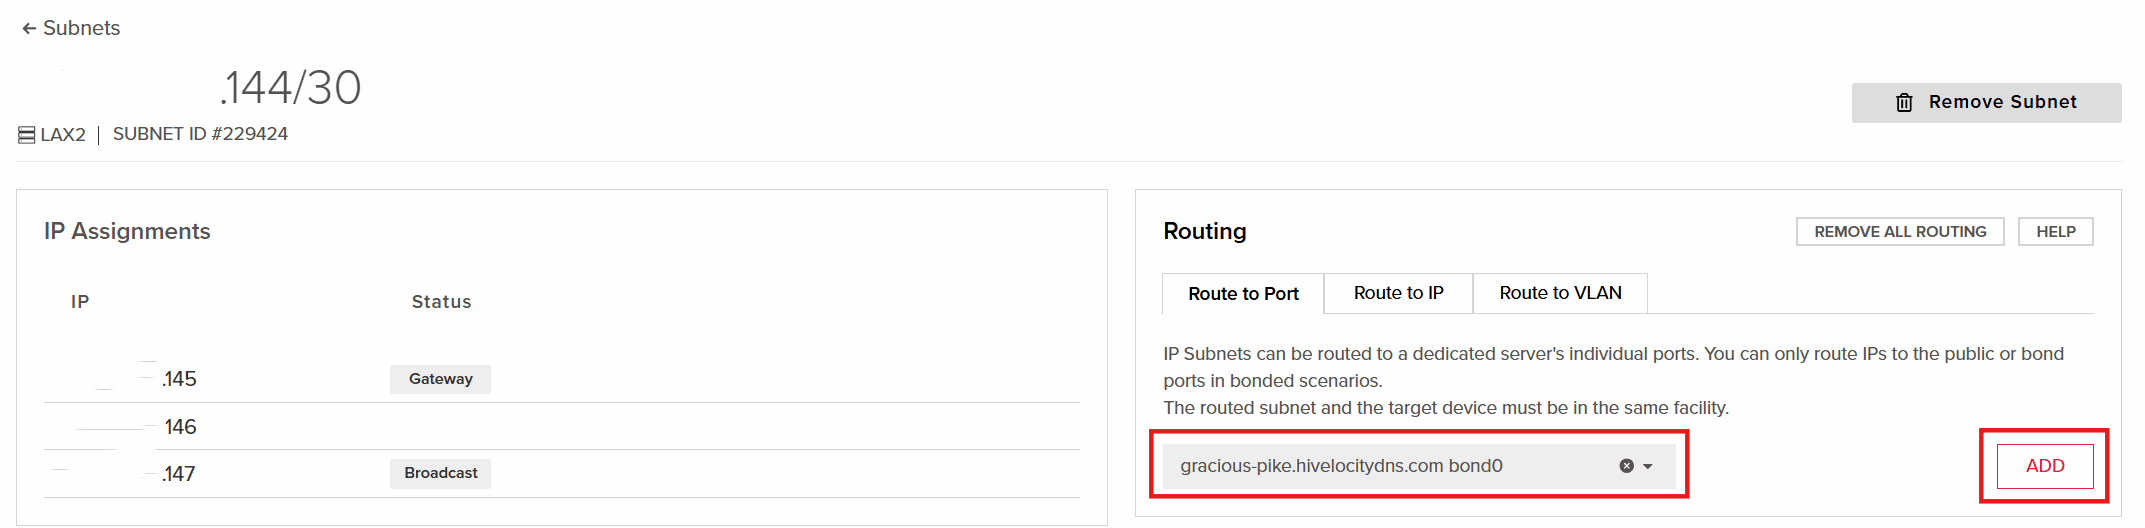
Routing a Subnet - Confirm the prompt “Are you sure you want to add the Subnet on this Port?” to proceed with the automated task.
- Once completed, the subnet will then be routed through that device.
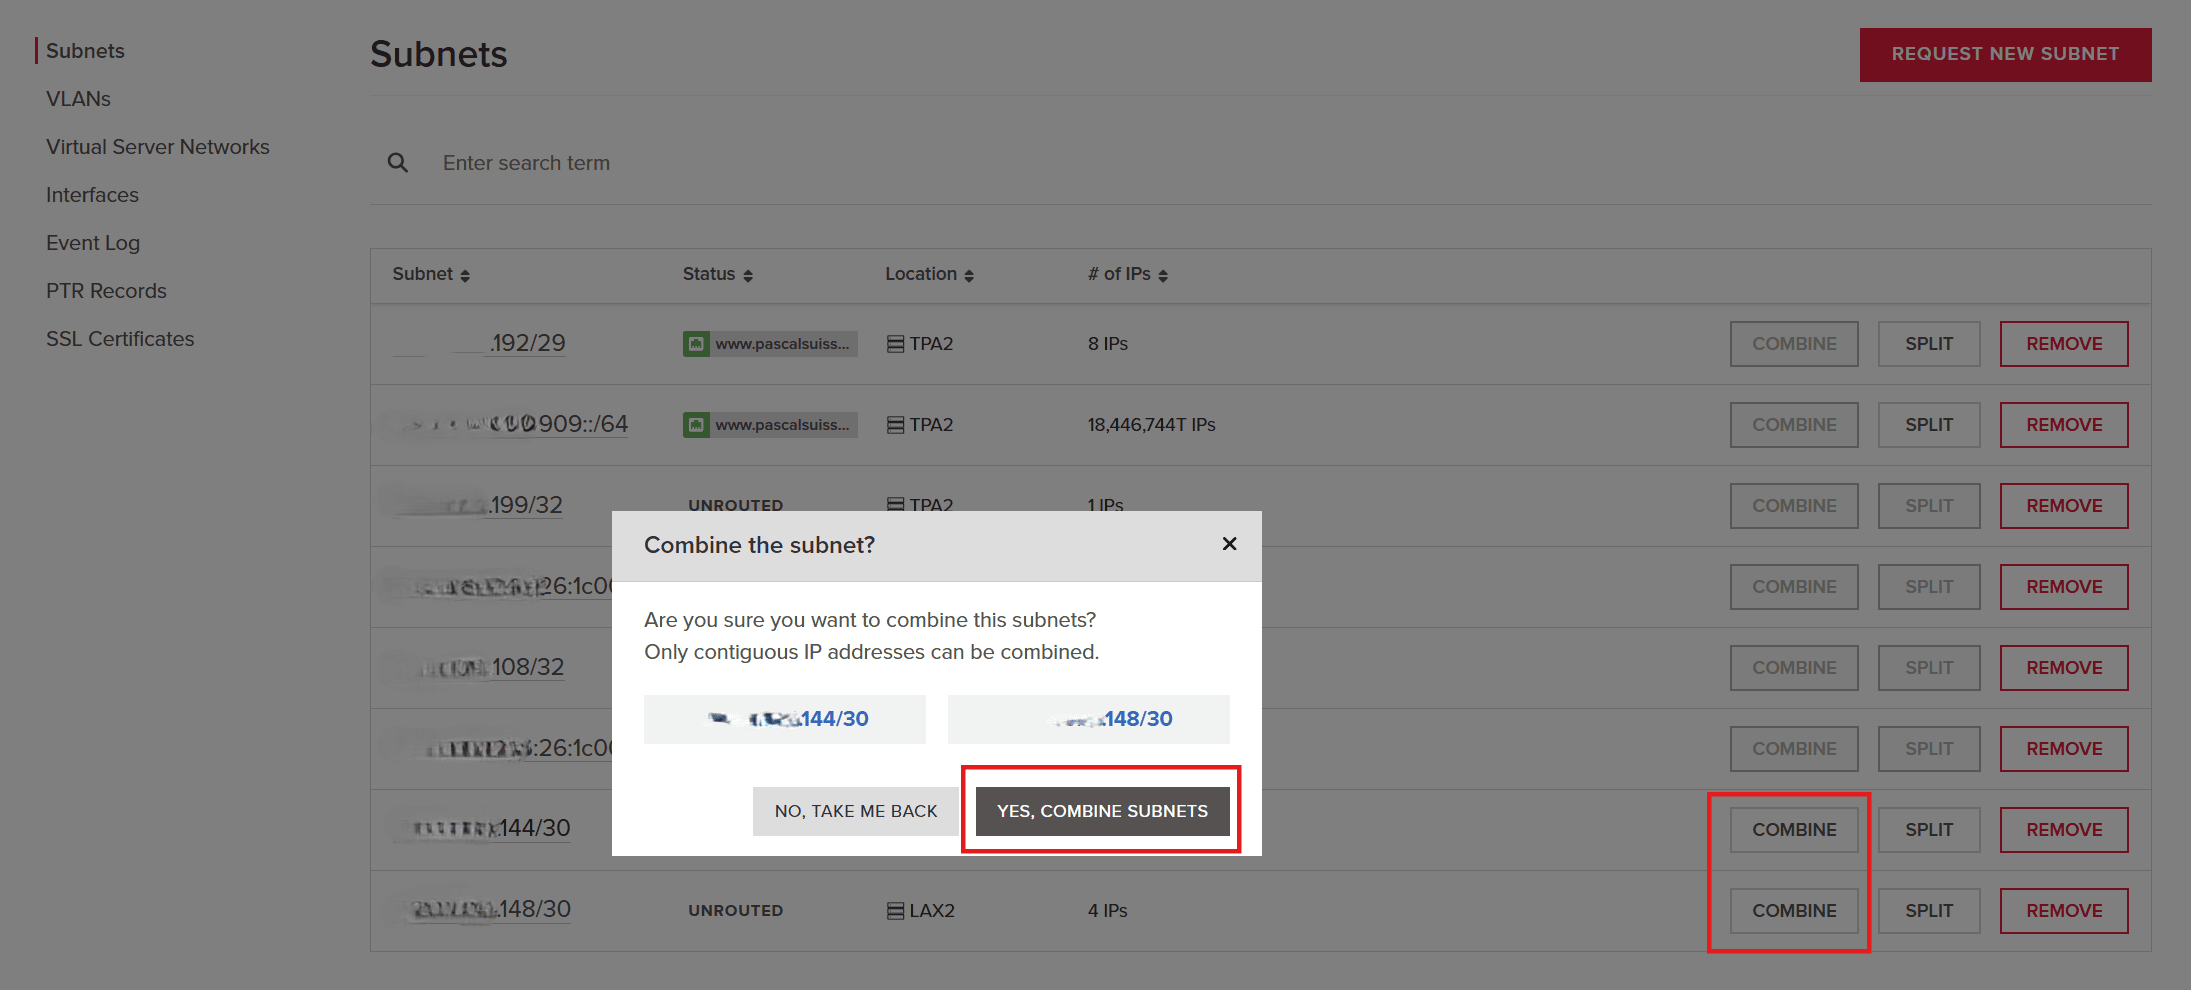
Merging Previously Segmented Subnets
When you have contiguous IP addresses, they can be combined into a larger subnet. For example, you can take two /30 and combine it into a /29.
- Proceed to the Networking page and into the Subnets tab to review the subnets you wish to combine.
- Press on Combine on any of the related subnets which will begin the automated task to combine the two.
vLANs
vLANs (Virtual Local Area Networks) logically segment a physical network into isolated broadcast domains, improving security, performance, and traffic management. Private vLANs are used for internal, restricted communication between devices, providing isolation and improved security. Public vLANs support broader communication and can share public IP addresses across multiple devices through routing or NAT, enabling access to global networks.
Requesting Network Automation
Some vLANs require to be adjusted for network automation tasks, if networking tasks in the portal are required then it is advised to push for automation via pressing the Request Automation button on the specific vLAN.

Removing a vLAN
Removing a vLAN can be done simply by pressing the Remove button in the vLANs page.
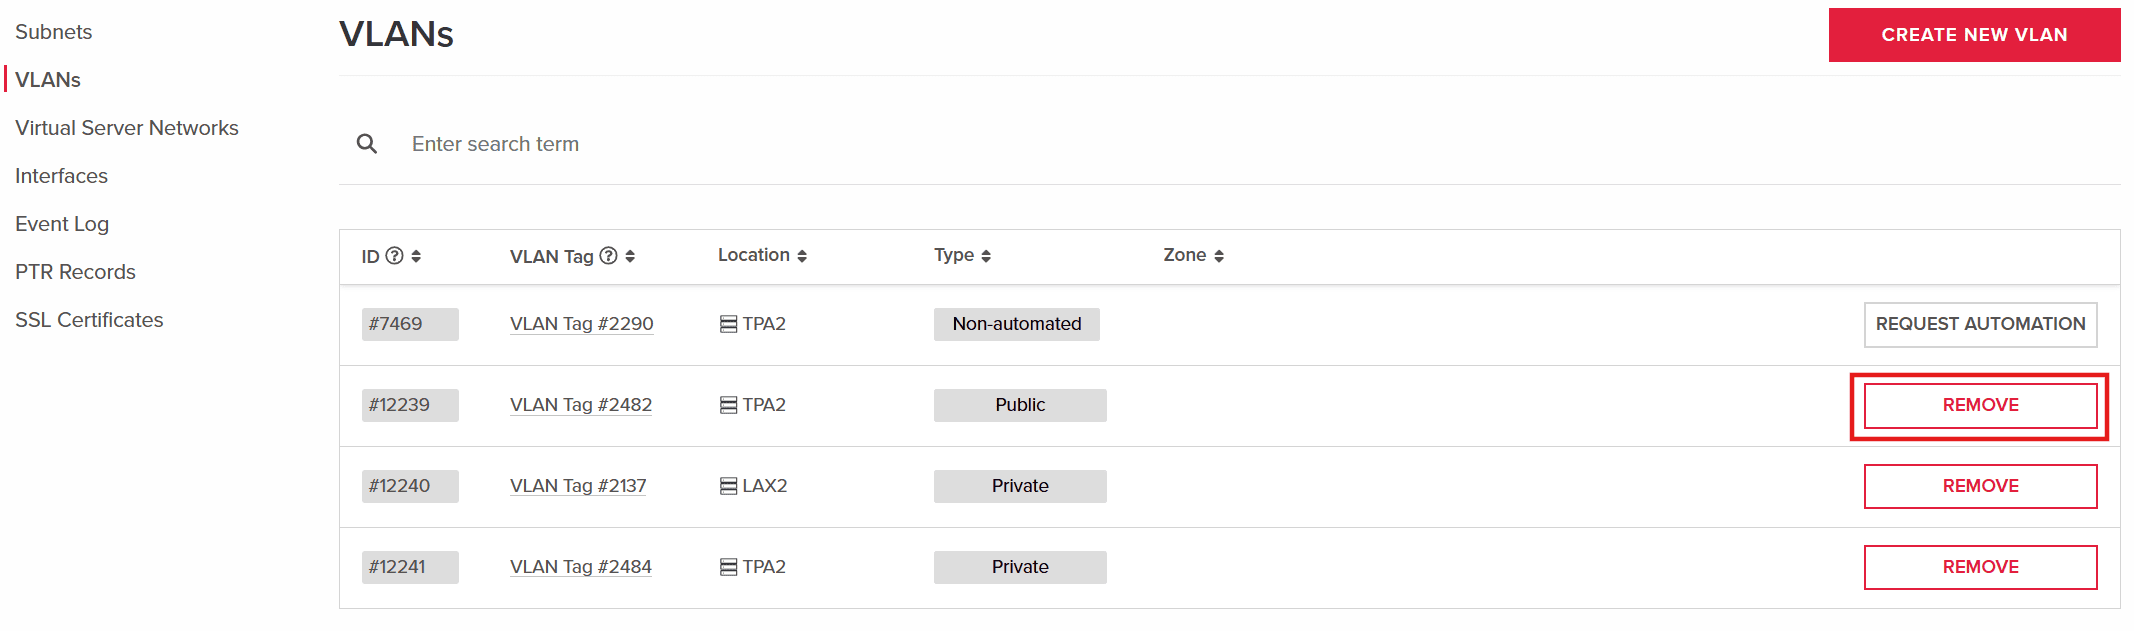
Creating a New vLAN
Choose public if you want to be able to assign IPs to the vLAN, making it reachable from the internet. Choose private if the vLAN should never be reachable from the internet. All vLANs are subject to traffic billing and overages, with the exception of private vLAN traffic on unbonded Devices.
- Proceed to the Networking page and into the Subnets tab to review the subnets you wish to combine.
- Press on the Create New vLAN button and select a type (Public/Private) along with the location.
The creation of the vLAN is one part of the process, you will have to attach devices to a vLAN in order for them to communicate with one another. Further details below.
Virtual Server Networks
Creating a Virtual Server Network (VSN) allows you to interconnect your virtual servers in the Same Location, essentially a local area network (vLAN). Note that virtual server networks are limited to servers in a single location and that vLAN connections cannot be changed after network setup.
To create a VSN proceed to the Virtual Server Networks tab and press on the Add Virtual Server Network button. Proceed to fill the form accordingly.
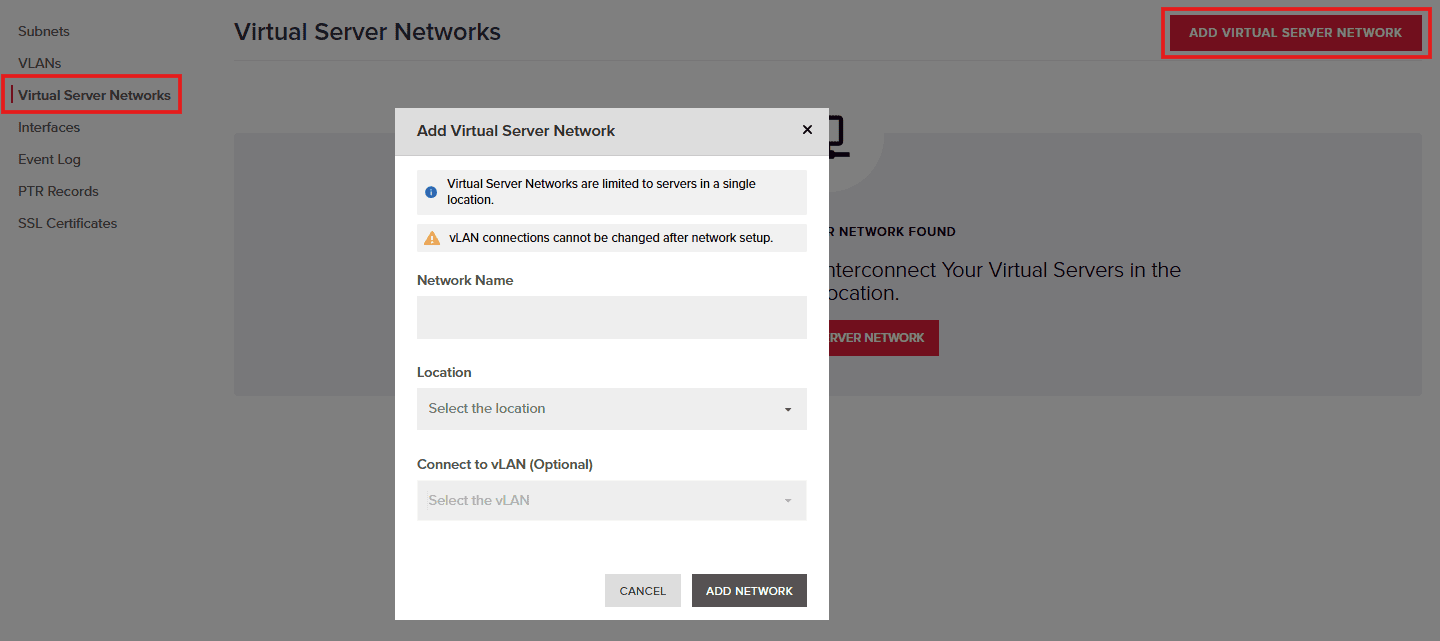
Connecting to a vLAN allows you to connect your VSN to an existing vLAN to communicate with your non-virtual devices. More information is available in the article below.
Interfaces
The Interfaces page will provide you an overview of all devices and their current interfaces subnet assignments.

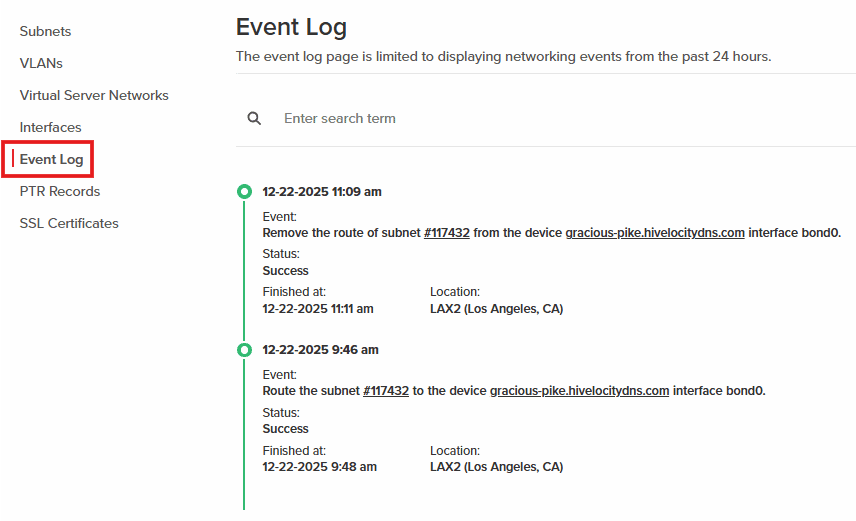
Event Log
The Event Log page will display all recent network-related activity such as routing tasks or bond removal.
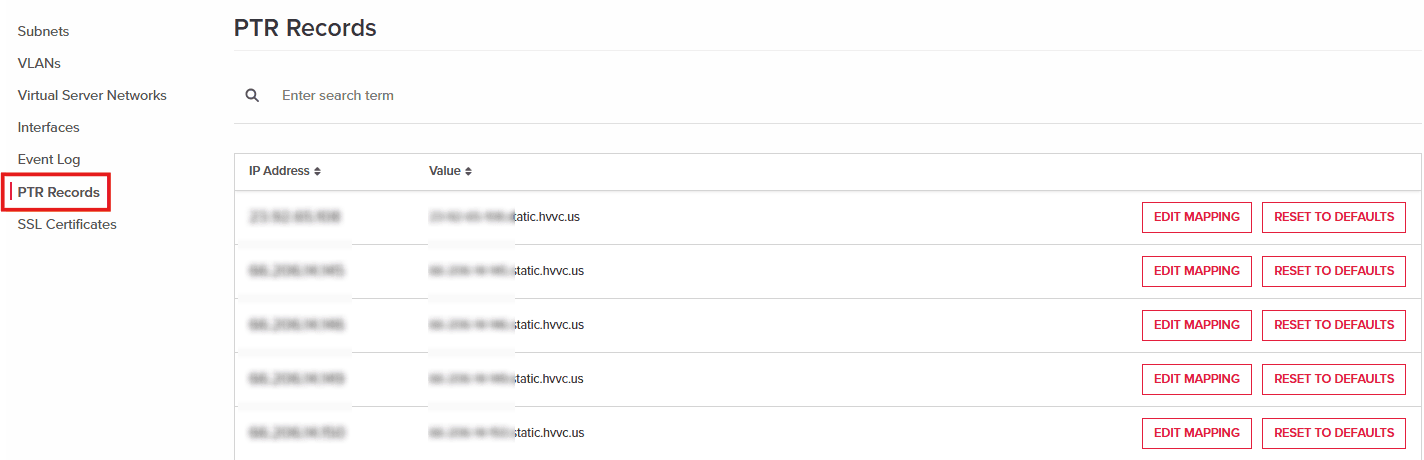
Managing PTR Records
PTR records map an IP address back to a hostname using reverse DNS. They’re commonly used by mail servers and security systems to verify the legitimacy of the source IP. Within the PTR Records page you can edit existing PTR records based per usable IP and reset to defaults as necessary.
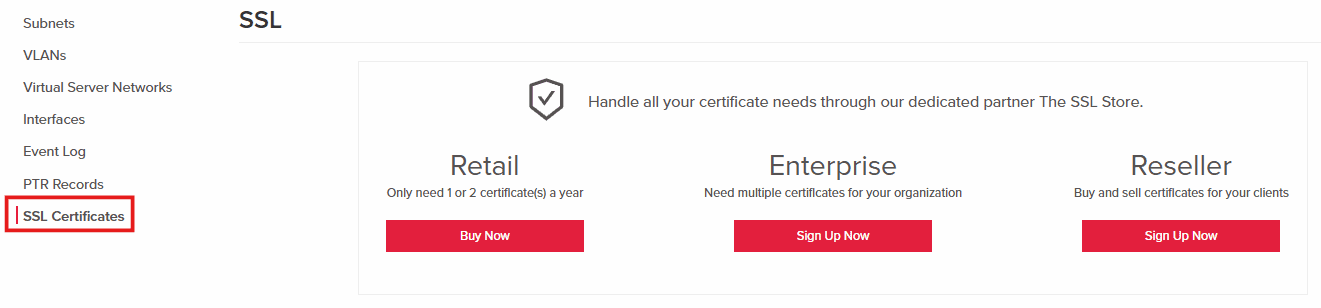
SSL Certificates
SSL records and certificates secure the connection between a website and its visitors by encrypting data in transit. They also help browsers verify the website’s identity, building trust and preventing tampering or impersonation. The SSL Certificates page will allow you to purchase SSL certificates as necessary for your websites.
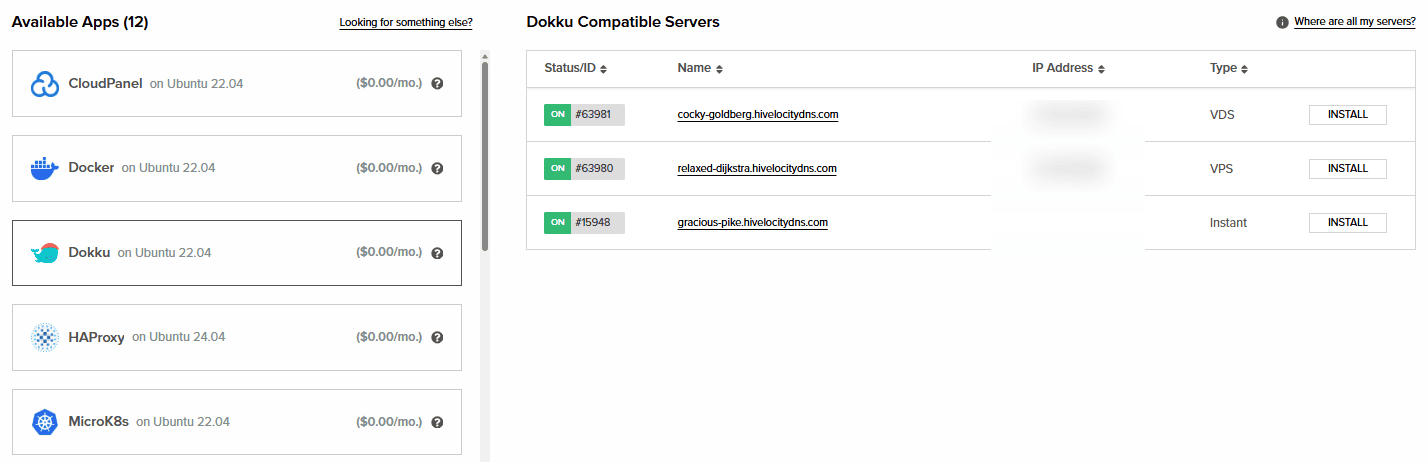
Apps
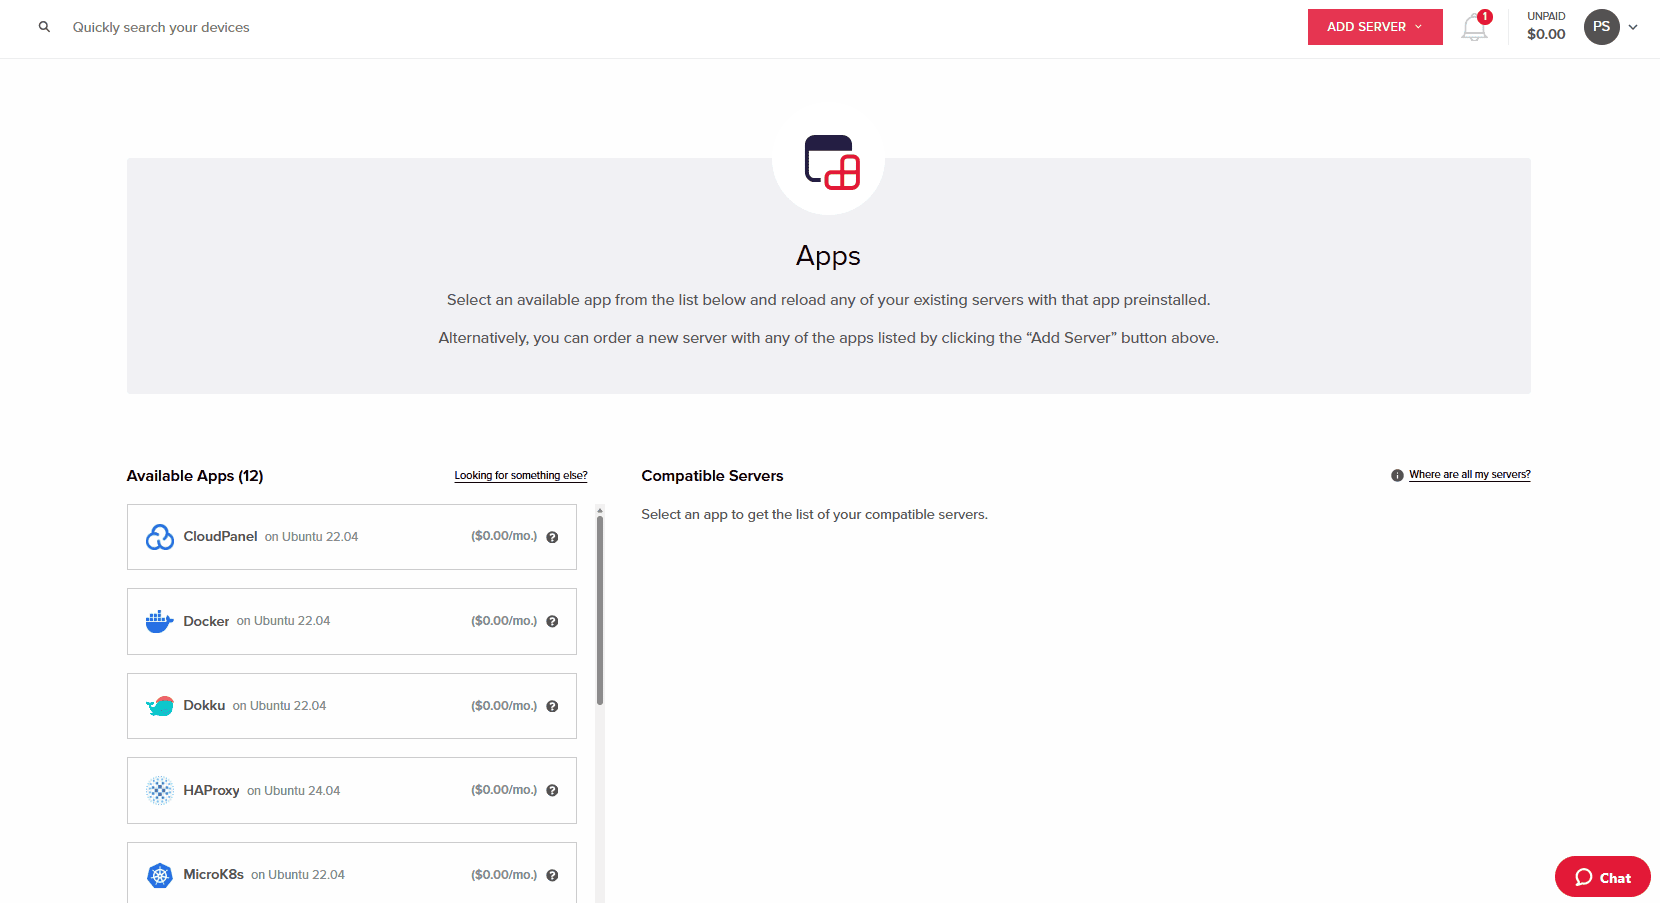
Reloading a Server with an Application
Installing an application can be done on both dedicated and virtual servers through the portal.
- Within the Apps page, select the application of choice.
- Press the Install button for the related app to install it on your compatible server.
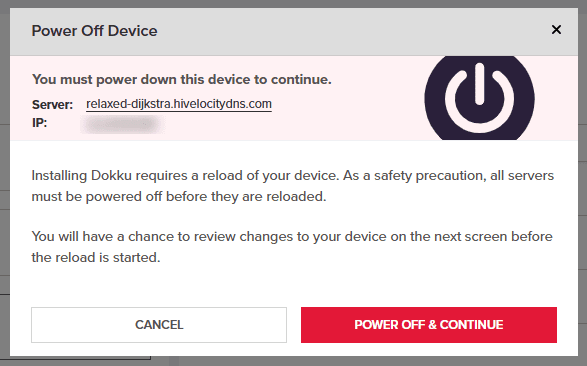
Application Installation - Review the information in the popup message as powering down the device will be required. If a reload is necessary, the prompt will describe the process accordingly.
Application Installation Confirmation
Domains
DNS records are essential entries that link domain names to IP addresses, mail servers, and other services, ensuring that traffic is routed correctly across the internet. Common types include A, AAAA, CNAME, MX, TXT, and PTR records, each serving a specific purpose in directing web, email, and network traffic.
Managing DNS records can vary by platform: in Hivelocity’s myVelocity portal, DNS is managed centrally for all servers and services you host, allowing unified control and propagation across your infrastructure. In cPanel, DNS is handled per server, typically through the Zone Editor, giving control over records specific to that server’s hosted domains. At a registrar, you generally manage only the authoritative records, often pointing to your hosting provider’s nameservers, which then handle the detailed record management. These distinctions are important because they all depend onwhere you plan to host your DNS records.
Within the Domains page you can create domains, which within you can create further DNS records such as A, AAAA, TXT, and more.
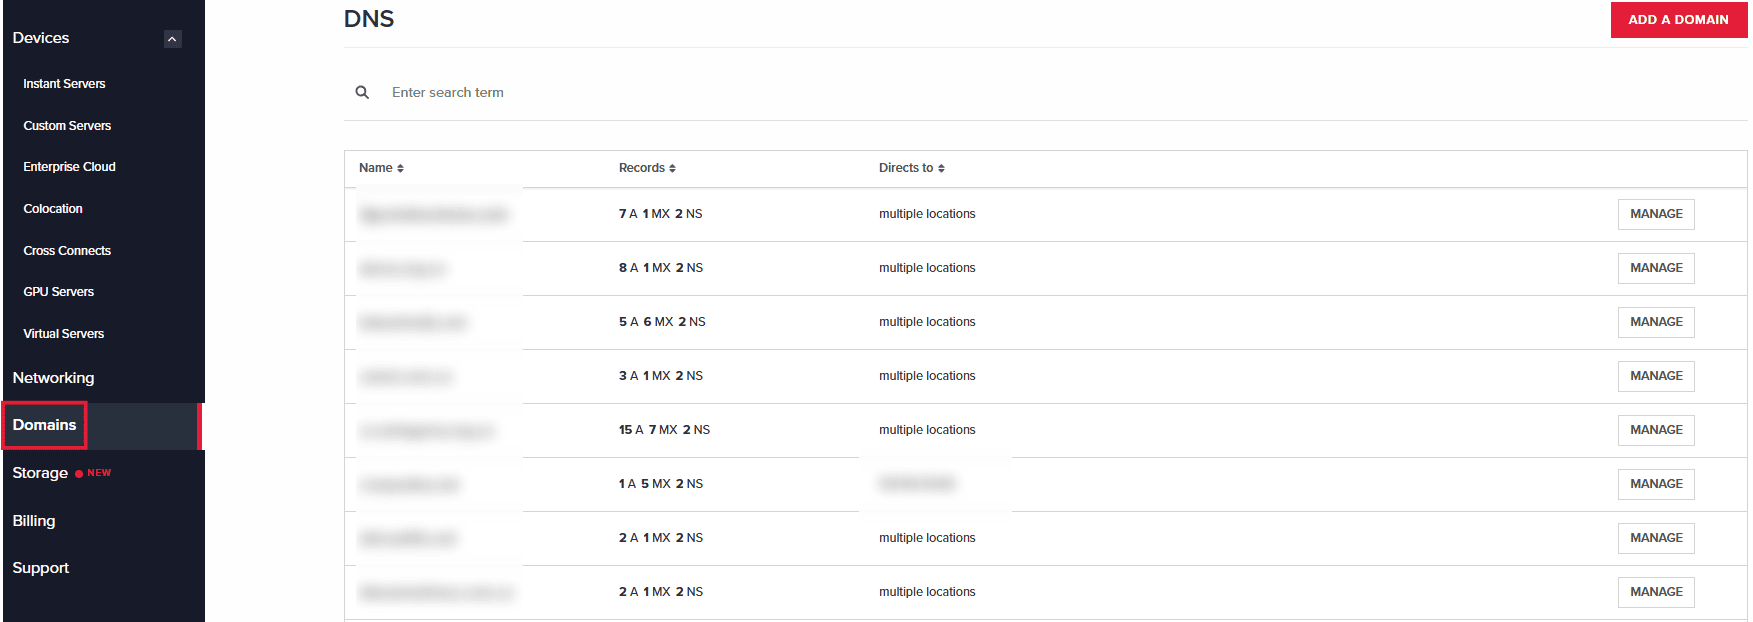
Managing DNS Records
You can manage DNS records for each domain by selecting the desired domain from the list. You can create, edit, or remove entries accordingly in each respective tab (A, AAAA, etc)

Storage
The Storage page provides an overview of virtual server volumes, Custom ISOs, and the option to sign up for Third-Party Storage.
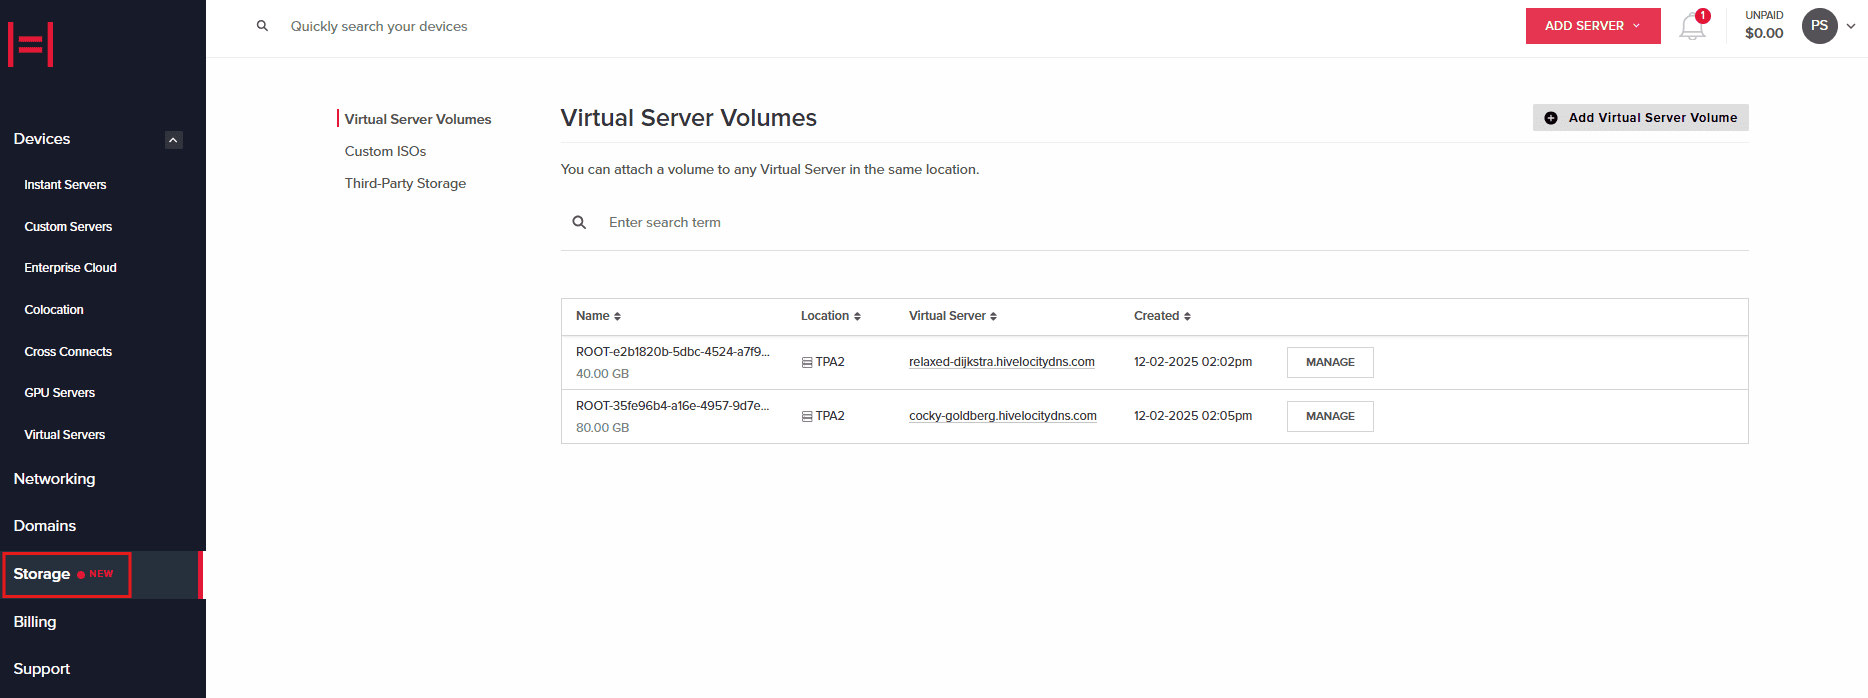
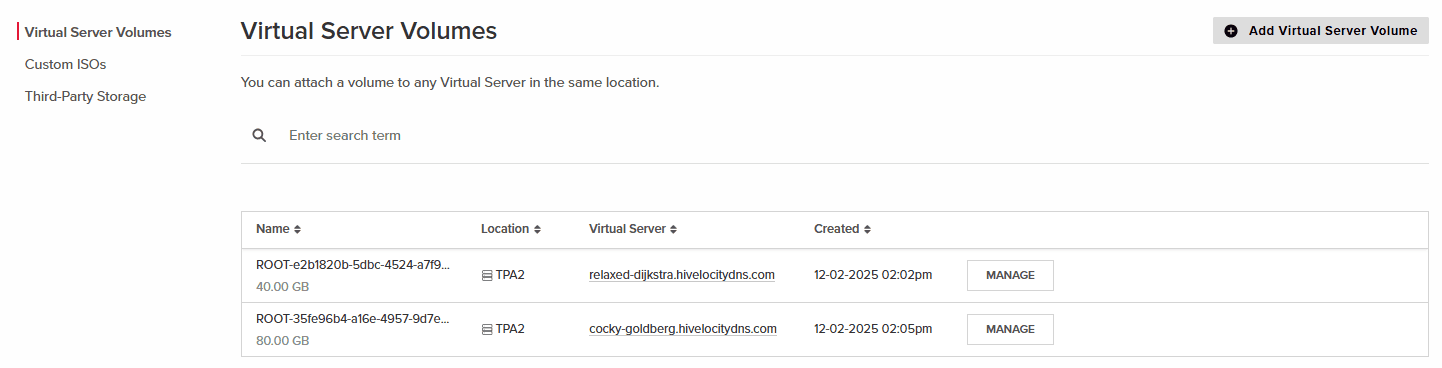
Virtual Server Volumes
Within the Virtual Server Volumes tab you can manage existing volumes and add new volumes as necessary to applicable servers.
Custom ISOs
The Custom ISOs tab provides a general overview of the existing custom ISOs that can be utilized across your virtual server. You can also upload and use ISOs as needed from this page.
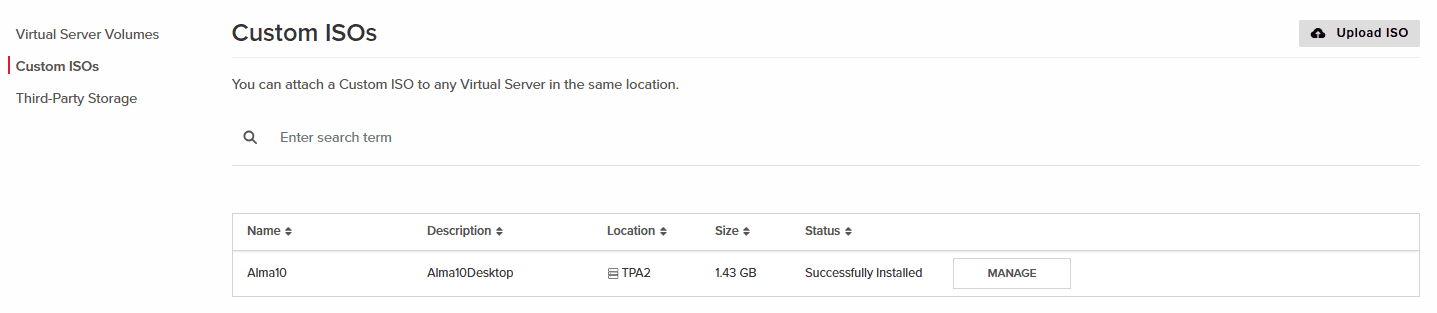
Information relating to Custom ISOs can be viewed in the article below.
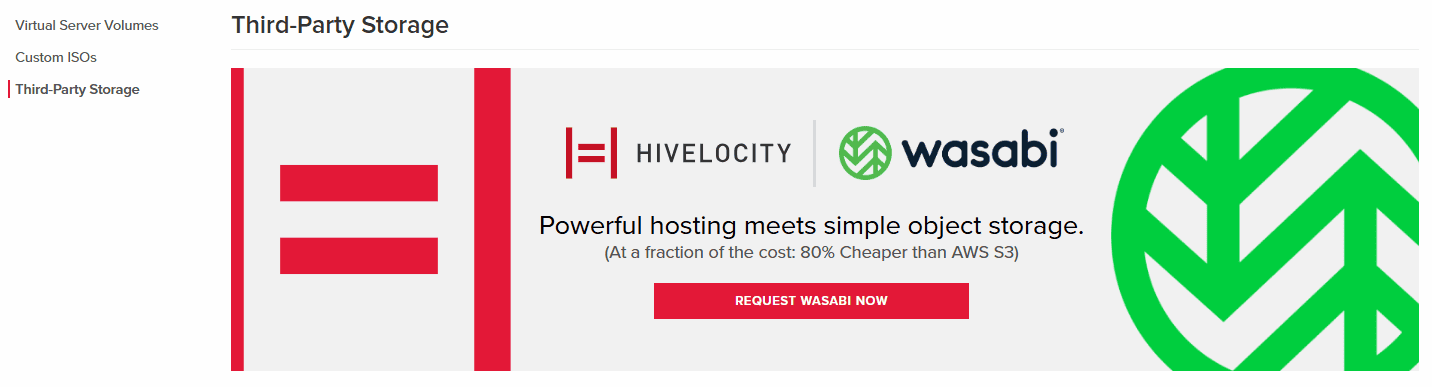
Third-Party Storage
Hivelocity is partnered with Wasabi to provide a third-party storage solution. Wasabi is a secure, S3-compatible cloud storage service offering durable, encrypted offsite storage with flat-rate pricing, no egress fees, and fast access for backups, archives, and active workloads.
To request installation simply press on the Request Wasabi Now to fill the form and submit the request.
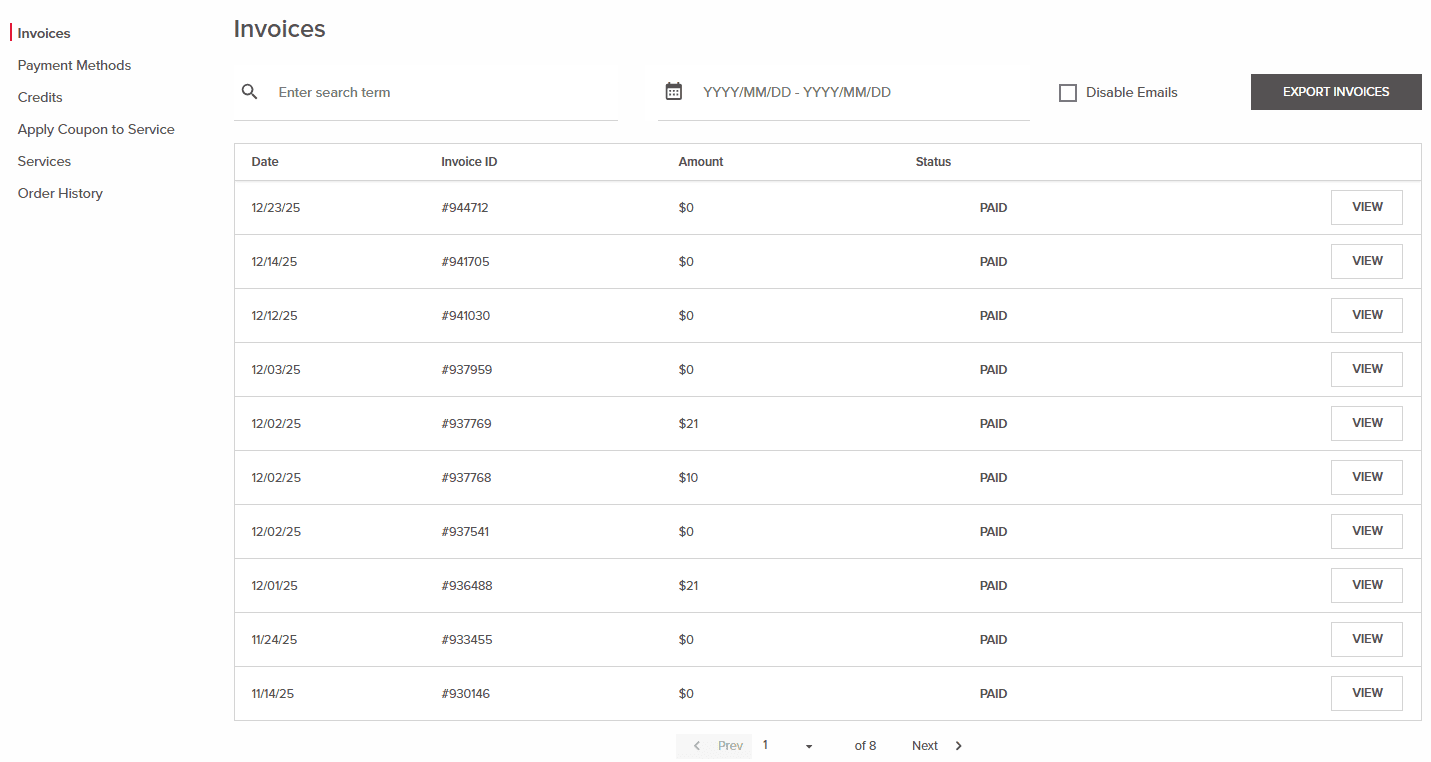
Billing
Within the Billing page you can review invoices, manage payment methods, apply and review credits/coupon, review existing services, and review order history.
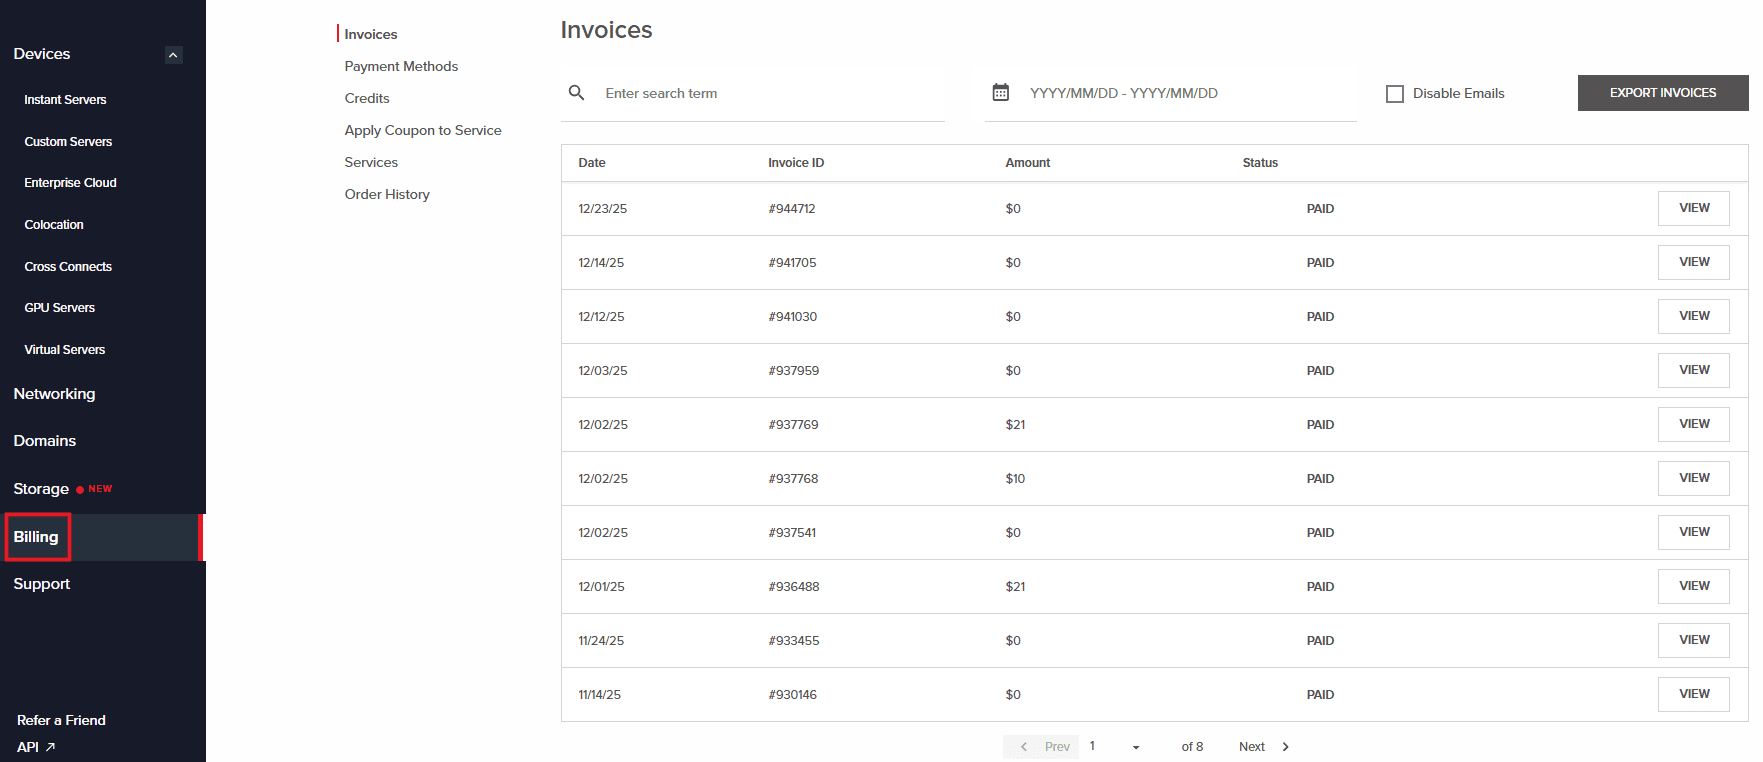
Invoices
The Invoices tab presents all available invoices including their status and invoice IDs. Exporting invoices can be done by selecting years and months as well followed by sending the report to an email address on file.
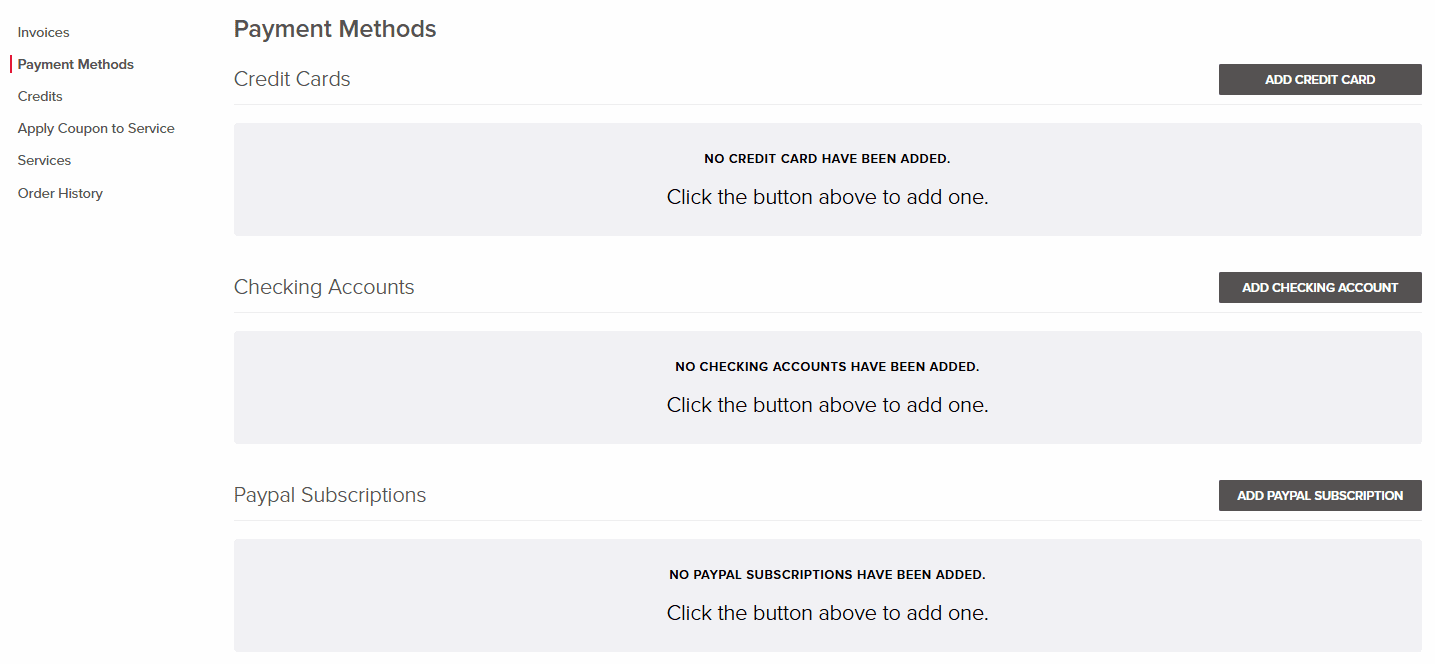
Payment Methods
Within the Payment Methods tab you can add a credit card, a checking account, or begin a PayPal subscription.
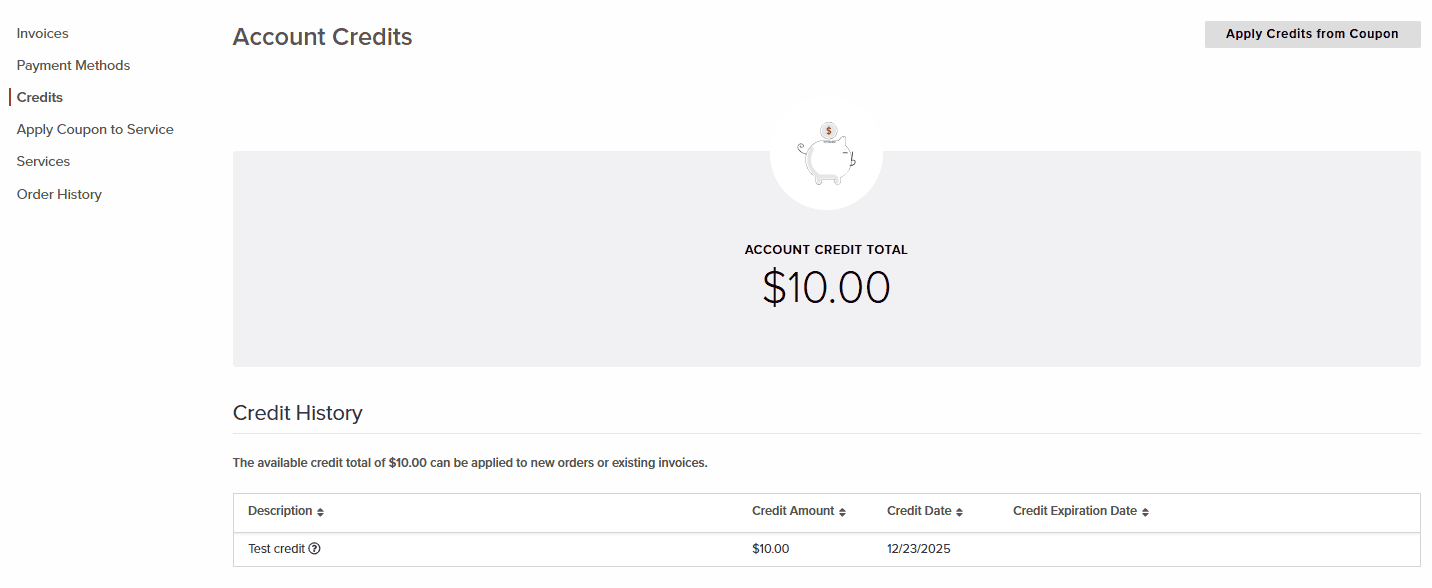
Credits
Within the Credits tab, credits applied by the Hivelocity team can be applied to new orders or existing invoices. If you possess a coupon, you can also apply credits to the account as well.
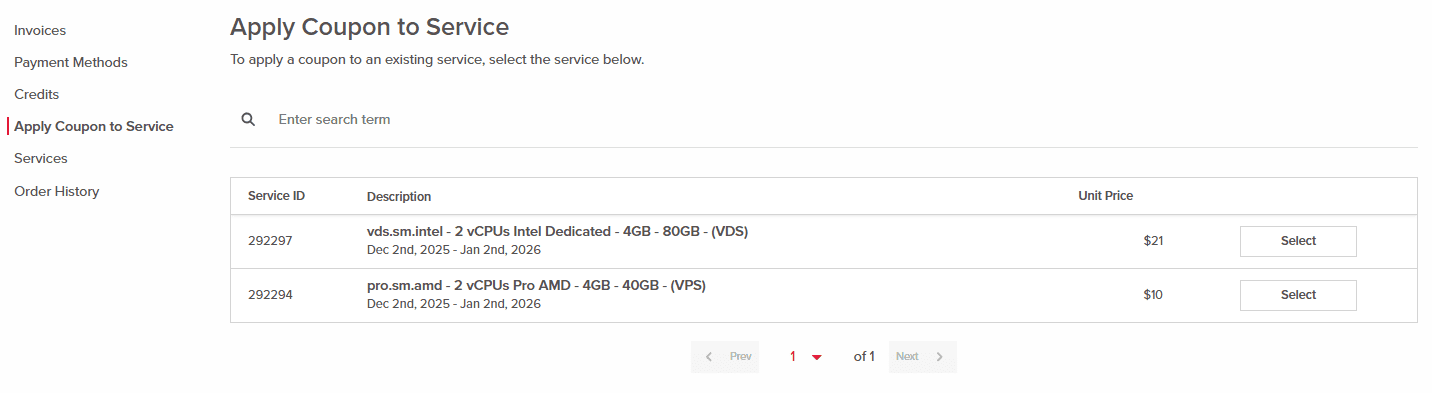
Apply Coupon to Service
Within the Apply Coupon to Service tab, coupons can be applied on existing services.
Services
Itemized services overview is available within the Services tab including involved pricing and relevant dates.

Order History
The Order History tab provides an overview of all acquired servers with the ability to purchase their variation again.

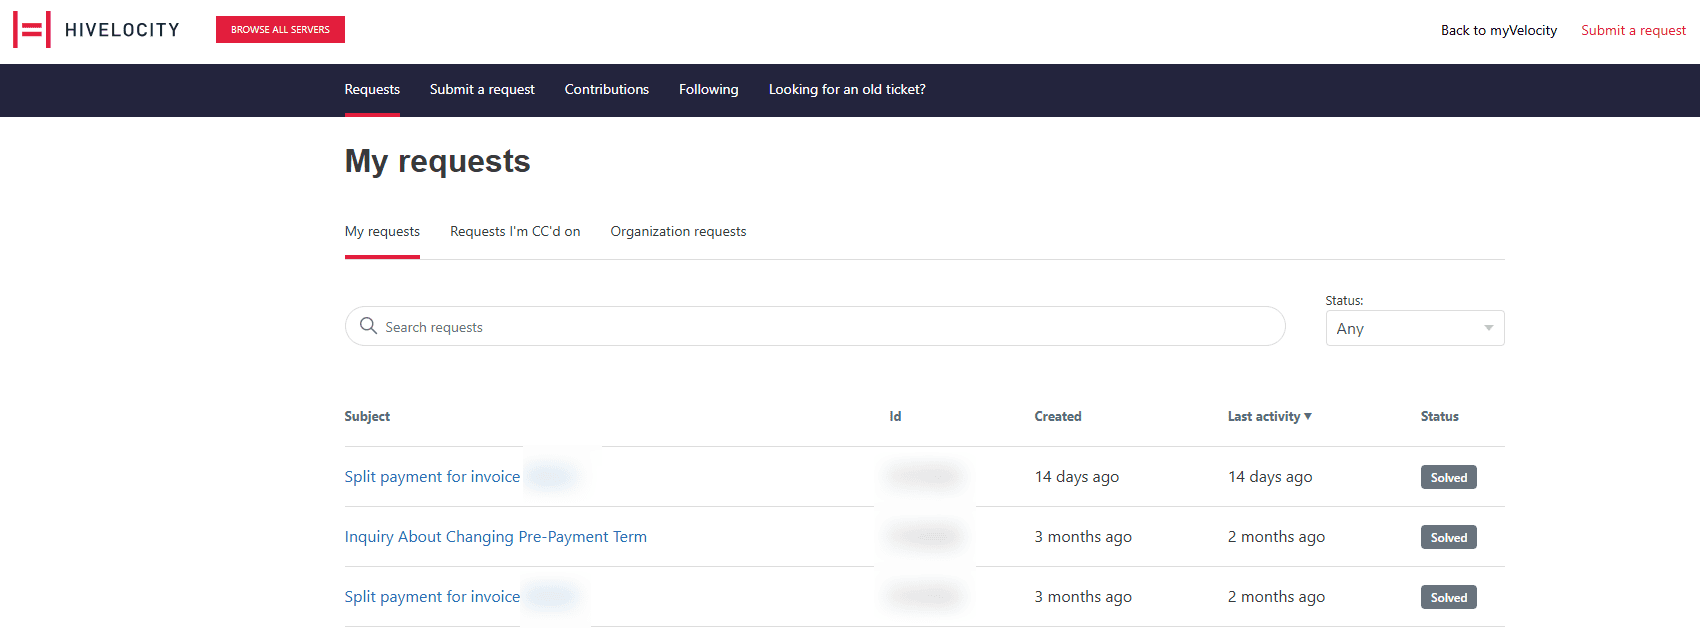
Support
The Support page is where clients can contact our support team for assistance. It allows users to submit requests, track existing tickets, and get help with services or issues as needed.
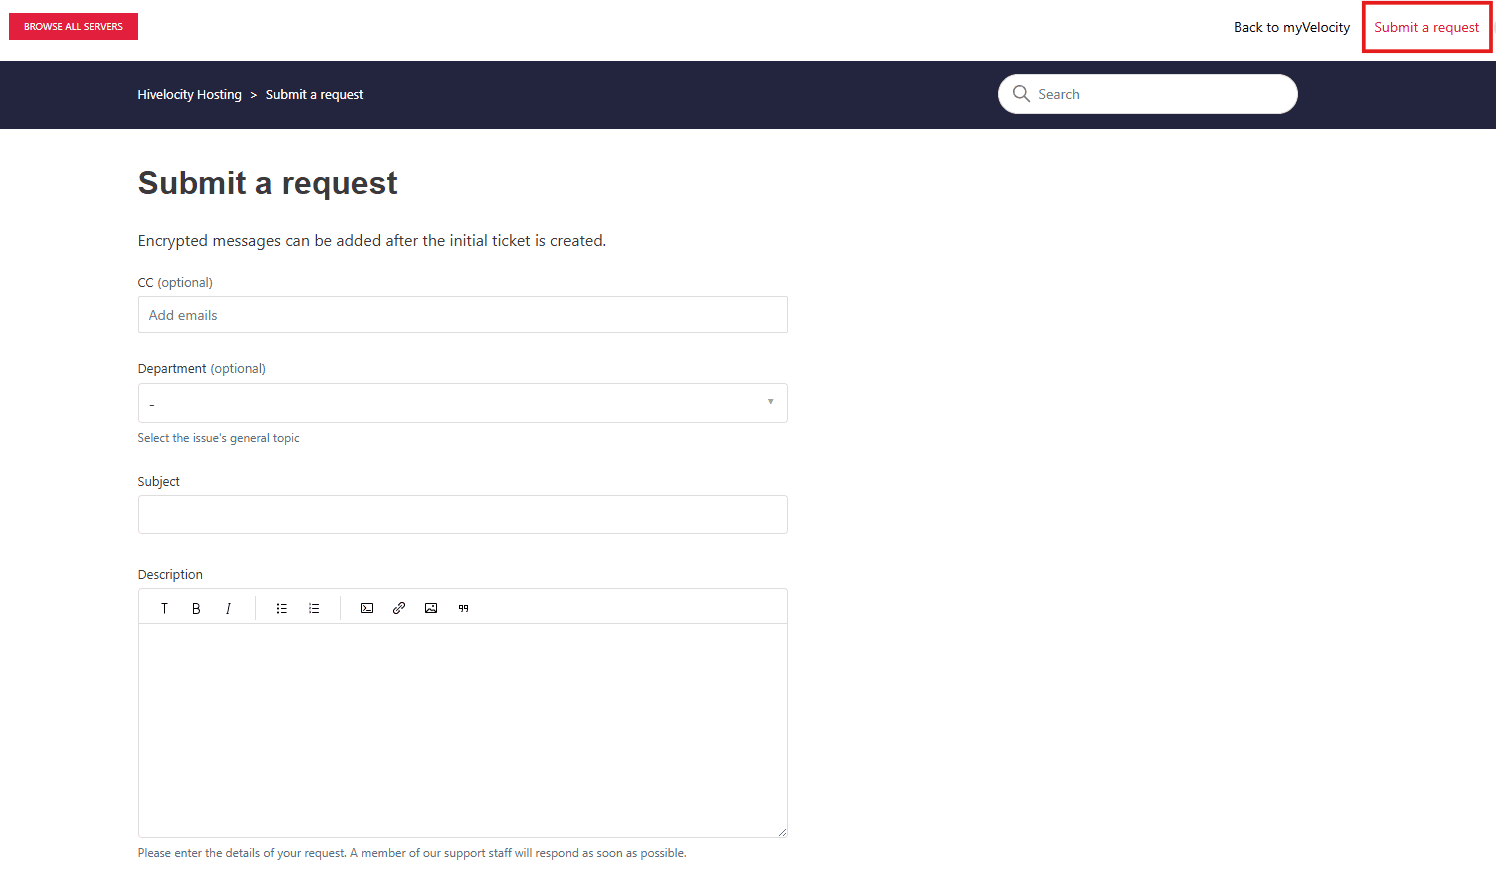
Creating Support Tickets
Creating a support ticket can be done by pressing the Submit a Request link at the top of the page. The next page will display the request form which upon submission will generate a new support ticket.
API & Knowledge Base
- The Hivelocity developer portal offers a quick-start guide for deploying servers and outlines core concepts like creating an account, managing API keys, and using the Bare Metal/VPS Cloud platform to provision and control infrastructure via our APIs.
- The Hivelocity Knowledge Base offers a large collection of knowledge base articles to read and use as reference throughout your webhosting journey.
Further Assistance
For any further assistance involving your the myVelocity customer portal or any other aspect, do not hesitate to reach out to the Hivelocity Support team via a chat, support ticket, or phone at 888-869-4678.
— Written by Pascal Suissa