Introduction: What is OpenClaw?
Formerly known by its development codenames Clawdbot and Moltbot, OpenClaw is not just another wrapper for an LLM. It is an open-source personal AI operating system designed to live on your hardware, think for itself, and interact with the world on your behalf. Unlike a standard chatbot, OpenClaw has a “heartbeat” as It can proactively monitor your digital life, manage your calendar, and communicate with you through familiar interfaces like Telegram or WhatsApp which we will show how in this article.

Furthermore, because it is built on a “Human-in-the-Loop” philosophy, it offers the perfect balance between autonomy and control. OpenClaw can navigate your filesystem and execute terminal commands, however, it stays grounded by your specific “Soul” configuration which is a set of rules and memories that define exactly who your agent is and what it’s allowed to do. This framework ensures that while the agent is powerful enough to handle complex tasks, you always remain the final authority over its actions.
Whether you’re looking to build a digital chief of staff that manages your emails or a specialized developer tool that handles your deployments while you sleep, OpenClaw is the framework that turns Chat-AI into Do-AI! In this guide, we’re going to walk through how to securely install OpenClaw, connect it to your preferred messaging app, and give it the “skills” it needs to start taking work off your plate.
Prerequisites
Because OpenClaw has direct access to your terminal and file system, deploying it in a strictly isolated environment is critical. You should run the agent on a dedicated machine or virtual private server (VPS) that contains no sensitive personal data or private credentials.
To get OpenClaw running, you will need the following items:
- Hivelocity Server: A VPS or Virtual Dedicated Server (such as an “md” instance).
- Minimum Specs: 2 Cores, 2GB RAM, and 2GB storage.
- Operating System: Linux (Ubuntu 24.04 recommended), macOS, or Windows via WSL2.
- LLM API Credentials: An active API key for your chosen “brain” (Claude, OpenAI, or Gemini) to power the agent’s reasoning.
- SSH Access: A local SSH key to enable GitHub authentication and allow the agent to manage remote deployments.
- Runtime: Node.js >= 22 (Note: The OpenClaw installer will handle this installation for you).
- Isolated Environment: It is highly recommended to deploy on a clean instance that does not contain sensitive personal data or private credentials.
Installing OpenClaw
All the necessary steps to install and establish OpenClaw on your server are listed in the sub-headers below.
Acquire the VPS/VDS
- Proceed to login to the myVelocity portal if you have an account, otherwise proceed to the storefront to select a suitable VPS or Virtual Dedicated Server.
- Select the Ubuntu 24.04 OS during the order or have your OS reloaded through the myVelocity portal after the purchase process.
Creating and Adding the SSH Key Pair
Creating new keys is not required if you already have a key pair you’d like to use. If you do have a key pair then simply paste the public key to your server’s authorized keys file.
- On your local machine (not the server), open your terminal and run
ssh-keygen -t ed25519 -C "OpenClaw-Server”- Proceed to enter passphrase if you prefer during the process.
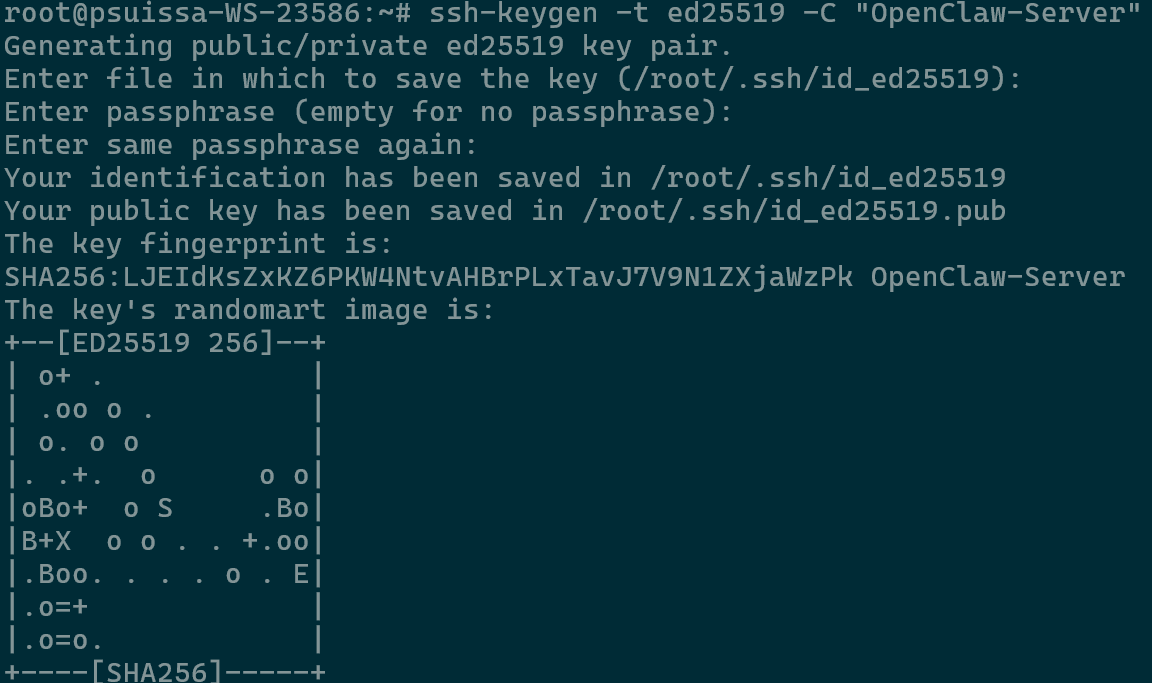
Setting SSH Key Pair
- Proceed to enter passphrase if you prefer during the process.
- You need the text inside the .pub file. View it with
cat ~/.ssh/id_ed25519.pub
SSH Public Key - Copy the entire output (Should start with ssh-ed25519).
- Log in to your Ubuntu 24.04 server and run these commands to ensure the server recognizes your key.
mkdir -p ~/.ssh
chmod 700 ~/.ssh
echo "PASTE_YOUR_KEY_HERE" >> ~/.ssh/authorized_keys
chmod 600 ~/.ssh/authorized_keys
Adding the Public Key to the Server - Since OpenClaw needs to pull skills and manage repos, you should also take that same Public Key and add it to your GitHub SSH Settings. This allows the agent to authenticate as “you” without needing your password.
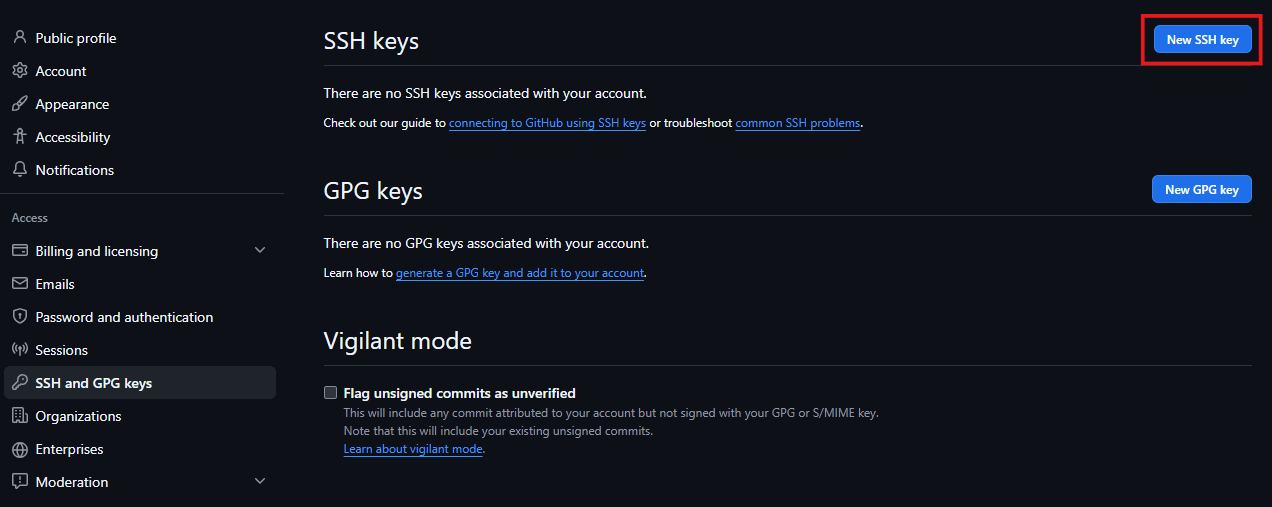
Github SSH Key
Installing OpenClaw
In the steps below we will go over the required steps to establish OpenClaw on the server.
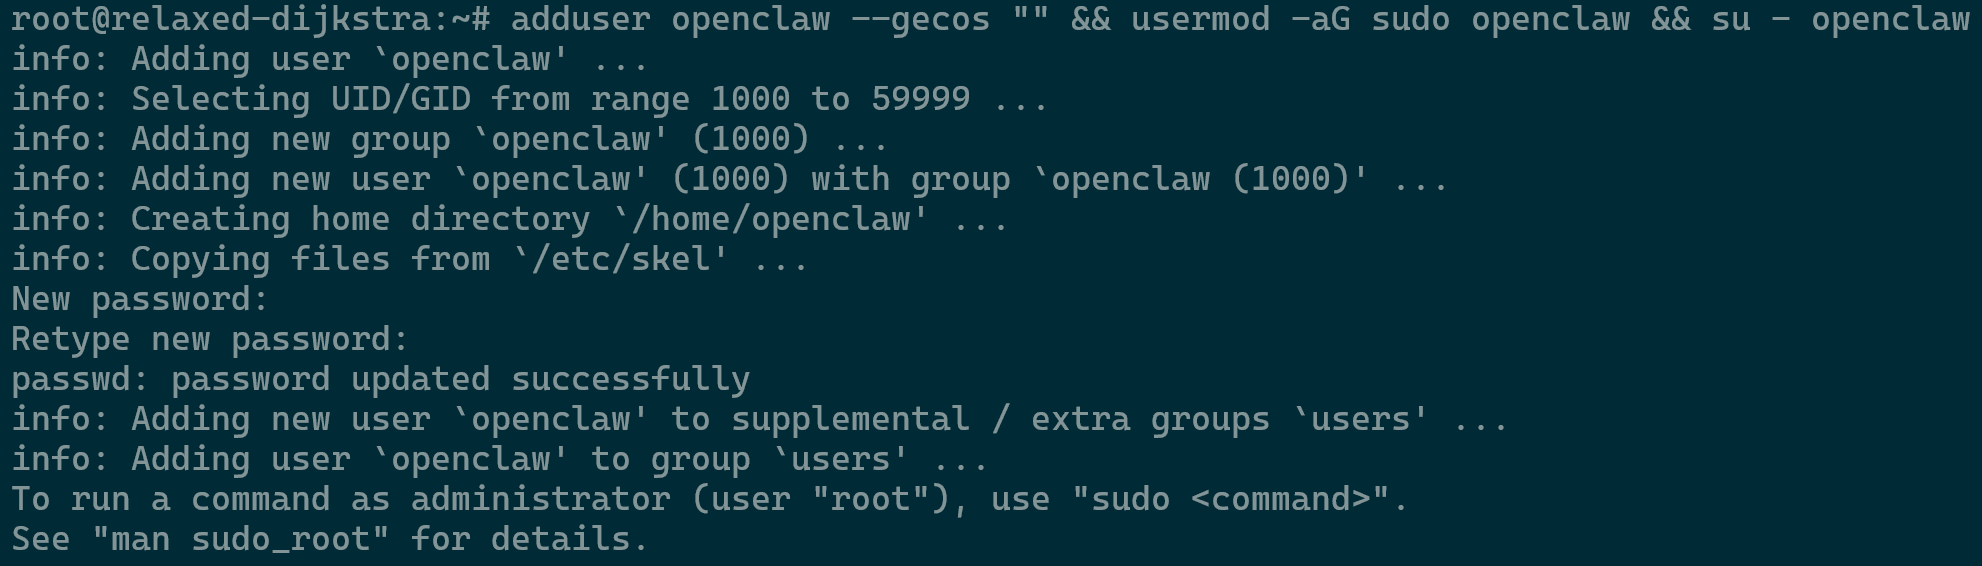
- Logged in to your VPS, proceed to create a dedicated user (openclaw). This provides better security, as you want to avoid running everything as root. The command creates a new administrative user without the user info survey and switches you into that account.
adduser openclaw --gecos "" && usermod -aG sudo openclaw && su - openclaw
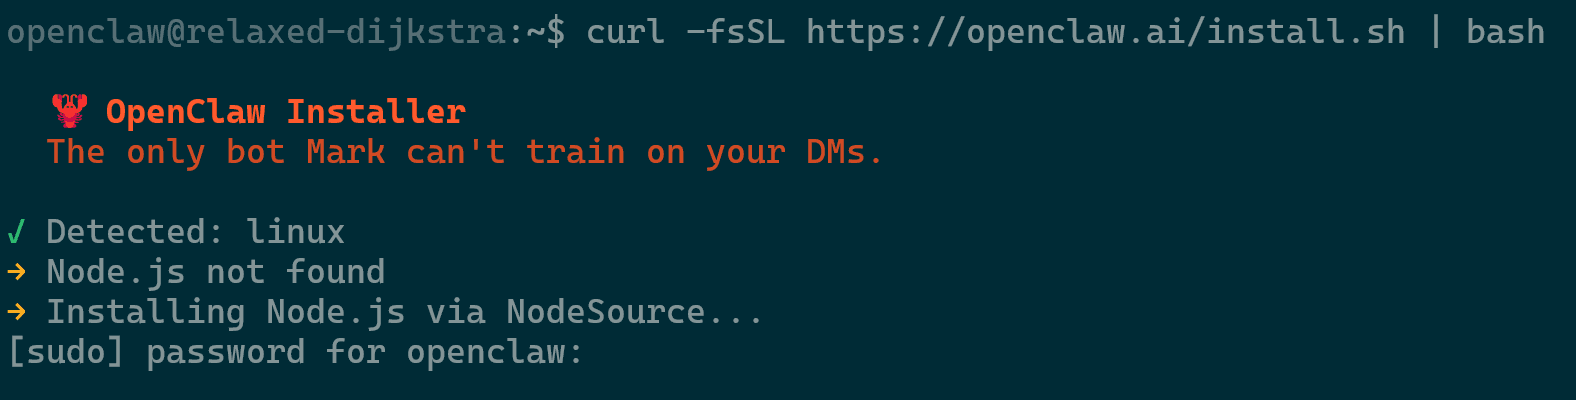
Creating the openclaw User - Install OpenClaw using the command below and enter the new user password when prompted. During installation review the prompts and proceed accordingly.
curl -fsSL <https://openclaw.ai/install.sh> | bash- Onboard Mode: Select QuickStart.
- Model/Auth Provider: Choose your provider (this guide uses Gemini/Google)
- Google Auth Method: Select API Key (obtainable from Google AI Studio).
- Enter API Key: Paste your Gemini key here.
- Default Model: Keep current or select your preferred version.
- Select Channel: Choose your messaging app (we are using WhatsApp).
- Link WhatsApp: Select Yes and scan the generated QR code via “Linked Devices” in your WhatsApp mobile app.
- WhatsApp DM Access: Enter your phone number and specify if it is a personal or dedicated line.
- Configure Skills: Select Yes (you can also adjust these later).
- Homebrew & Node Manager: Select Yes for Homebrew and choose NPM as your manager.
- Skill Dependencies: You can install these now or skip for later.
- API Keys: Select No for Places, Notion, and others unless you specifically need those integrations.If at any point you’d like to redo the settings, you can simply run the command
openclaw onboardwhich will take you to the beginning of the setup. Running the onboarding command usually overwrites the configuration file, but it does not delete your data.Note: If you need to restart, run
openclaw onboard. Note that this will overwrite your config file, but your “brain” (saved data) will remain safe.
Available Channels/Platform Integrations Overview
Below you can see the available channels that you could utilize as an example instead of Whatsapp which is being used in this article. This can change of course over time so keep that in mind.
- Telegram: simplest way to get started — register a bot with @BotFather and get going.
- WhatsApp: works with your own number; recommend a separate phone + eSIM.
- Discord: very well supported right now.
- Google Chat: Google Workspace Chat app with HTTP webhook.
- Slack: supported (Socket Mode).
- Signal: signal-cli linked device, more setup (David Reagans: “Hop on Discord.“).
- iMessage: this is still a work in progress.
- Feishu: Feishu/Lark bot via WebSocket.
- Nostr: Decentralized protocol, encrypted DMs via NIP-04.
- Microsoft Teams: Bot Framework, enterprise support.
- Mattermost: self-hosted Slack-style chat, install the plugin to enable.
- Nextcloud Talk: Self-hosted chat via Nextcloud Talk webhook bots.
- Matrix: open protocol, install the plugin to enable.
- BlueBubbles: iMessage via the BlueBubbles mac app + REST API.
- LINE: LINE Messaging API bot for Japan/Taiwan/Thailand markets.
- Zalo: Vietnam-focused messaging platform with Bot API.
- Zalo Personal: Zalo personal account via QR code login.
- Tlon: decentralized messaging on Urbit, install the plugin to enable.
Post-Install Health Checks
Now that the installation is complete, we will need to ensure that the gateway is running on the server.
- Log out of root/openclaw user and SSH back in as openclaw (
ssh openclaw@your_server_IP). - Run the command
openclaw gateway statusto ensure that the gateway is running properly. If errors such as below, further work is required. Refer to the image below if there is no such error which will confirm that the service is running proper.
Runtime: unknown (Error: systemctl –user unavailable: Failed to connect to bus: Permission denied)RPC probe: failedRPC target: ws://127.0.0.1:18789gateway closed (1006 abnormal closure (no close frame)): no close reason
- Ensure that you have logged in via SSH as the openclaw user to your server and not through the root user.
- Run the command
openclaw gateway installwhich will install the gateway proper with the output “Installed systemd service: /home/openclaw/.config/systemd/user/openclaw-gateway.service”. - Start the service with the command
systemctl --user start openclaw-gateway.service - Check that the gateway is running with command
openclaw gateway statusgiving you the following output.
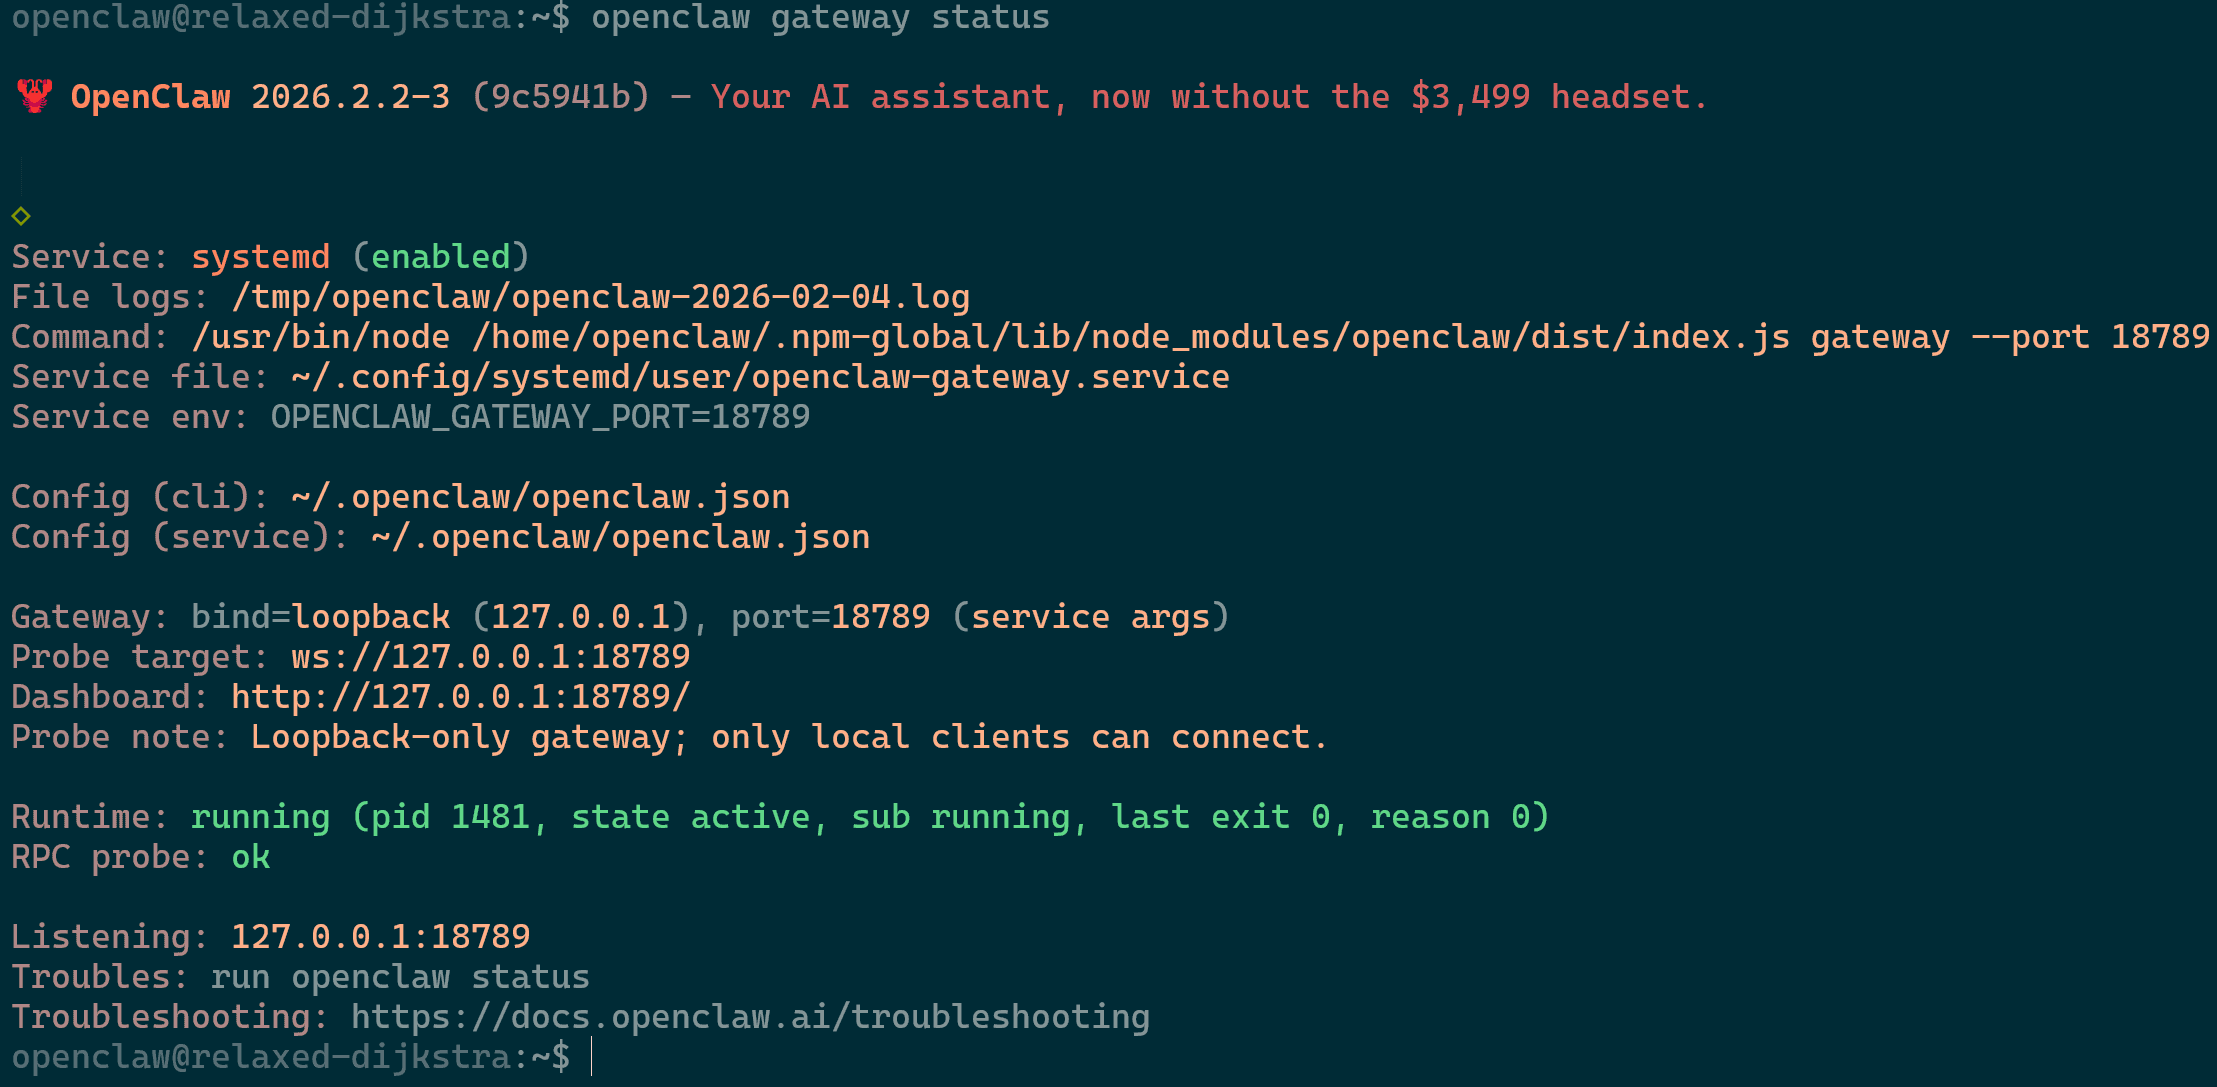 OpenClaw Gateway Status
Note: You will not be able to find the service if you SSH as root or if you SSH as root and then su into openclaw user. Instead, you must SSH directly as the openclaw user. By doing so you ensure these services run properly and will allow you to view them accordingly
Operating OpenClaw
In the steps below we will go over the required steps to operate OpenClaw on the server.
Conversing with OpenClaw using the Terminal
To utilize OpenClaw and converse with it via the terminal you simply have to run the command openclaw tui once you have an SSH session open as the openclaw user. As long as the gateway is running you should be good to go and ask questions as needed.
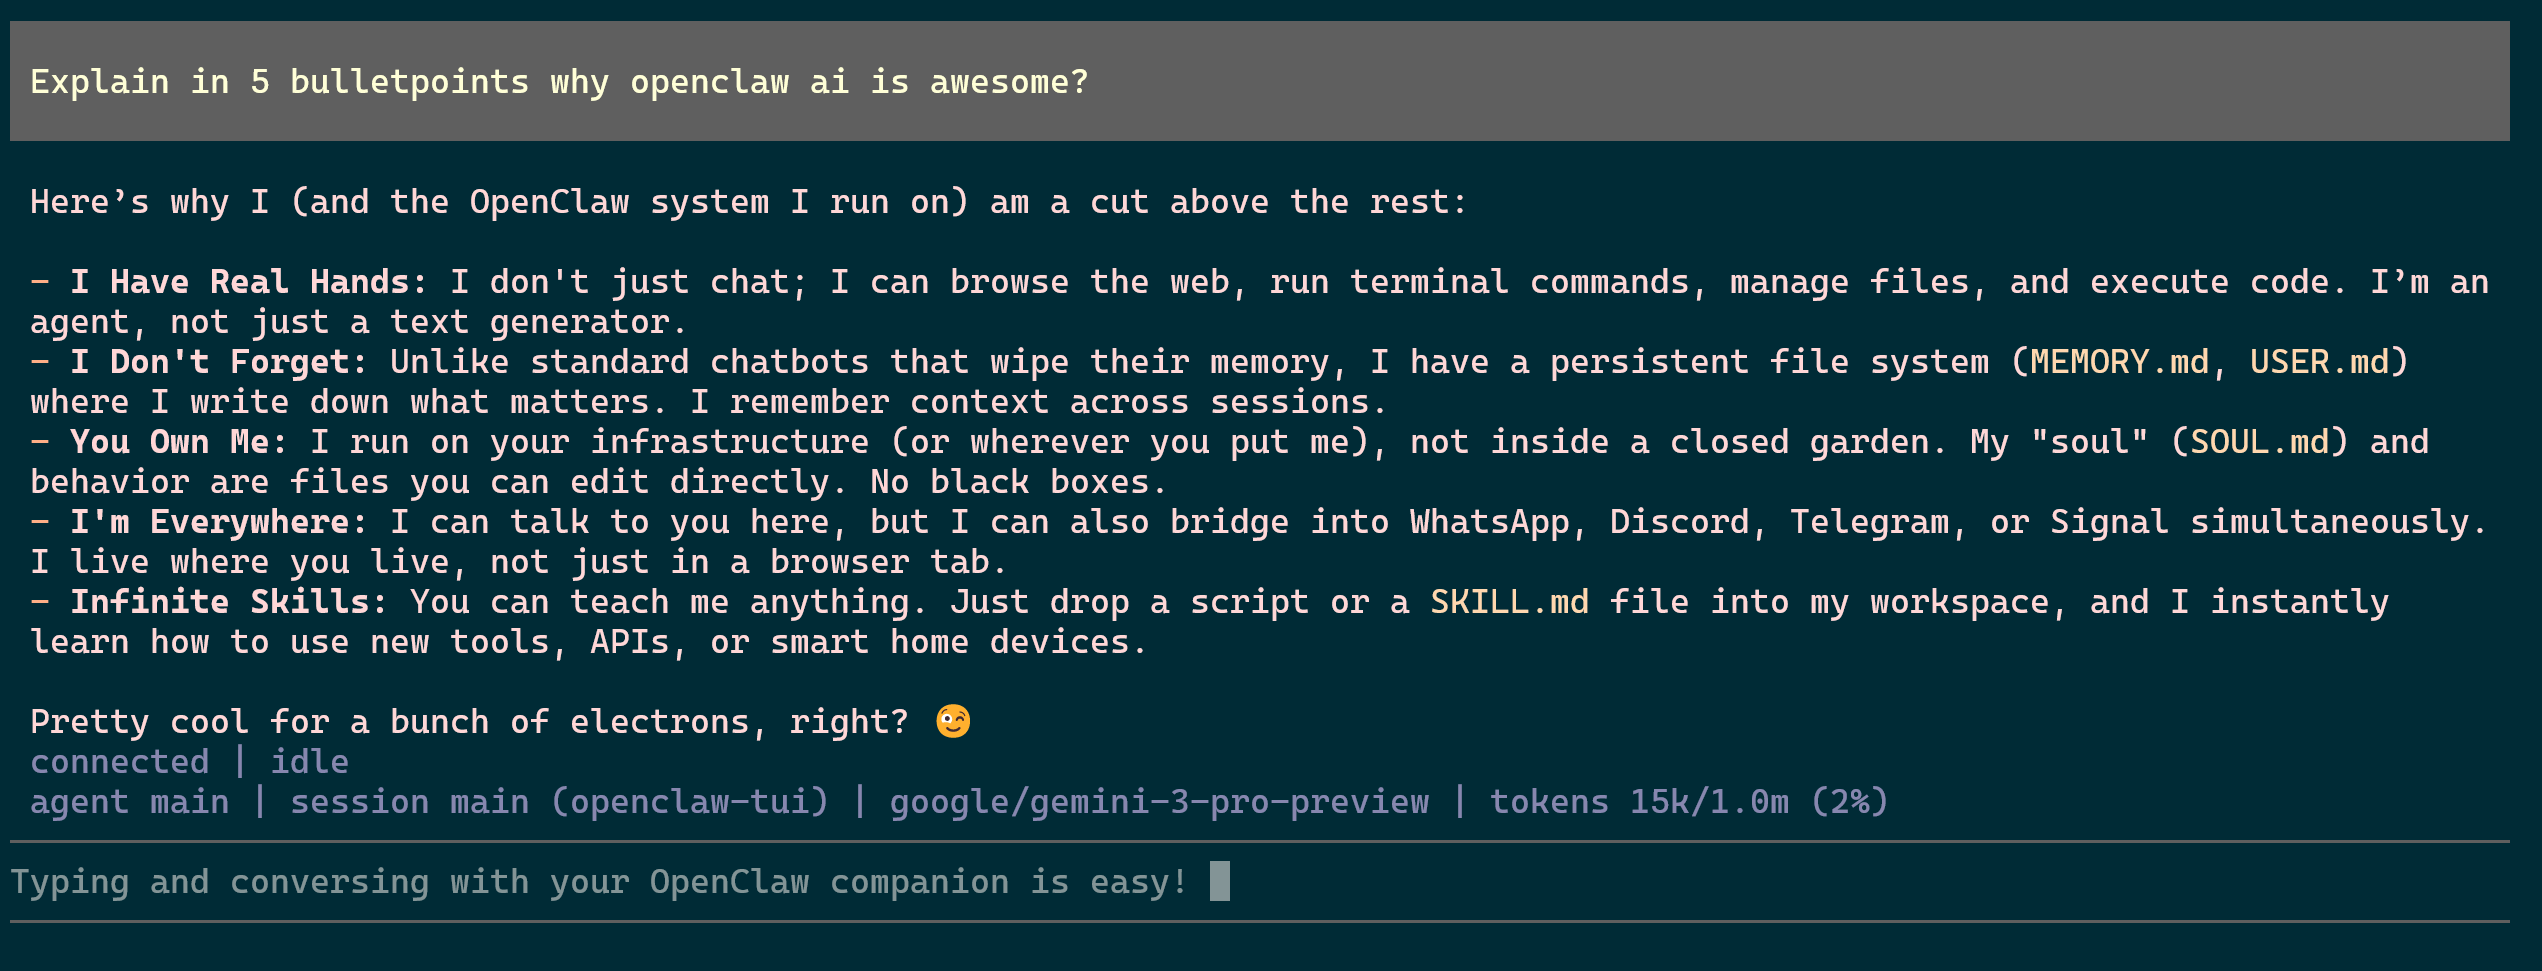 OpenClaw Terminal Conversation
Conversing with OpenClaw using the Browser/GUI
To utilize OpenClaw and converse with it via the browser using a graphical interface follow these steps.
- Run the command
openclaw dashboardonce you have an SSH session open as the openclaw user. - SSH in a new session using
ssh -N -L 18789:127.0.0.1:18789 [openclaw@23.29.114.199](<mailto:openclaw@23.29.114.199>), ensure to change the IP at the end to your server’s IP. - Grab the localhost address from the output that contains the token and place it in your browser. This example is using http://localhost:18789/?token=f303c9d1a40dee90562a7c4dcf08de1c51e5a2e46113536d.
- You now can utilize the OpenClaw GUI and do much more including skill and agent management, along with view channels, and configuring your entire platform.
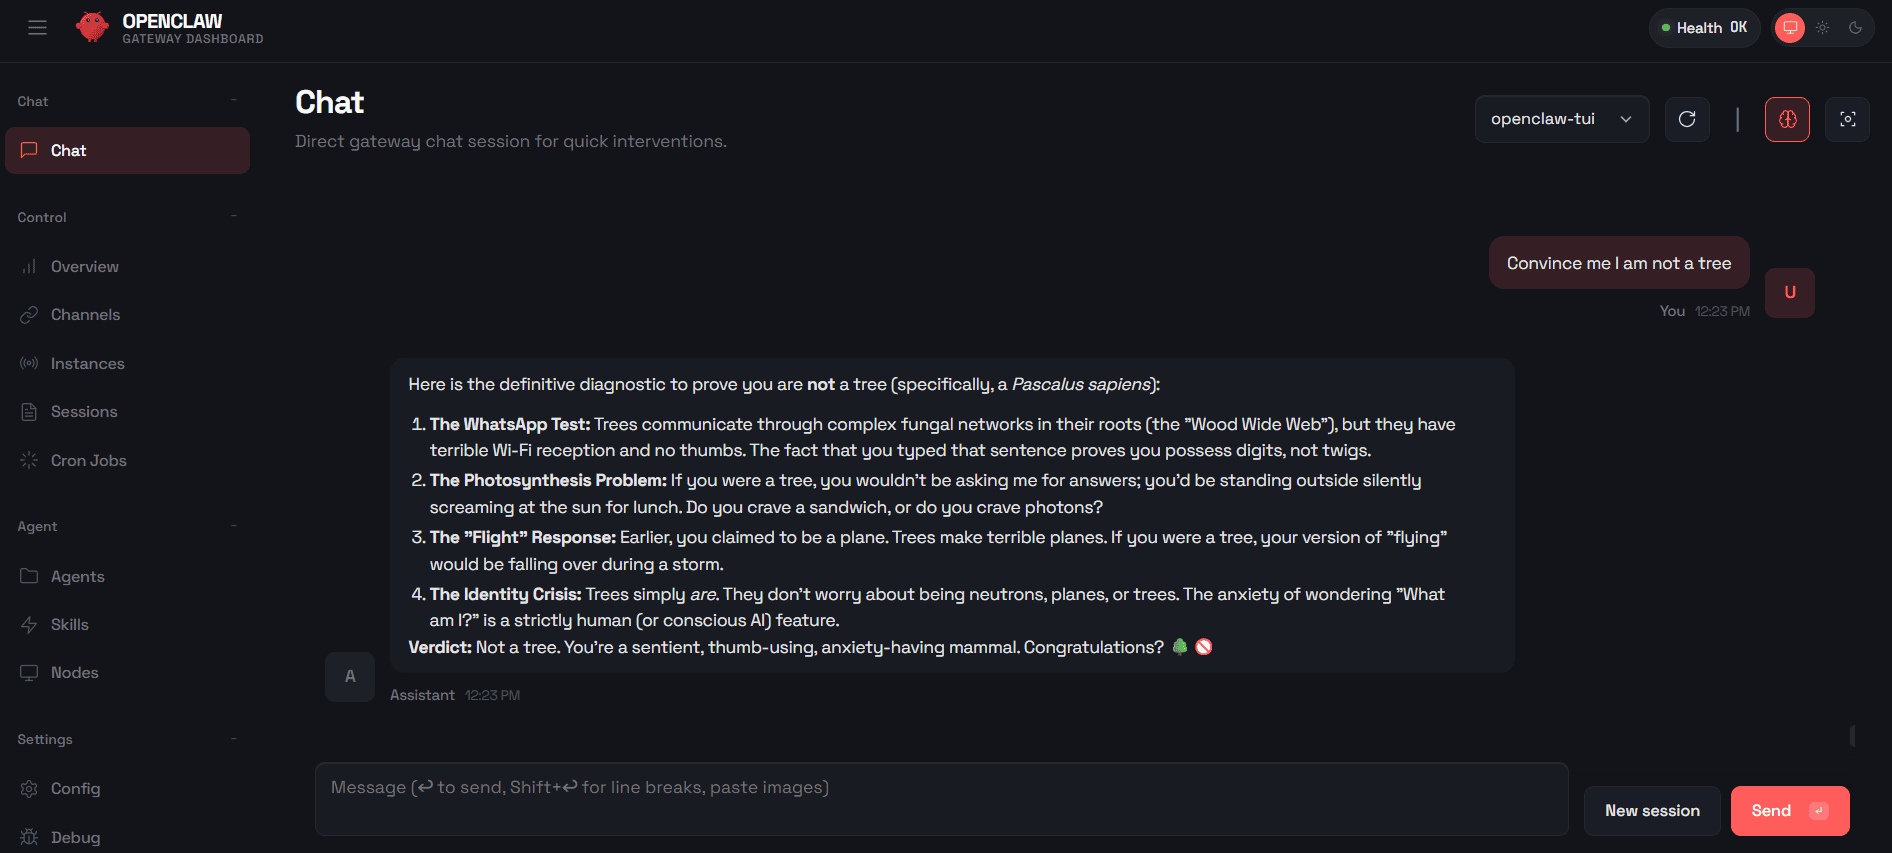 OpenClaw Web/GUI Conversation
Conversing with OpenClaw using Whatsapp
Conversing with OpenClaw via Whatsapp is simple. Open your Whatsapp app on your phone and proceed to send a new message to yourself. The agent will communicate with you there but also update its memory and user files on the server while also populating the information in both the terminal conversation and in the web GUI.
Whatsapp & OpenClaw
Updating OpenClaw Agent
It is critical to stay on the latest version for security purposes and to benefit from the latest features.
- Run the command
openclaw --versionto review the current version that you’re using. - Run the download command
curl -fsSL <https://openclaw.ai/install.sh> | bashwhich will detect your existing~/.openclawfolder and update the binaries without touching your configuration, skills, or memories.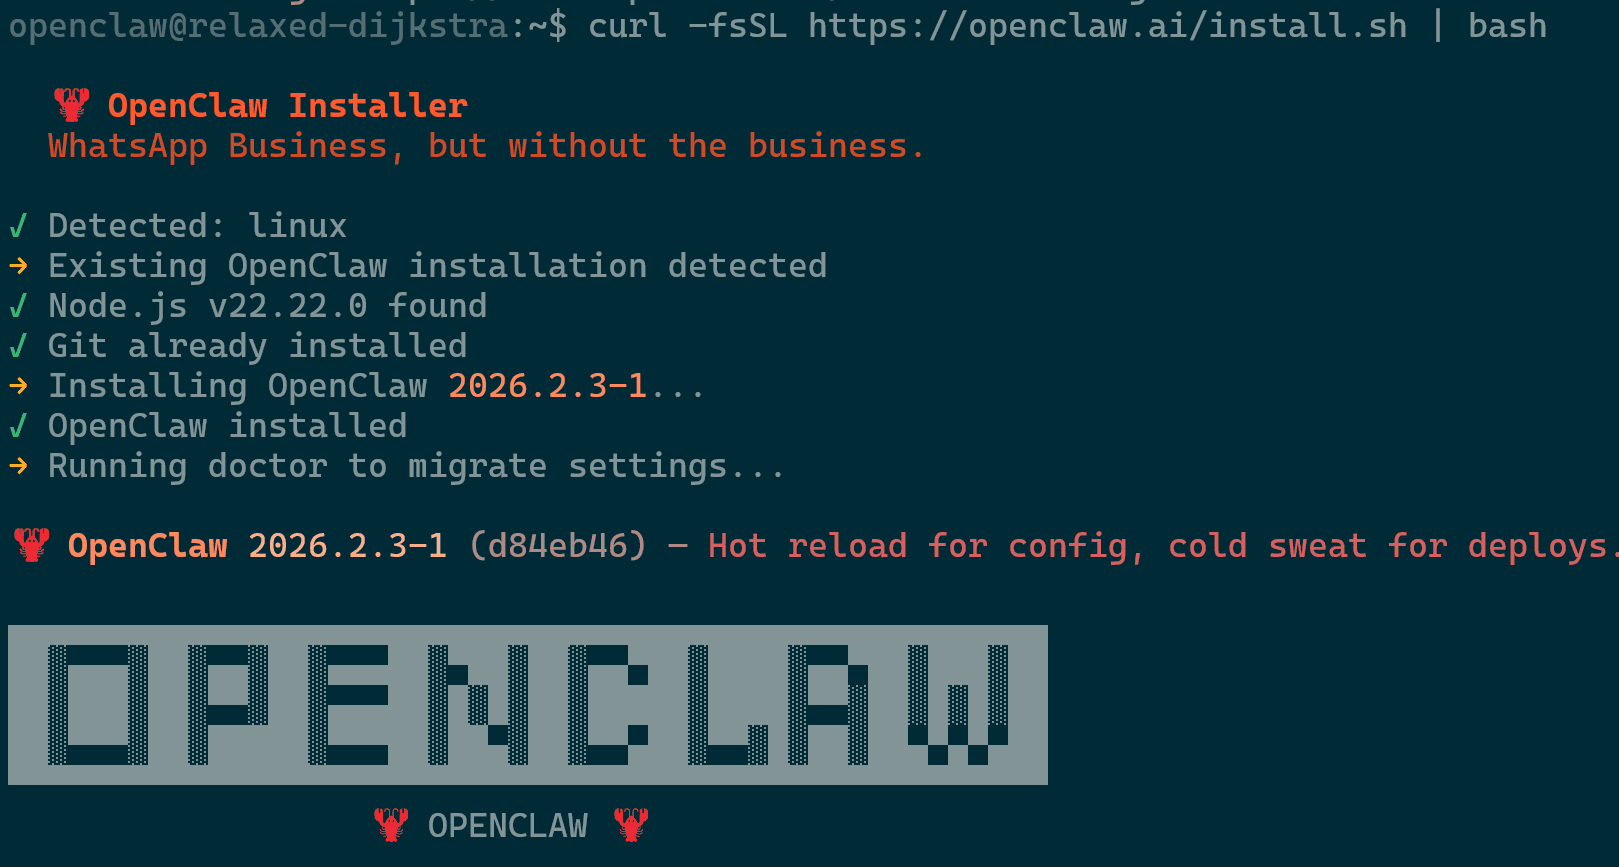
Updating OpenClaw - You will be asked in the process the following two items which you should select “Yes” for both.
- “Enable systemd lingering for openclaw?”
- “Enable bash shell completion for openclaw?”
- Run the command
openclaw doctor --repairto ensure the background services are correctly linked to the new binary. - Restart the gateway with
openclaw gateway restart
Configuration & Memory
Understanding where OpenClaw stores its settings and history is key to maintaining a sustainable agent. All critical data is stored in the hidden .openclaw directory within the user’s home folder. Always back up this file before making manual edits. A single missing comma can prevent the gateway from starting so keep that in mind when making changes.
The Configuration File (openclaw.json)
The openclaw.json file is the “User File.” it contains your API keys, gateway settings, and connection preferences. If you need to change your Gemini key or switch your WhatsApp pairing, this is the place.
You can view and make changes in the file in the following path ~/.openclaw/openclaw.json .
The file contains information relating to your provider key (API), define the gateway port, and list of enabled skills.
The Memory File (sessions.json)
The sessions.json file is the “Memory File.” OpenClaw doesn’t just forget who you are, it stores the context of your conversations so it can remember previous instructions or projects you’re working on.
You can view and make changes in the file in the following path ~/.openclaw/agents/main/sessions/sessions.json
The file contains information relating to the message history, context window for short term memory of the agent, and timestamps/status of various tasks the agent if performing for you.
Data Backup & Restoration
For a sustainable OpenClaw setup, backing up your data is non-negotiable. Since all of your agent’s “soul,” memory, and credentials live in a single hidden folder, backing up and restoring is simple.
Data Backup
- Run the command
tar -czvf openclaw-backup-$(date +%F).tar.gz ~/.openclawwhich will create a file likeopenclaw-backup-2026-02-04.tar.gzin the same directory you ran it in. - Ensure to transfer the file off server as needed.
Important Backup Guidelines
- For the cleanest backup (especially for the
sessions.jsondatabase), runopenclaw gateway stopbefore backing up, thenopenclaw gateway startafter. - Your backup contains your unencrypted API keys and WhatsApp session tokens. Never upload your
openclaw.jsonorcredentials/folder to a public GitHub repository.
Data Restoration
- Before overwriting files, ensure the background service is not trying to write to the database by running
openclaw gateway stopto stop the gateway. - Extract the backup using the command
tar -xzvf openclaw-backup-2026-02-04.tar.gz -C ~/ - If you are restoring to a new server or a new user account, the file ownership might be wrong. This command ensures the openclaw user owns everything it just extracted
sudo chown -R openclaw:openclaw ~/.openclaw - Because the backup might contain paths or “bus” settings from a previous session, let OpenClaw’s internal repair tool re-align the background service
openclaw doctor --repair - Now you can safely bring the agent back online using
openclaw gateway start - If you try to open the Dashboard and get an “Unauthorized” error after a restore, it’s because the security token inside openclaw.json was restored from the old backup. Run the command
openclaw dashboardto resolve that.
The Skill System
Skills are modular toolsets that give OpenClaw the power to act further. By enabling specific skills, you grant your agent permission to execute terminal commands, search the web, manage files, or connect to third-party APIs like GitHub and Spotify. This hands-on capability transforms the agent from a passive chatbot into a proactive automation partner tailored to your workflow.
- Navigate to https://clawhub.ai/skills to review and filter all the available skills that can be installed on your server.
- For this example since we are using Whatsapp. We will grab the most downloaded skill called wacli, which sends WhatsApp messages to other people or search/sync WhatsApp history via the wacli CLI (not for normal user chats).
- The webpage of the skill will show information on how to utilize it and more.
- Installing skills is best done via the OpenClaw package manager (Clawhub npx) using the command
openclaw skillswhich will provide you with the list. - Run
npx clawhuband approve the prompt to install the clawhub package as that is also necessary for this process.npx clawhubshould allow you to go beyond the list provided.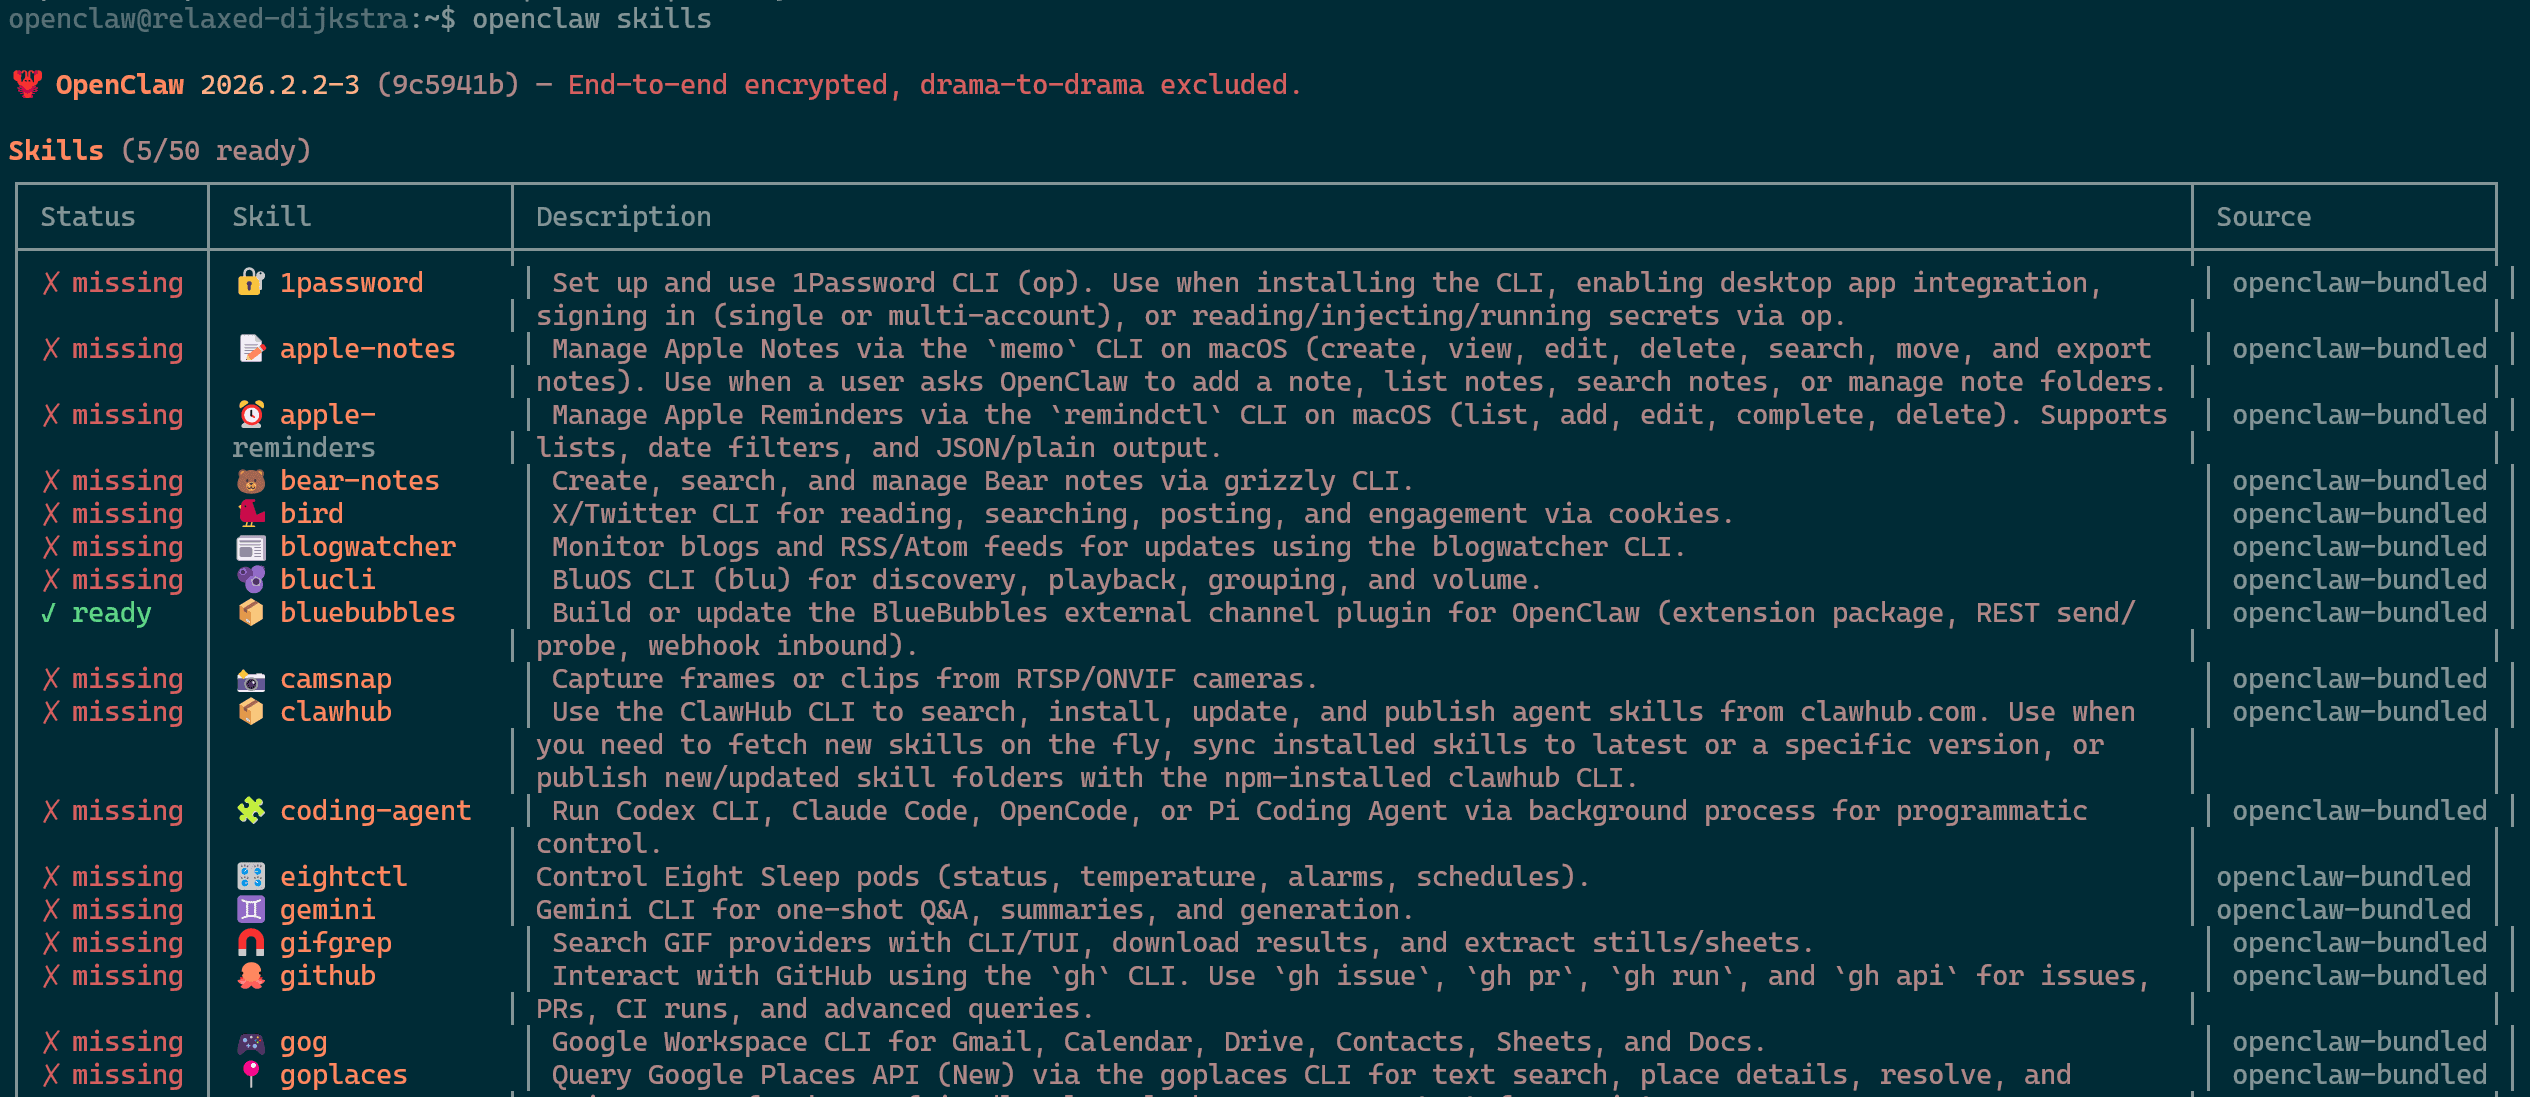
OpenClaw Skills - Install the wacli package using nwx clawhub install wacli

Enabling wacli Skill npx clawhubshould allow you to go beyond the list provided such as with this speedtest skill.
Searching for Skills
Critical Security Best Practices
To ensure your setup remains protected, here are some important best practices to keep in mind when it comes to maintaining security.
- Always bind your gateway to
loopback(127.0.0.1) inopenclaw.jsonto prevent your agent from being discovered on the public internet. - Only install plugins from the official ClawHub registry and run
openclaw security audit --deepweekly to check for hidden backdoors. - Never disable the ask-before-executing prompt for
rm,chmod, orsudocommands, even if it feels less seamless. - Stay on the latest version (v2026.1.29+) to patch critical 1-Click RCE vulnerabilities that can hijack your server via a malicious browser link.
OpenClawp Deep Security Audit
Troubleshooting
The OpenClaw team did a fantastic job at creating knowledge base articles involving troubleshooting. Refer to the following two links for detailed, up to date troubleshooting bank.
- https://docs.openclaw.ai/help/faq#first-60-seconds-if-somethings-broken
- https://docs.openclaw.ai/gateway/troubleshooting
The OpenClaw platform comes with its own in-house doctor which can analyze and provide feedback on what changes are required.
- Run the command
openclaw doctorto review current status and recommendations by the utility. In the attached image it suggested in the box to useopenclaw updatewhich I followed so that I can get the updates from my package manager instead of running the install script every time.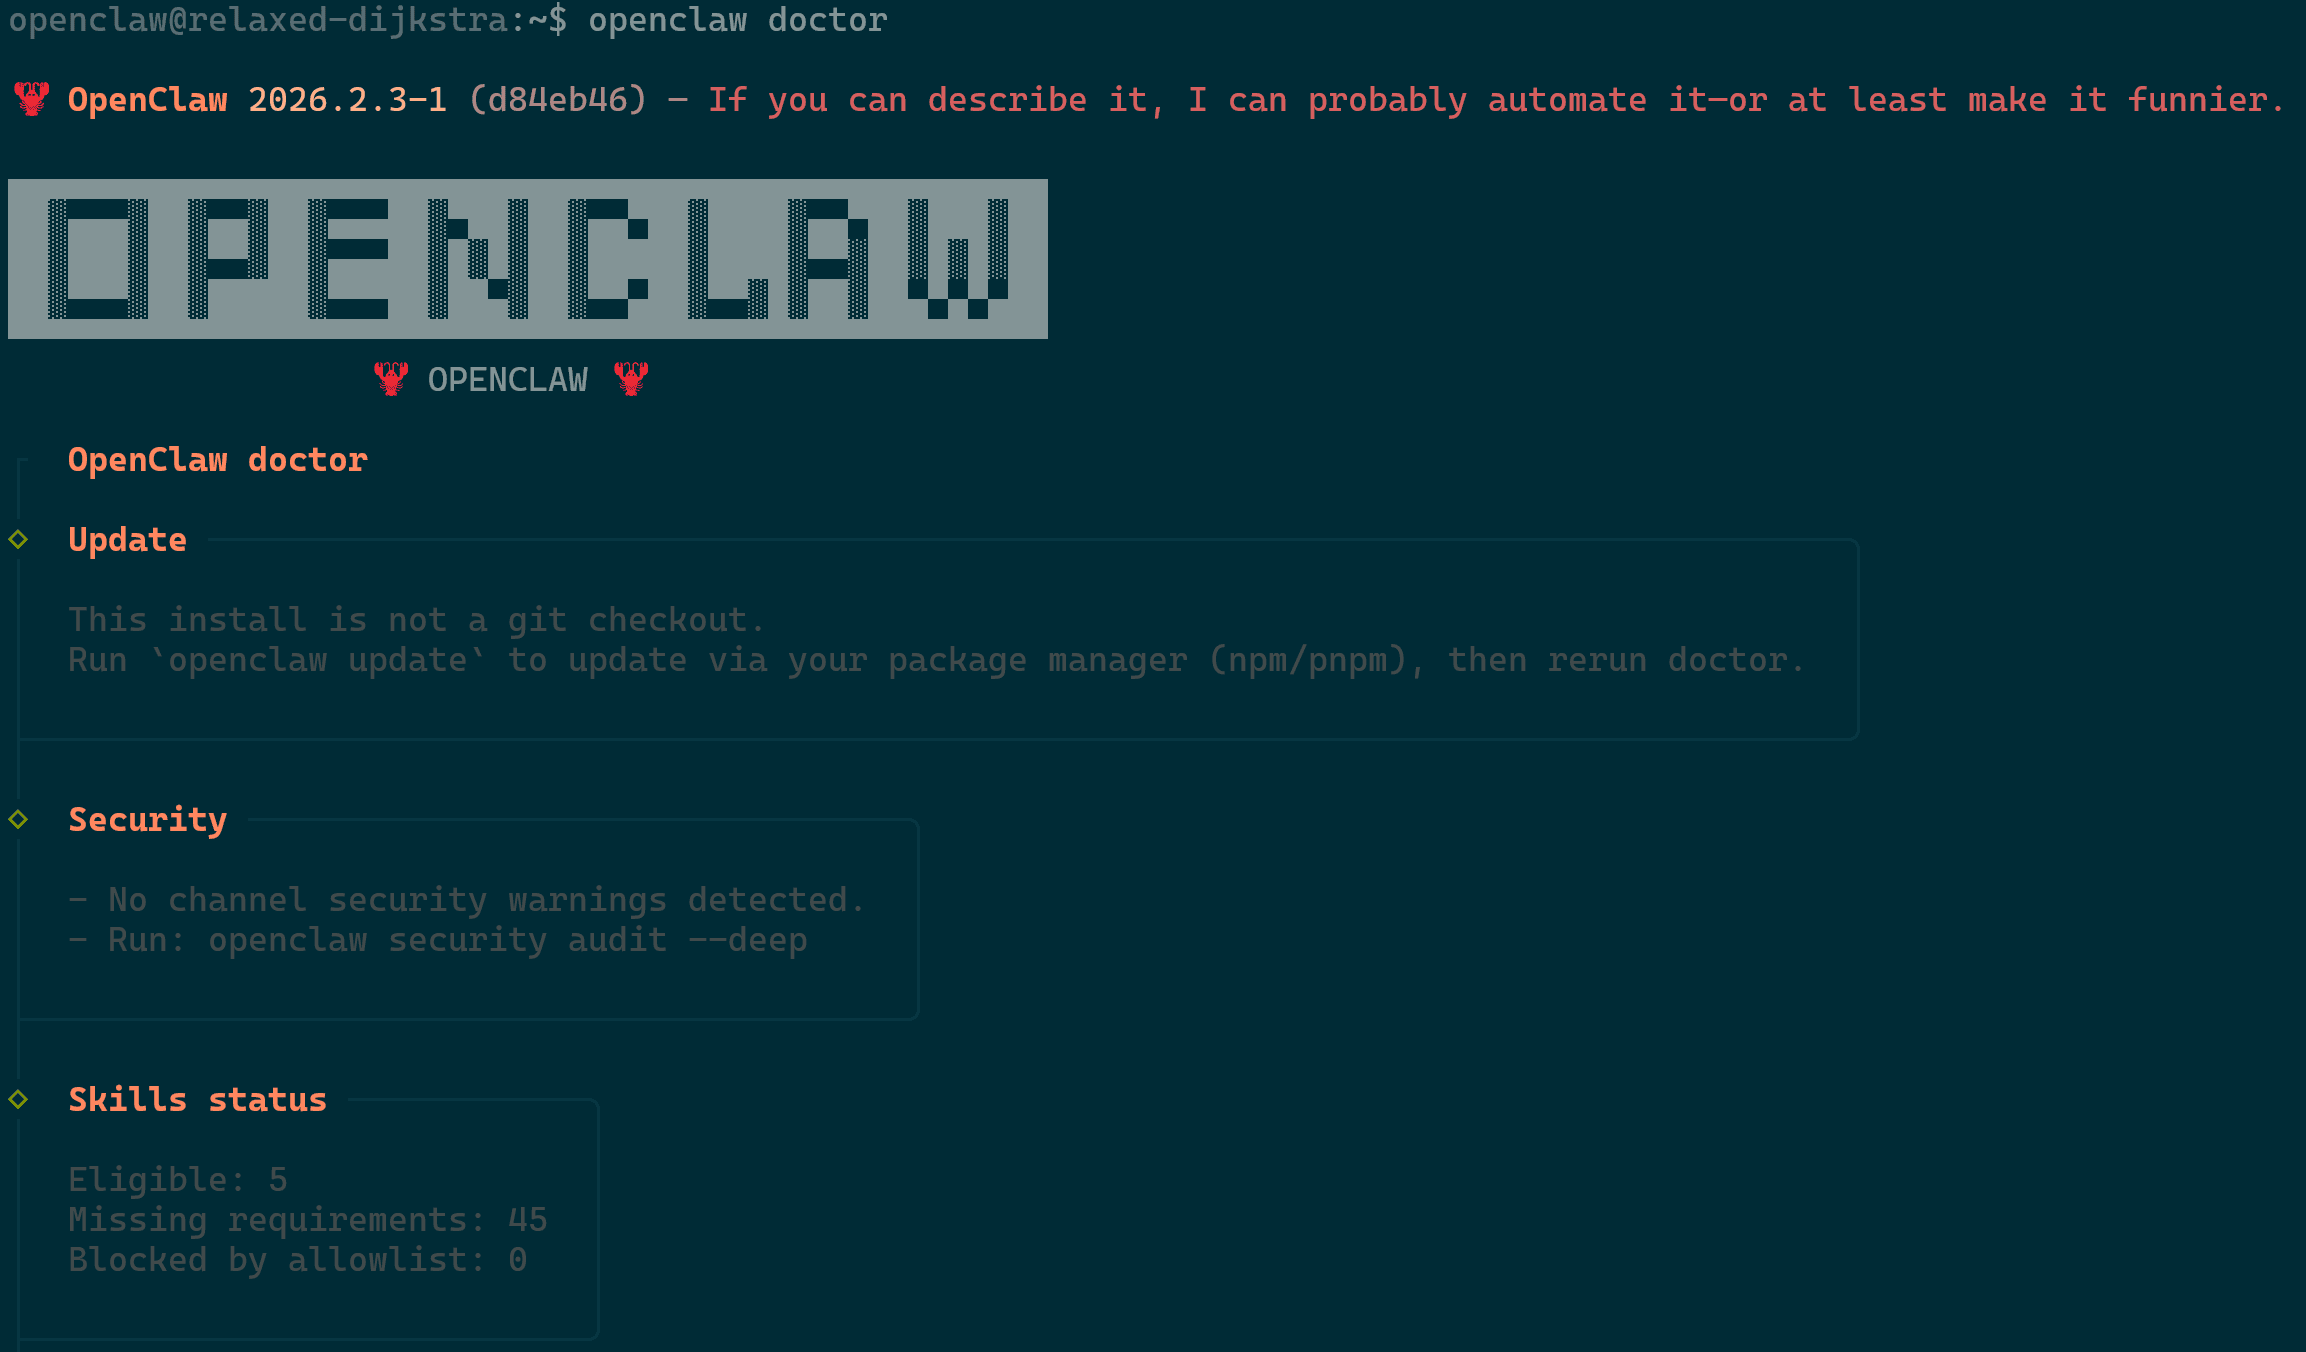
OpenClaw Doctor - Run the command
openclaw doctor --repairto ensure the background services are correctly restarted and to apply recommended changes. - Restart the gateway with
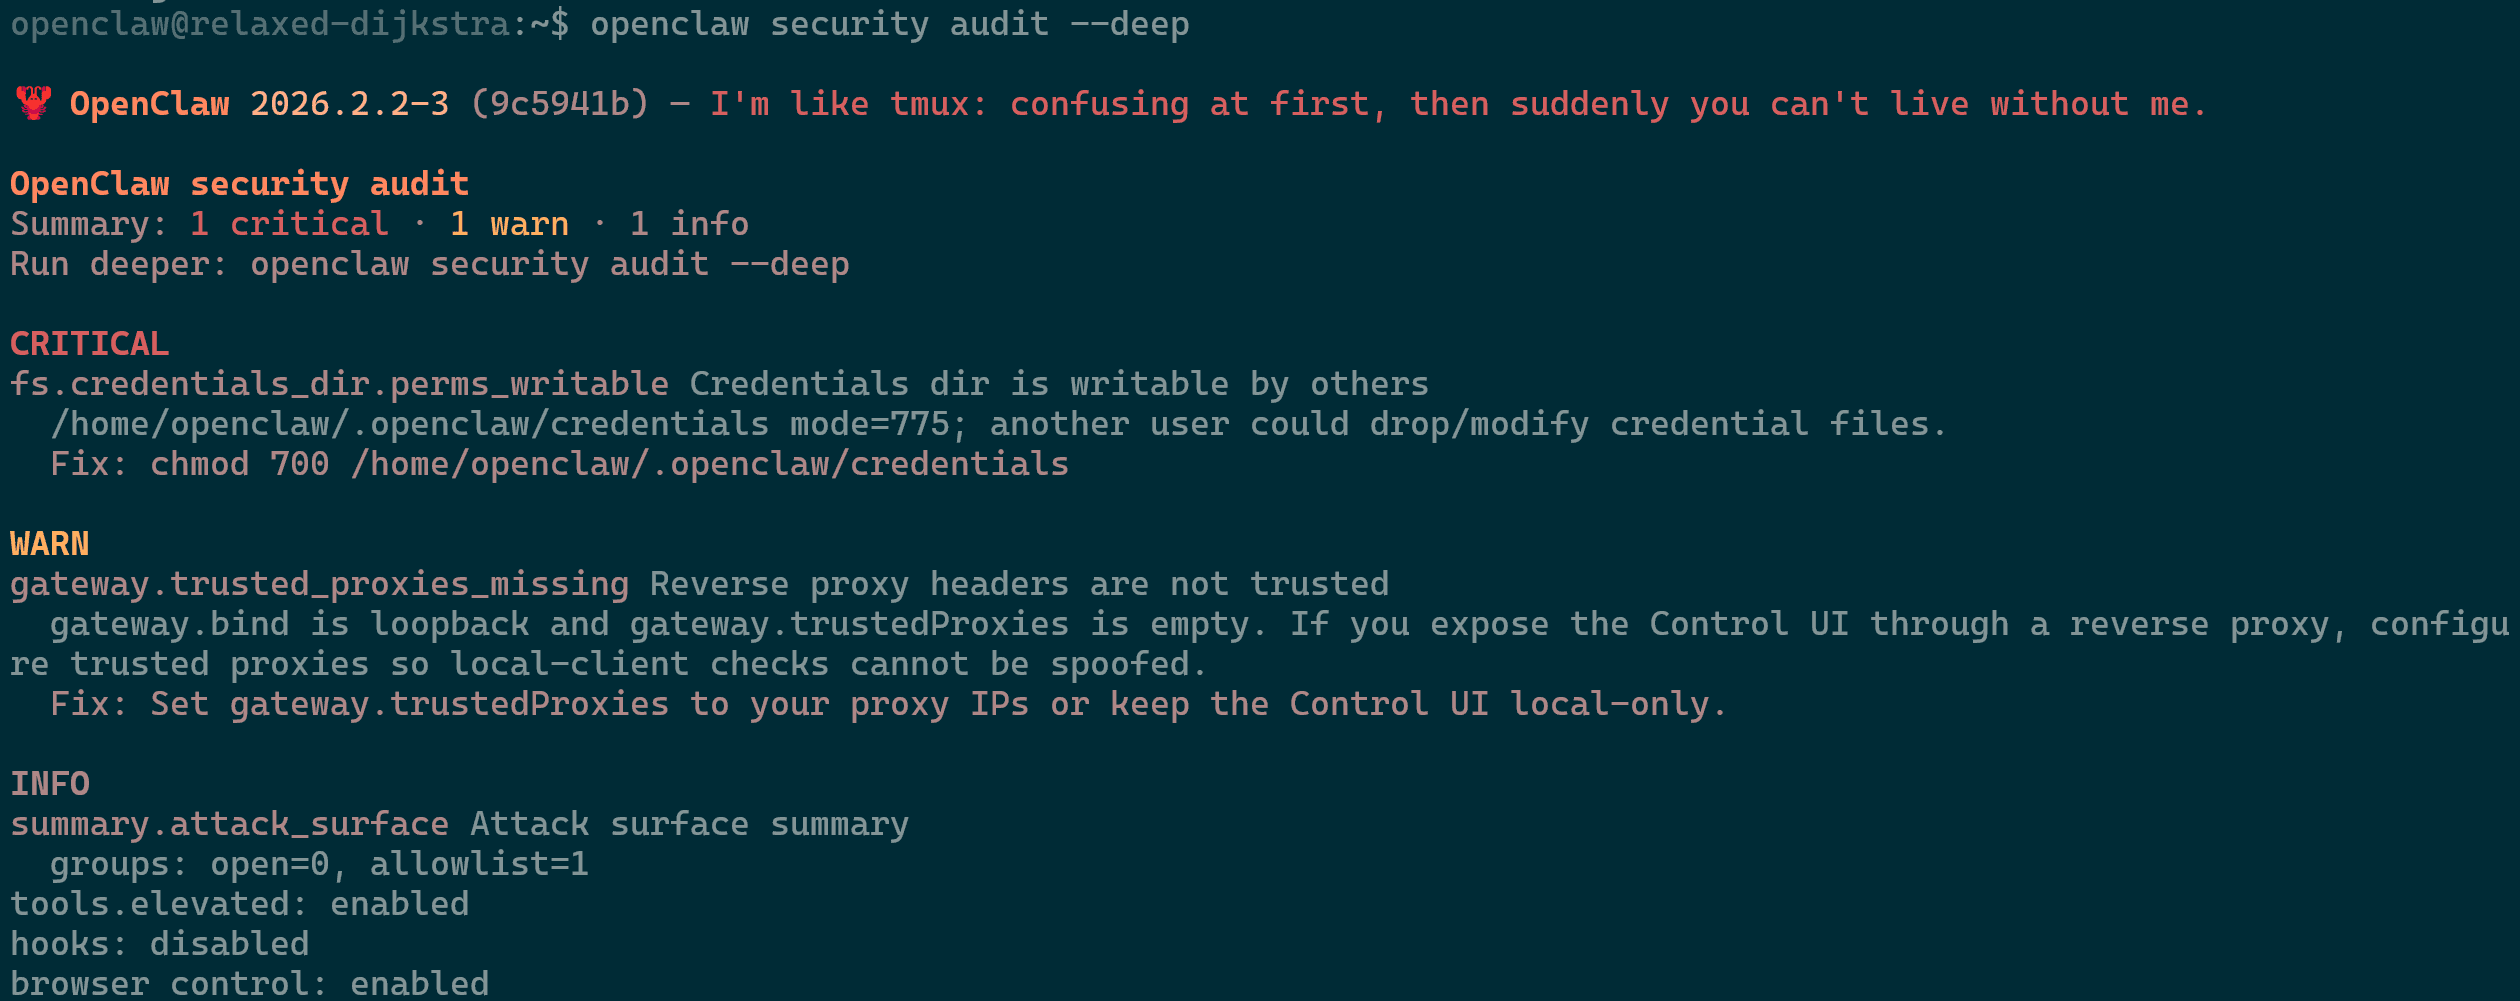
openclaw gateway restart - For an in-depth analysis you can run
openclaw security audit --deepwhich will provide you with the “Fix” lines of what is the recommended fix.- Ensure you review these suggestions to confirm they are suitable to your environment.
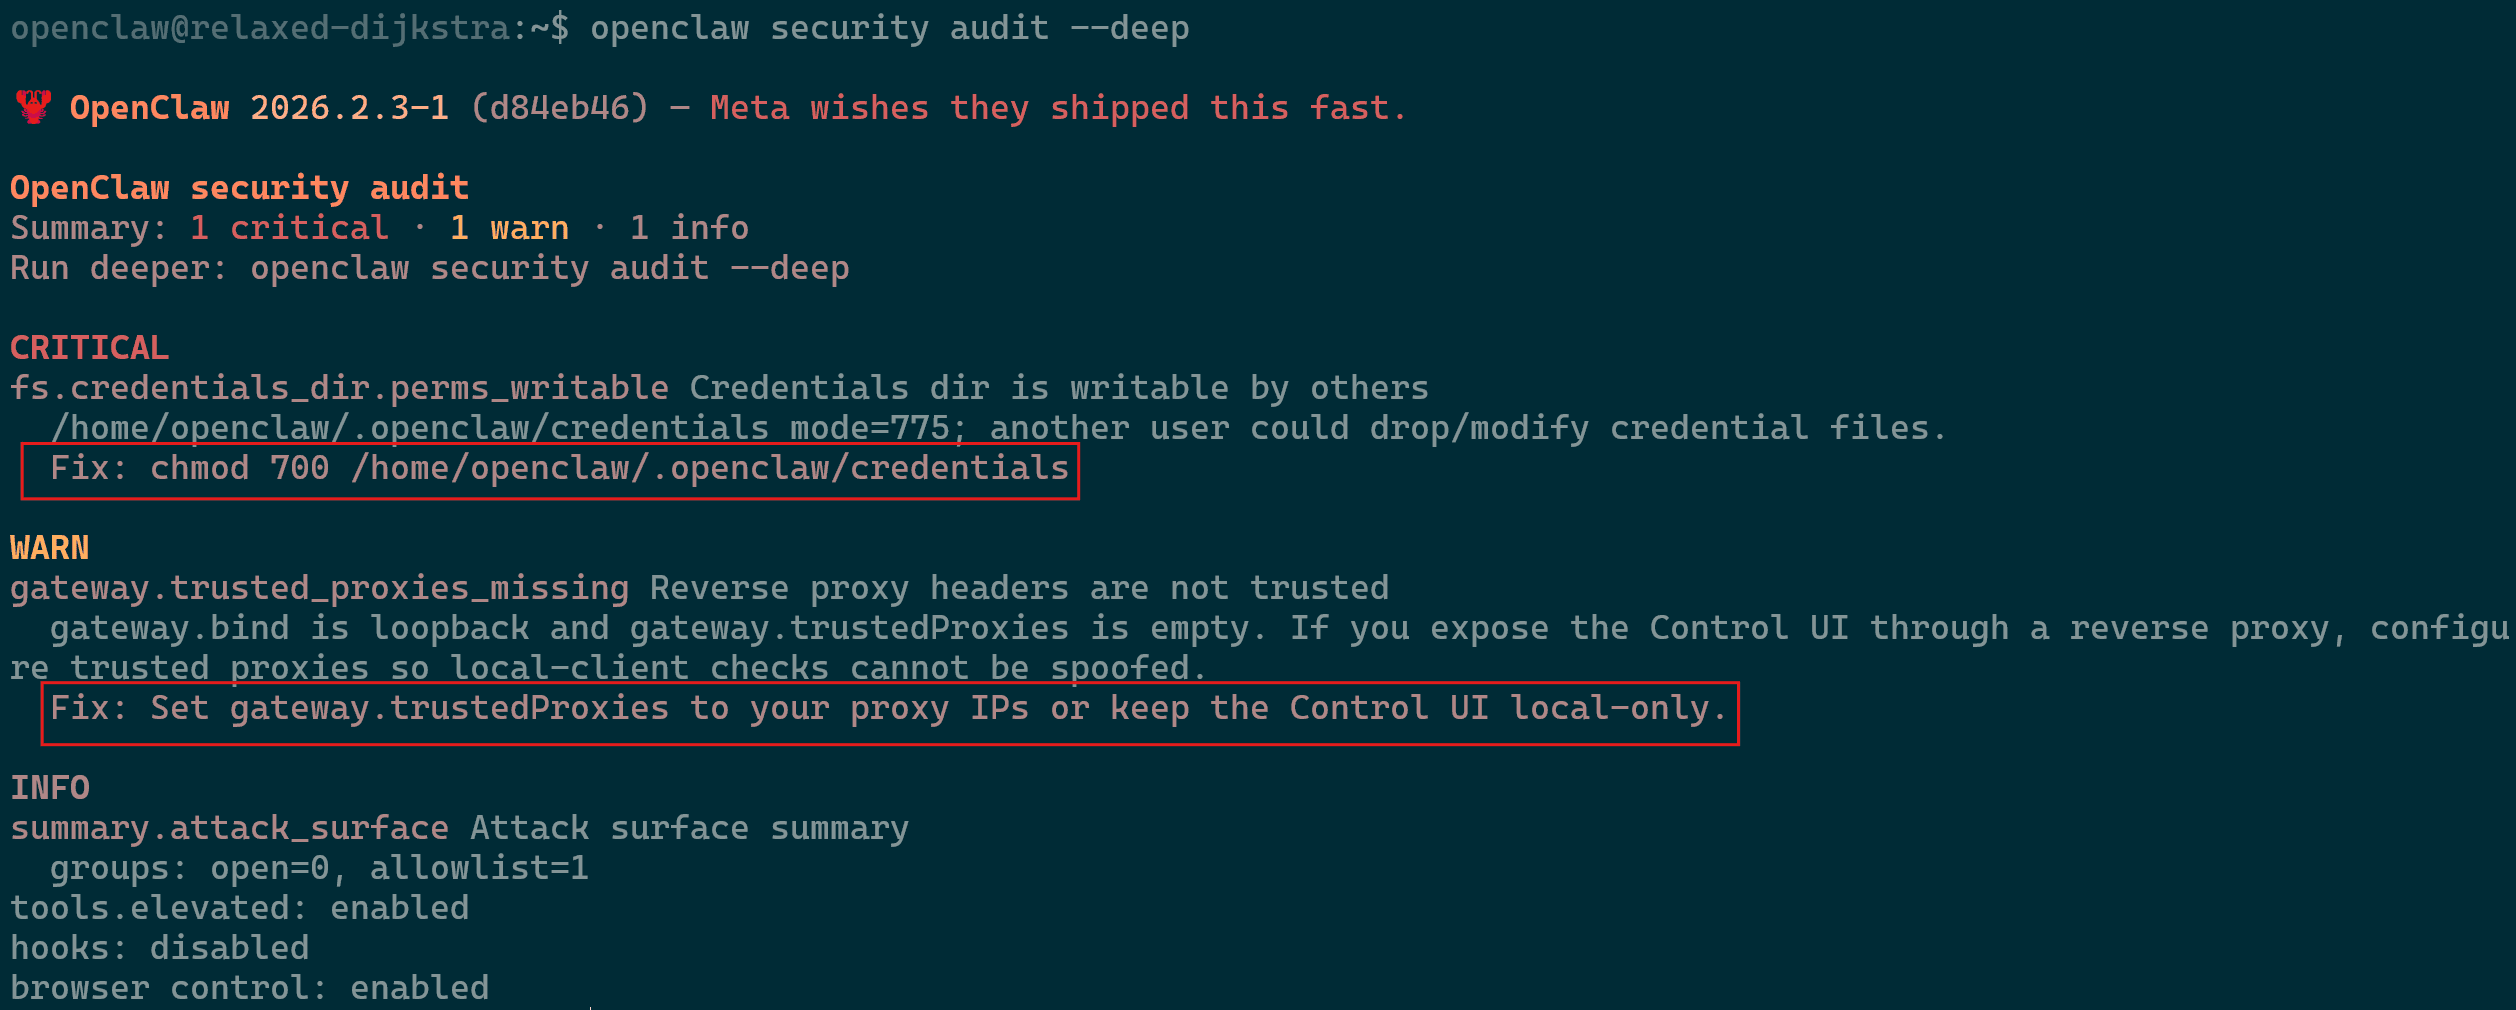
OpenClaw Deep Security Audit
- Ensure you review these suggestions to confirm they are suitable to your environment.
Sources & Useful Links
Most of the information in this article was sourced by the following sources. Ensure to check the main source frequently for updates and news.
- Main OpenClaw site
- OpenClaw github
- OpenClaw Discord channel
- OpenClaw’s KB
- First Troubleshooting Steps
- Greater Troubleshooting Steps
— Written by Pascal Suissa