Introduction
Website data is vulnerable to server failures, failed updates, security breaches, and accidental deletions. While website owners often focus on security and design, having a reliable backup strategy is your ultimate safety net. cPanel makes it easy to schedule, create, and manage backups for your entire hosting account, including files, databases, and email accounts.
Whether you are running a personal blog or a high-traffic e-commerce store, configuring automated backups ensures you can restore your site in minutes if disaster strikes. In this guide, we’ll walk you through how to enable and configure cPanel backups step-by-step so your data stays safe and easily recoverable.
Why Automated cPanel Backups Are Crucial
Running a website without a backup plan is dangerous as everything feels fine until an unexpected disaster leaves you stranded. While web hosting providers often implement server-level snapshots (VPS/VDS when scheduled in Hivelocity’s case), relying solely on your host is a risky strategy. Setting up your own automated backups directly within cPanel gives you complete control over your data, ensuring that your site can be restored fast.
Data loss rarely gives a warning, often striking through human errors like accidentally deleting critical files, dropping database tables, or breaking core configuration files. Failed plugin or theme updates that cause fatal system errors, as well as severe security breaches like malware injections and ransomware attacks, can also instantly trigger it. On top of software risks, sudden server crashes or hardware drive failures can permanently corrupt unbacked-up site data without notice.
Things to Know Before You Begin
- Creating a full backup temporarily duplicates your data on the server. Ensure you have at least double the disk space of your current site size.
- Schedule your backups for periods with the lowest traffic. Normally this time frame is overnight, and a recommended time point is to configure it for 2AM.
- During the backup generation, large MySQL databases may temporarily lock tables to ensure data consistency, which can cause brief database connection errors (Error Establishing a Database Connection) on high-traffic sites.
- The backup process for an account near or over its quota may fail because the system cannot write necessary files, such as a database lock file.
How to Enable and Configure Backups in cPanel
Backup Configuration
Enable Backups & Set Global Parameters
- Log into WHM.
- Search for Backup Configuration which is under Home > Backup > Backup Configuration.
- Check the Enable Backups box to goggle the backup activity.
- Under Global Settings select Compressed. The process takes more time to create a backup but uses less disk space while still saving all of your data.
- Ensure the Check the Available Disk Space so that if there is not enough space on the system, the backup will not proceed. Ensure the setting is set to 10% which will provide you a good buffer.
-
Maximum Destination Backup Timeout and Maximum Backup Restoration Timeout should remain in their default values of 7200 and 21600 respectively.
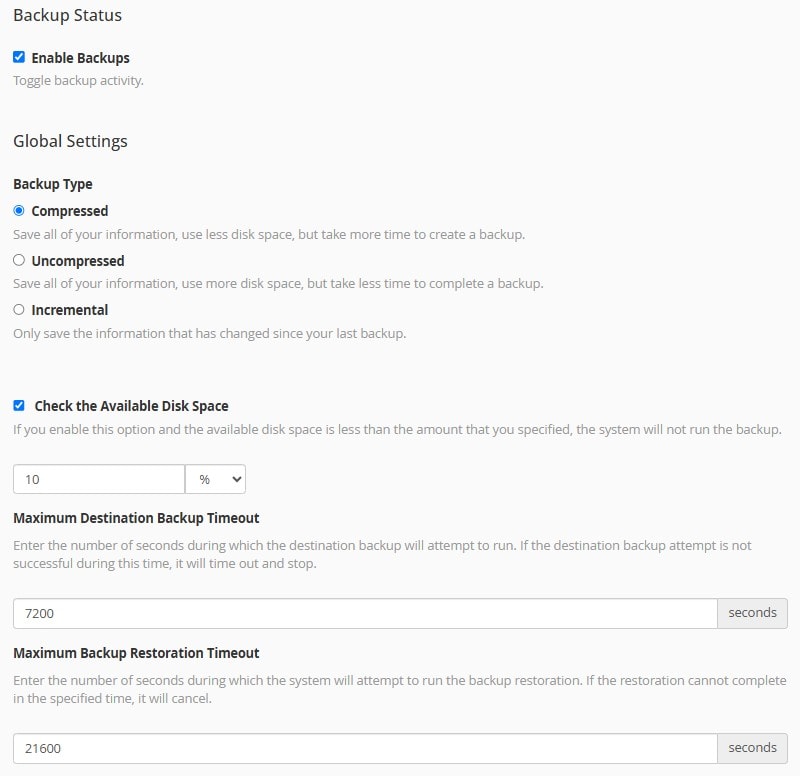
Backups & Global Parameters
Set Scheduling and Retention Rules
- Check the Daily Backup option and select the days you wish to perform the updates on.
- Uncheck the Strictly enforce retention, regardless of backup success. Unchecking this option forces the system to pause the deletion of older, healthy backups until a new backup successfully completes. This process guarantees you always keep at least one valid restore point, even if it is outdated.
- There are options for weekly and monthly backups to meet your preference. Note that you can perform daily and add weekly or even monthly backups as well.
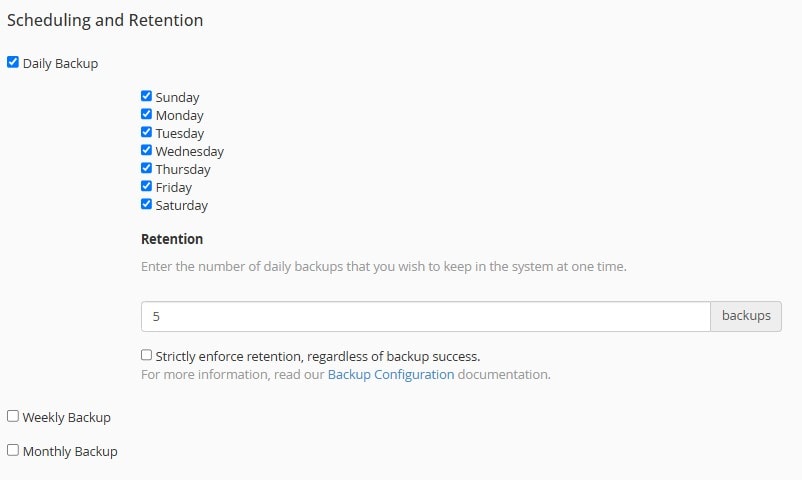
Scheduling and Retention Rules
Choose File & Database Inclusions
- Check the Back up User Accounts option.
- Backing up suspended accounts can be done by checking the Back up Suspended Accounts option but by default it is turned off.
- Check the Back up Access Logs.
- Check the Back up Bandwidth Data.
- Uncheck the Use Local DNS option.
- Check the Back up System Files which is crucial for server restoration.
- Within the Databases section, check the Per Account Only option so the system dumps each account’s databases for future restoration.
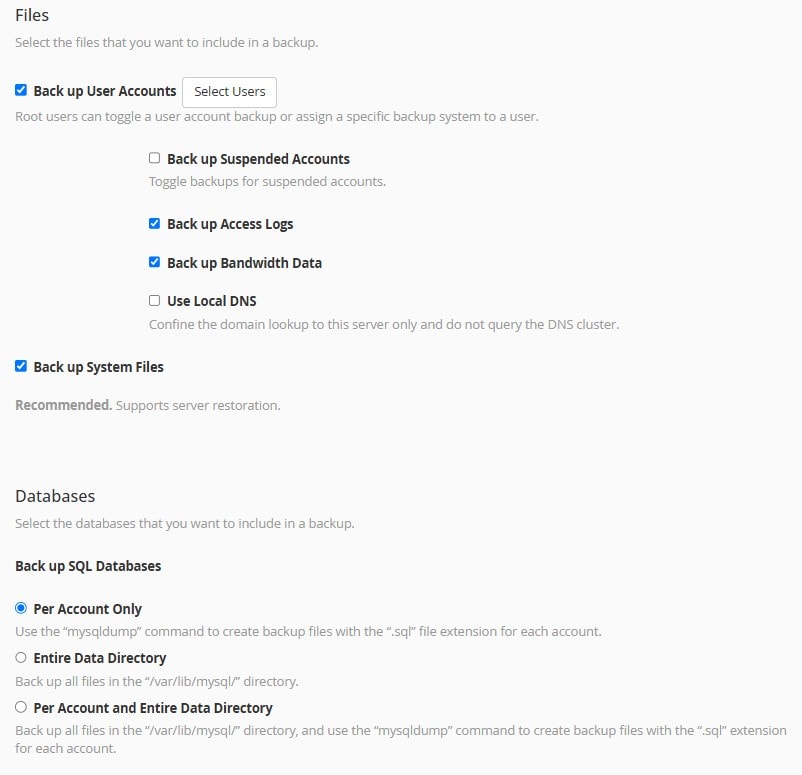
File & Database Inclusions
Configure Backup & Staging Directories
- Enter the Default Backup Directory as an absolute path (for example, /backup). You must create this directory on the server beforehand, though you can check if it already exists before creating it.
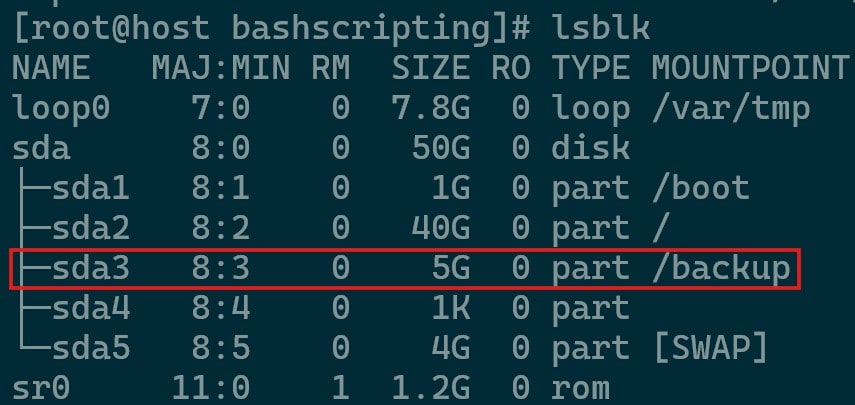
/backup Directory Confirmation -
The system uses the Backup Staging Directory to temporarily store a remote backup’s files and directories during a restoration. The directory empties once the system restores the backup. In this example it is the same directory as the /backup that is on the server as above but can be configured to any other location on any of your drive (Space permitting).
- Check the Mount Backup Drive as Needed in cases where the backup mounting point exists on other drives or uses other mounting points.
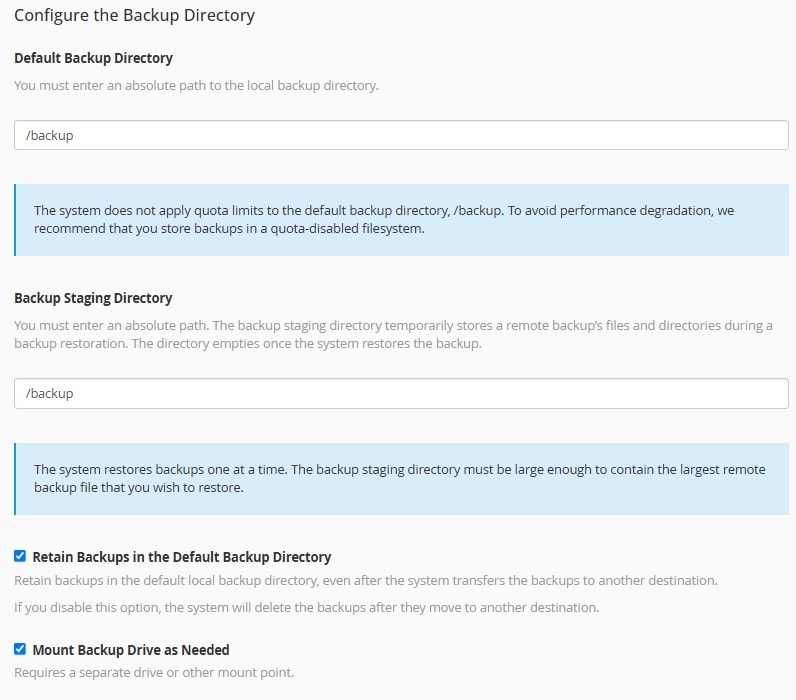
Backup & Staging Directories
Configuring Additional Destinations
Configuring additional destinations in cPanel lets you automatically offload server backups to remote storage services like Amazon S3, Google Drive, SFTP, or custom FTP servers.
- You can set up and manage these locations in WHM under Backup Configuration > Additional Destinations.
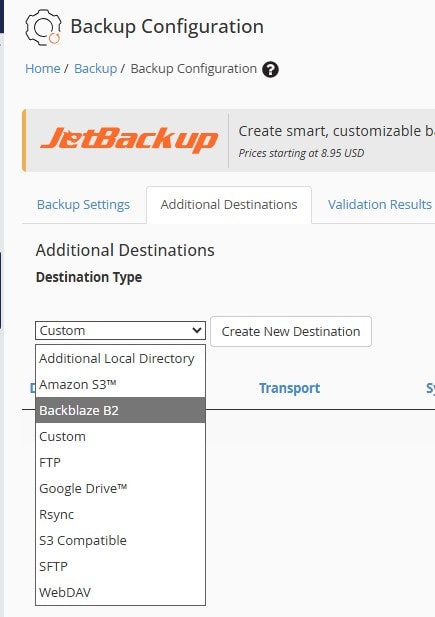
Destination Types - Choose the destination type and enter the required API keys or login credentials. Once configured, click Validate Destination to test the connection before saving to ensure your offsite backups upload securely and reliably.
- You can find specific information on how to configure each destination via reviewing each tab within cPanel’s KB on this topic.
Best Practices for cPanel Backup Management
- 3-2-1 Backup Strategy involves maintaining at least three copies of your data on two different media types, with at least one copy stored completely off-site. Never rely solely on server-local backups.
- Configure cPanel’s Remote Destinations to automatically push completed backups to off-server storage locations such as Amazon S3, Google Drive, Remote FTP, or SFTP. If the primary server suffers drive failure or compromise, local backups will be lost with it.
- Generating full cPanel backups consumes significant CPU, RAM, and disk I/O. Set automated cron jobs or schedule cPanel backup generation during low-traffic periods (typically late night or early morning) to prevent site performance degradation.
- Encrypt remote transport using SFTP or SSL/TLS for FTP connections. Ensure access keys, SSH tokens, and credentials used for remote destinations follow the principle of least privilege.
