Introduction
If you have multiple Linux kernels installed, whether you’re testing a custom build, running a real-time kernel, or keeping a stable fallback after a system update, your machine might not automatically boot into the one you prefer. By default, GRUB boots the newest installed kernel, which isn’t always the one you want.
Fortunately, you don’t have to manually select your preferred kernel in the boot menu every time you turn on your computer. By tweaking a few configuration settings in GRUB & grubby, you can permanently set your system to boot into your desired kernel automatically. In this guide, we’ll walk through how to identify your installed kernels, update your GRUB configuration safely, and verify your changes.
Identify Your Installed Kernels and Menu Entries
RHEL 8/9, AlmaLinux, Rocky Linux, and CentOS
- Check currently booted kernel using uname -r
- List default kernel with grubby –default-kernel
[root@server1 bashscripting]# grubby --default-kernel
/boot/vmlinuz-4.18.0-477.27.2.el8_8.x86_64
- Obtain the index number of the current default kernel via grubby –default-index
Ubuntu and Debian
Identify default kernel (Plus available kernels) and current kernel used using grep menuentry /boot/grub/grub.cfg and uname -r
root@ubuntutest:/home/pascal# grep menuentry /boot/grub/grub.cfg
if [ x"${feature_menuentry_id}" = xy ]; then
menuentry_id_option="--id"
menuentry_id_option=""
export menuentry_id_option
menuentry 'Ubuntu' --class ubuntu --class gnu-linux --class gnu --class os $menuentry_id_option 'gnulinux-simple-329693eb-4a2c-46cb-a647-d41871693b65' {
submenu 'Advanced options for Ubuntu' $menuentry_id_option 'gnulinux-advanced-329693eb-4a2c-46cb-a647-d41871693b65' {
menuentry 'Ubuntu, with Linux 5.15.0-97-generic' --class ubuntu --class gnu-linux --class gnu --class os $menuentry_id_option 'gnulinux-5.15.0-97-generic-advanced-329693eb-4a2c-46cb-a647-d41871693b65' {
menuentry 'Ubuntu, with Linux 5.15.0-97-generic (recovery mode)' --class ubuntu --class gnu-linux --class gnu --class os $menuentry_id_option 'gnulinux-5.15.0-97-generic-recovery-329693eb-4a2c-46cb-a647-d41871693b65' {
menuentry 'Ubuntu, with Linux 5.15.0-94-generic' --class ubuntu --class gnu-linux --class gnu --class os $menuentry_id_option 'gnulinux-5.15.0-94-generic-advanced-329693eb-4a2c-46cb-a647-d41871693b65' {
menuentry 'Ubuntu, with Linux 5.15.0-94-generic (recovery mode)' --class ubuntu --class gnu-linux --class gnu --class os $menuentry_id_option 'gnulinux-5.15.0-94-generic-recovery-329693eb-4a2c-46cb-a647-d41871693b65' {
Method A: Changing the Default Kernel on Ubuntu and Debian
- Locate the kernel you wish to set as the default and make a note of its position in the list. Remember that the list starts from 0, so the first entry is 0, the second entry is 1, and so on. To number the entries you can use awk ‘/menuentry/ && /class/ {count++; print count-1″****”$0 }’ /boot/grub/grub.cfg
pascal@ubuntutest:~$ awk '/menuentry/ && /class/ {count++; print count-1"****"$0 }' /boot/grub/grub.cfg
0****menuentry 'Ubuntu' --class ubuntu --class gnu-linux --class gnu --class os $menuentry_id_option 'gnulinux-simple-329693eb-4a2c-46cb-a647-d41871693b65' {
1**** menuentry 'Ubuntu, with Linux 5.15.0-97-generic' --class ubuntu --class gnu-linux --class gnu --class os $menuentry_id_option 'gnulinux-5.15.0-97-generic-advanced-329693eb-4a2c-46cb-a647-d41871693b65' {
2**** menuentry 'Ubuntu, with Linux 5.15.0-97-generic (recovery mode)' --class ubuntu --class gnu-linux --class gnu --class os $menuentry_id_option 'gnulinux-5.15.0-97-generic-recovery-329693eb-4a2c-46cb-a647-d41871693b65' {
3**** menuentry 'Ubuntu, with Linux 5.15.0-94-generic' --class ubuntu --class gnu-linux --class gnu --class os $menuentry_id_option 'gnulinux-5.15.0-94-generic-advanced-329693eb-4a2c-46cb-a647-d41871693b65' {
4**** menuentry 'Ubuntu, with Linux 5.15.0-94-generic (recovery mode)' --class ubuntu --class gnu-linux --class gnu --class os $menuentry_id_option 'gnulinux-5.15.0-94-generic-recovery-329693eb-4a2c-46cb-a647-d41871693b65' { - Edit /etc/default/grub and within this file, locate the line starting with GRUB_DEFAULT=.
# If you change this file, run 'update-grub' afterwards to update
# /boot/grub/grub.cfg.
# For full documentation of the options in this file, see:
# info -f grub -n 'Simple configuration'GRUB_DEFAULT=1
GRUB_TIMEOUT_STYLE=hidden
GRUB_TIMEOUT=0
GRUB_DISTRIBUTOR=`lsb_release -i -s 2> /dev/null || echo Debian`
GRUB_CMDLINE_LINUX_DEFAULT=""
GRUB_CMDLINE_LINUX="" - If you see a submenu like the box above in step 1 then the simple entry of 0 1 2 3 will not work! In some case older kernels are categorized under submenu. For example: In Ubuntu mostly older kernels are placed under ‘Advanced options for Ubuntu’ which is at second position. Under the submenu at entry 3 is the older kernel. However, numbering restarts with the submenu. To boot the target kernel the required entry is submenu 1 and menuentry 2 as such GRUB_DEFAULT=’1>2′

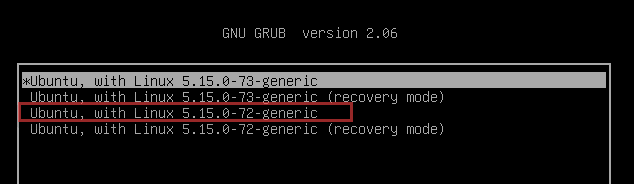
- Update grub to reflect the new changes with update-grub
root@ubuntutest:/home/pascal# update-grub
Sourcing file `/etc/default/grub'
Sourcing file `/etc/default/grub.d/init-select.cfg'
Generating grub configuration file ...
Found linux image: /boot/vmlinuz-5.15.0-97-generic
Found initrd image: /boot/initrd.img-5.15.0-97-generic
Found linux image: /boot/vmlinuz-5.15.0-94-generic
Found initrd image: /boot/initrd.img-5.15.0-94-generic
Warning: os-prober will not be executed to detect other bootable partitions.
Systems on them will not be added to the GRUB boot configuration.
Check GRUB_DISABLE_OS_PROBER documentation entry.
done - Reboot and confirm current kernel via uname -r
Method B: Changing the Default Kernel on RHEL 8/9, AlmaLinux, Rocky Linux, and CentOS
- Check all installed kernels grubby –info=ALL | egrep -i ‘index|title’
[root@server1 bashscripting]# grubby --info=ALL | egrep -i 'index|title'
index=0
title="AlmaLinux (4.18.0-477.27.2.el8_8.x86_64) 8.8 (Sapphire Caracal)"
index=1
title="AlmaLinux (4.18.0-477.21.1.el8_8.x86_64) 8.8 (Sapphire Caracal)"
index=2
title="AlmaLinux (4.18.0-477.15.1.el8_8.x86_64) 8.8 (Sapphire Caracal)"
index=3
title="AlmaLinux (0-rescue-d3961174b4cd409086ef0ce686d580d7) 8.5 (Arctic Sphynx)" - Check available kernels ls -lash /boot/vmlinuz*
[root@server1 bashscripting]# ls -lash /boot/vmlinuz*
9.8M -rwxr-xr-x. 1 root root 9.8M Jul 12 2022 /boot/vmlinuz-0-rescue-d3961174b4cd409086ef0ce686d580d7
11M -rwxr-xr-x 1 root root 11M Jul 24 2023 /boot/vmlinuz-4.18.0-477.15.1.el8_8.x86_64
11M -rwxr-xr-x 1 root root 11M Aug 10 2023 /boot/vmlinuz-4.18.0-477.21.1.el8_8.x86_64
11M -rwxr-xr-x 1 root root 11M Sep 29 08:29 /boot/vmlinuz-4.18.0-477.27.2.el8_8.x86_64
- Change the default kernel Boot entry via grubby –set-default [kernel-filename] , such as with this example, grubby –set-default /boot/vmlinuz-4.18.0-477.27.2.el8_8.x86_64
- You can also use the index number grubby –set-default-index=1 (Changing 1 here to whichever value you need).
[root@server1 bashscripting]# grubby --set-default /boot/vmlinuz-4.18.0-477.27.2.el8_8.x86_64
The default is /boot/loader/entries/d3961174b4cd409086ef0ce686d580d7-4.18.0-477.27.2.el8_8.x86_64.conf with index 0 and kernel /boot/vmlinuz-4.18.0-477.27.2.el8_8.x86_64
- You can also use the index number grubby –set-default-index=1 (Changing 1 here to whichever value you need).
- Reboot and you will be able to view the changes using uname -r and grubby –default-index
[root@server1 bashscripting]# uname -r
4.18.0-477.27.2.el8_8.x86_64
[root@server1 bashscripting]# grubby --default-index
0 - If you wish to review further details on all kernels in the system you can also use the command grubby –default-index to receive such output.
