Introduction
Moving your hosting environment is often met with a mix of excitement for better performance and the migration headache due to potential downtime. When that move is to Hivelocity, you’re stepping into a world of high-performance bare metal and top-tier support, but the success of the transition depends entirely on how you handle your cPanel account migration.
Whether you are consolidating multiple VPS instances into a single dedicated server or escaping issues of the public cloud, migrating cPanel-to-cPanel is one of the most reliable ways to move. With Hivelocity’s infrastructure, this process can be nearly invisible to your users, preserving everything from email accounts and SSL certificates to complex database configurations.
In this guide, we’ll walk through the specific steps to migrate your cPanel environment to Hivelocity. We’ll cover how to leverage our migration services and how to use the WHM Transfer Tool to migrate accounts over.
What Are the Benefits of Server Migration?
Unlike providers that hide behind chatbots, Hivelocity offers 24/7/365 on-site Human support with an average response time of under 15 minutes. When you migrate, you aren’t just getting a server, you’re gaining an auxiliary IT team. With Managed Services, Hivelocity’s experts handle your entire cPanel-to-cPanel migration. This includes your files, databases, and emails. We offer a 2-hour hardware replacement guarantee and lead the industry in customer satisfaction (NPS). Our team ensures your transition to bare metal is backed by real people, not just automated scripts.
Cost Reductions
Migrating to Hivelocity allows organizations to move away from the high Capital Expenditure (CapEx) of purchasing and maintaining on-premises hardware. However, unlike “The Big Three” public cloud providers, Hivelocity’s bare metal model eliminates the Cloud Paradox where costs spiral as you scale.
- Predictable OpEx, No Capital Risk: You get the accounting benefits of an Operational Expenditure (OpEx) model with monthly or hourly billing, but without the performance “tax” of virtualization.
- Predictable Outbound Transfer: While AWS or Azure might charge you for every gigabyte of data that leaves their network, potentially costing tens of thousands of dollars for high-traffic sites, Hivelocity includes massive buckets of outbound transfer (often 20TB standard) with every server.
- The Unmetered Advantage: For high-volume users, Hivelocity offers Unmetered 1Gbps and 10Gbps ports. This allows you to push as much data as the port can physically handle for one flat, predictable monthly fee. By switching to an unmetered plan, you effectively delete the “bandwidth tax” from your budget entirely
- Software License Stability: In 2026, with cPanel and other software costs rising, Hivelocity offers flat-rate cPanel pricing. By running on a dedicated environment, you avoid the per-user or per-instance price spikes common in multi-tenant clouds.
- Current 2026 Promo: You can currently leverage code
NEWDEDI50at checkout to receive 50% off your first three months of dedicated hosting, making the “overlap” period of your migration virtually cost-neutral.
Lower Management Overhead
Organizations often migrate to the cloud to shift the burden of maintenance from their internal teams to the provider. With Hivelocity’s Managed Services, you get Human Support that acts as an extension of your team. While your internal IT team focuses on growth, Hivelocity’s on-site technicians handle:
- Proactive Patching: Using tools like KernelCare for rebootless security updates.
- Hardware Health: 24/7 monitoring with instant replacement of failed components.
- cPanel Management: Specialized support for your hosting environment, including free migrations from competitors.
Security Hardening
Hivelocity provides single-tenant Bare Metal environments, which inherently eliminate the Noisy Neighbor and Side-Channel security risks found in multi-tenant cloud instances. By removing the shared hypervisor layer, your data remains physically isolated on its own dedicated hardware.
- Hardware Firewalls: Optional Juniper hardware firewalls are available to scrub malicious traffic at the network level before it ever reaches your operating system.
- Total Control: With full root access, you have the freedom to configure custom environment controls and advanced security tooling tailored to your specific application requirements.
Better Performance
Hivelocity servers provide significantly faster access to data because we eliminate the hypervisor overhead, if you go with dedicated hardware, which is inherent in standard virtualized cloud instances. On a typical cloud instance, a software layer sits between your app and the hardware, consuming resources and causing CPU steal time. With Hivelocity Bare Metal, your applications have direct, exclusive access to the processor and memory.
- Next-Gen Hardware: By utilizing the latest DDR5 memory and PCIe Gen5 NVMe storage, Hivelocity ensures your databases and high-traffic sites run at peak physical speed. While standard cloud SSDs often throttle IOPS, these NVMe drives can deliver millions of operations per second with near-zero latency.
- The Premium Network Blend: Performance isn’t just about the server, it’s about the pipe it sits on. Hivelocity utilizes an Intelligent Routing Platform (IRP) that automatically moves your traffic to the fastest available path among a premium blend of carriers like NTT, GTT, and Cogent.
- Global Edge Presence: With a large data center presence across continents, you can strategically place your cPanel accounts exactly where your users are. Whether your audience is in London, Seoul, or Tampa, placing data at the edge minimizes the physical distance traffic must travel, drastically reducing ping times.
- High-Throughput Ports: Every server comes standard with high-speed connectivity, ensuring that even during massive traffic spikes or large data transfers, your network interface is never the bottleneck.
What Are the Key Steps in a Server Migration?
- Evaluate Current Servers and Configurations
- The first step is a comprehensive inventory of your existing cPanel environment.
- You must document your current disk usage, the number of accounts, and specific software versions.
- Pay close attention to hidden dependencies such as custom PHP modules (e.g., IonCube Loader), specific MySQL/MariaDB versions, and cron jobs that rely on absolute file paths.
- Evaluate Target Systems
- Document the resources required on your new Hivelocity Bare Metal or VPS environment.
- Since cPanel requires overhead for backups and logs, you should provision a server with at least 20-30% more storage than your current total data volume.
- Ensure the OS and partition layout are suitable for the migration in the target server.
- Identify Migration Strategy
- For cPanel users moving to Hivelocity, the choice between migration strategies typically depends on how much you want to modernize your stack.
- Shift then transform: This is the most common approach. You use the WHM Transfer Tool to move accounts exactly as they are to the new server. Once the transfer is complete and verified, you then begin updating PHP versions or optimizing your LiteSpeed/Apache configurations on the Hivelocity hardware.
- Transform then shift: If your current server is running an end-of-life OS (like CentOS 7), you may choose to modernize your applications and databases on a staging environment first to ensure compatibility with AlmaLinux 8 or 9 before performing the final move to Hivelocity. This process can also be done on your new target server as well with Hivelocity.
- For cPanel users moving to Hivelocity, the choice between migration strategies typically depends on how much you want to modernize your stack.
- Establish the Target Environment
- Once your Hivelocity server is provisioned, you must prepare the landing zone. This involves installing cPanel/WHM (Hivelocity team will handle that), configuring the initial setup wizard, and setting up your Nameservers. If you’re utilizing the Hivelocity team for the migration itself, the team will assist you accordingly with the process.
- You should mirror the security settings of your old server, such as whitelisting the source server’s IP in ConfigServer Security & Firewall (CSF) to ensure the transfer tool isn’t blocked during the move.
- Migration Process
- With the environment ready, you perform the actual data transfer. Using the WHM Transfer Tool, you connect the two servers via SSH. The tool packages each cPanel account, moves it across Hivelocity’s high-speed network, and restores it on the new machine.
- Testing
- After the data migration, thorough testing is required before the final DNS cutover.
- Ensure all MySQL/PostgreSQL databases moved without corruption.
- Compare page load speeds on Hivelocity’s bare metal versus your old host.
- Confirm that AutoSSL has correctly identified the new IP and secured the domains.
- Send and receive test emails to verify that IMAP/SMTP settings and DKIM records remain intact.
- After the data migration, thorough testing is required before the final DNS cutover.
Matching Your Needs to a Suitable Hosting Plan
Choosing the right Hivelocity plan depends on your workload’s intensity and your need for isolation. In 2026, the transition from cloud instances to bare metal is often driven by a need for predictable costs and raw physical power.
Virtual Private Servers (VPS)
Hivelocity’s VPS is a scalable, cloud-like environment that uses premium hardware for increased performance.
- The Fit: Ideal for developers, staging environments, or low-traffic cPanel accounts (1–5 accounts).
- The Advantage: It offers the most flexibility at the lowest price point, with instant deployment in under 10 minutes.
Virtual Dedicated Servers (VDS)
A VDS offers the agility of a VPS but with unshared physical resources.
- The Fit: Perfect for medium-sized cPanel fleets (6–30 accounts) or resource-sensitive applications like Magento or WooCommerce.
- The Advantage: Because the CPU cores and RAM are 100% yours, you avoid the performance dips caused by other users on the same node.
Bare Metal Dedicated Servers
This is a single-tenant environment where you own the entire physical chassis.
- The Fit: Massive cPanel environments (30+ accounts), high-traffic streaming, and AI training or inference.
- The Advantage: You get 0% hypervisor overhead and massive network throughput. It eliminates the Egress Fees typical of public clouds, making it much cheaper for data-heavy operations.
How to Transfer Web Hosting to Hivelocity: A Step-by-Step Guide
Moving your infrastructure to Hivelocity is more than a file transfer. It is an opportunity to optimize your stack on world-class bare metal. While migrating cPanel accounts can feel daunting, a structured workflow ensures your data remains safe. By using the WHM Transfer Tool and aligning your environments early, you can transition to our high-performance network with total confidence. Here is an overall view on how to execute a migration from start to finish.
| While the steps below outline a simplified process, large-scale migrations involving multiple accounts can present complex challenges. We highly recommend contacting the Hivelocity support team for assistance. Our experts are fully qualified to manage cPanel-to-cPanel migrations, ensuring a smooth and secure transition. |
Pre-Migration Infrastructure Check
Before moving data, ensure your new “foundation” is solid.
- Hardware Audit: Check your drive health on the new server to ensure you have plenty of overhead. You can utilize the command
df -has shown below.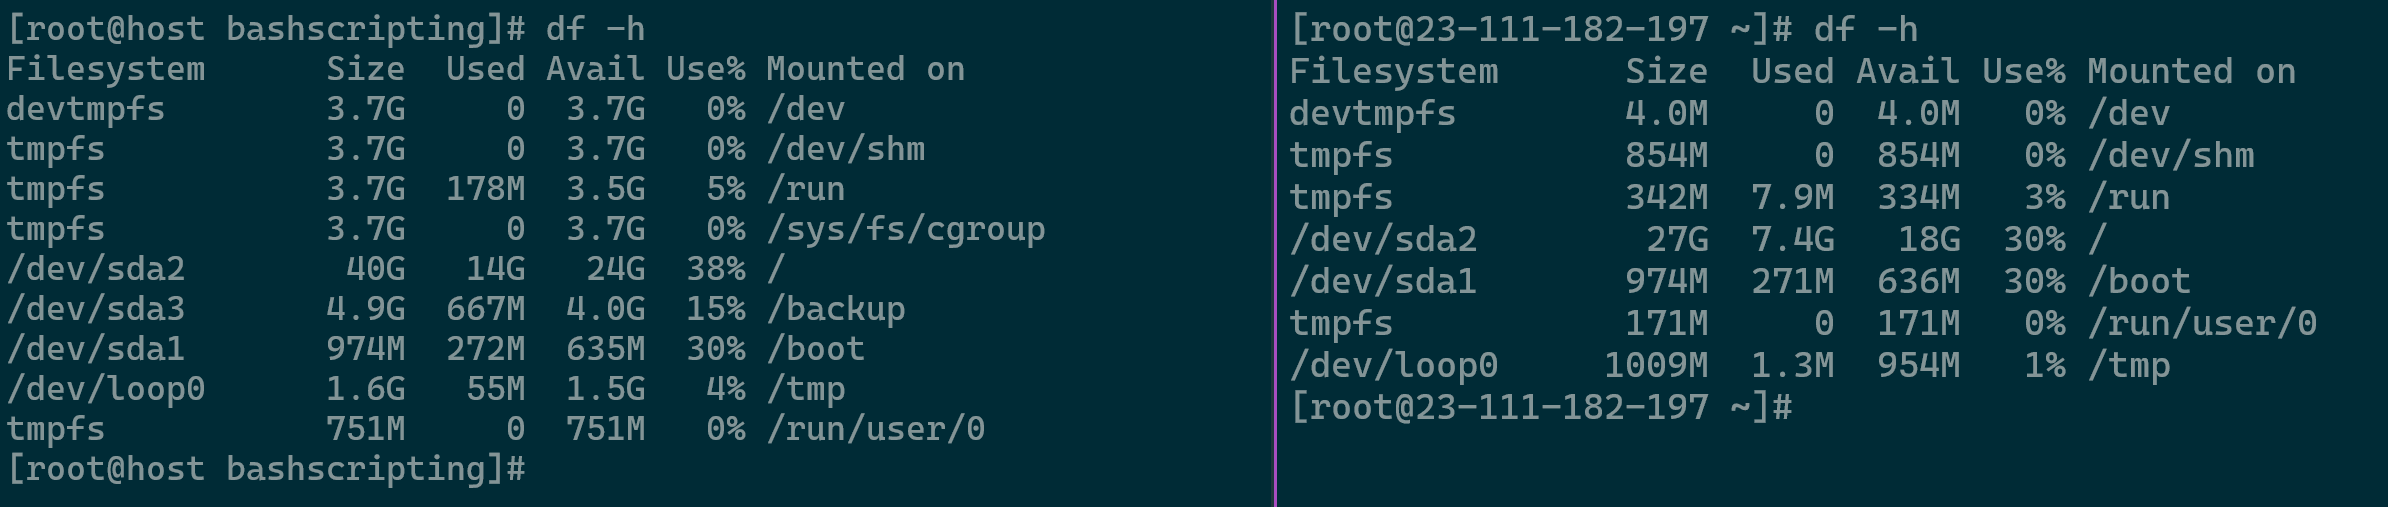
Reviewing Source and Target Servers Storage Conditions – Important to review partition layout as well - Database Maintenance: Run a quick health check on your old server’s databases to ensure no corrupted data is moved. Use the command
mysqlcheck -c -u root -p --all-databasesto run a health check on all databases without forcing a repair. Acquiring your DB password can be done viamy_print_defaults -s client.

Inspecting DB Health - Security Whitelisting: Both servers need to talk to each other. Temporarily whitelist your old server’s IP in the Hivelocity firewall (and vice versa) so the transfer doesn’t get blocked mid-way.
- Site Check: Documenting the operational status of all sites prior to migration is essential for accurate post-migration validation.
- Backups: Create comprehensive backups on the source server should any issues arise.
Matching Your “Stack” (Apache & PHP)
One of the most common reasons a site fails after migration is a mismatch in software.
- EasyApache Profiles: You can actually download your existing “EasyApache” profile from your old server and upload it to the Hivelocity server within EasyApache 4 in your WHM. This ensures all your PHP modules and Apache settings match exactly. Once the installed packages are converted to a profile, it can be downloaded and imported in the new server.
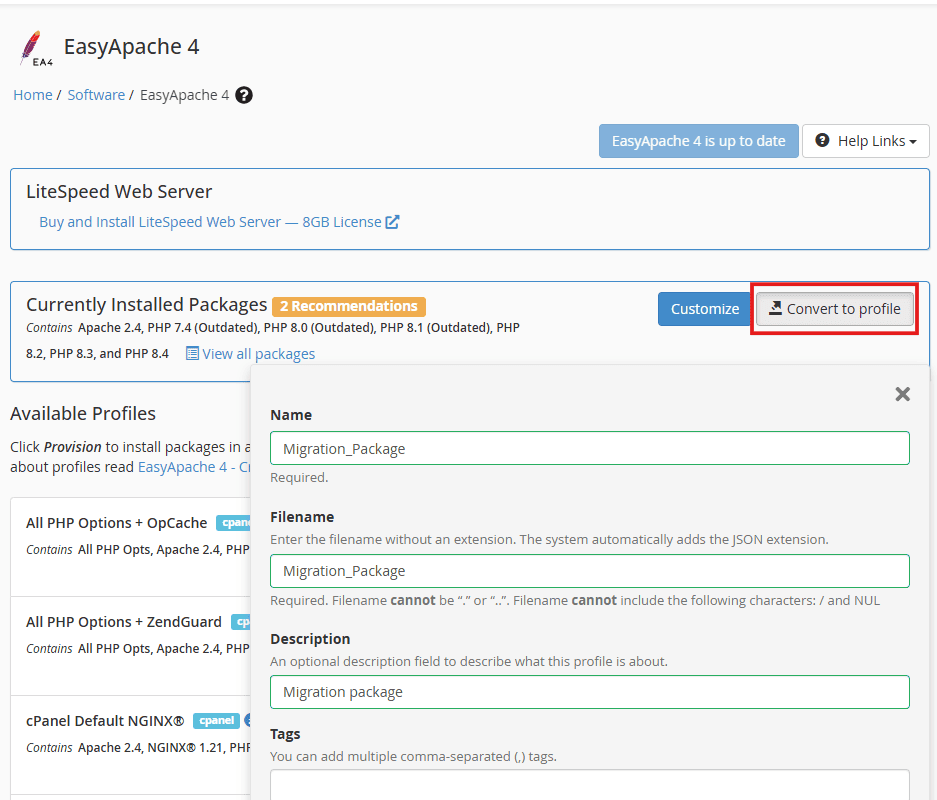
Converting Installed Packages to an EA4 Profile - PHP Versions: Use the MultiPHP Manager in WHM to make sure your new Hivelocity server has the same PHP versions (e.g., 7.4 or 8.2) as your source. Note that some OS versions especially newer ones, do not allow older PHP versions such as 7.x so you might have to update your site code, plugins, and themes.
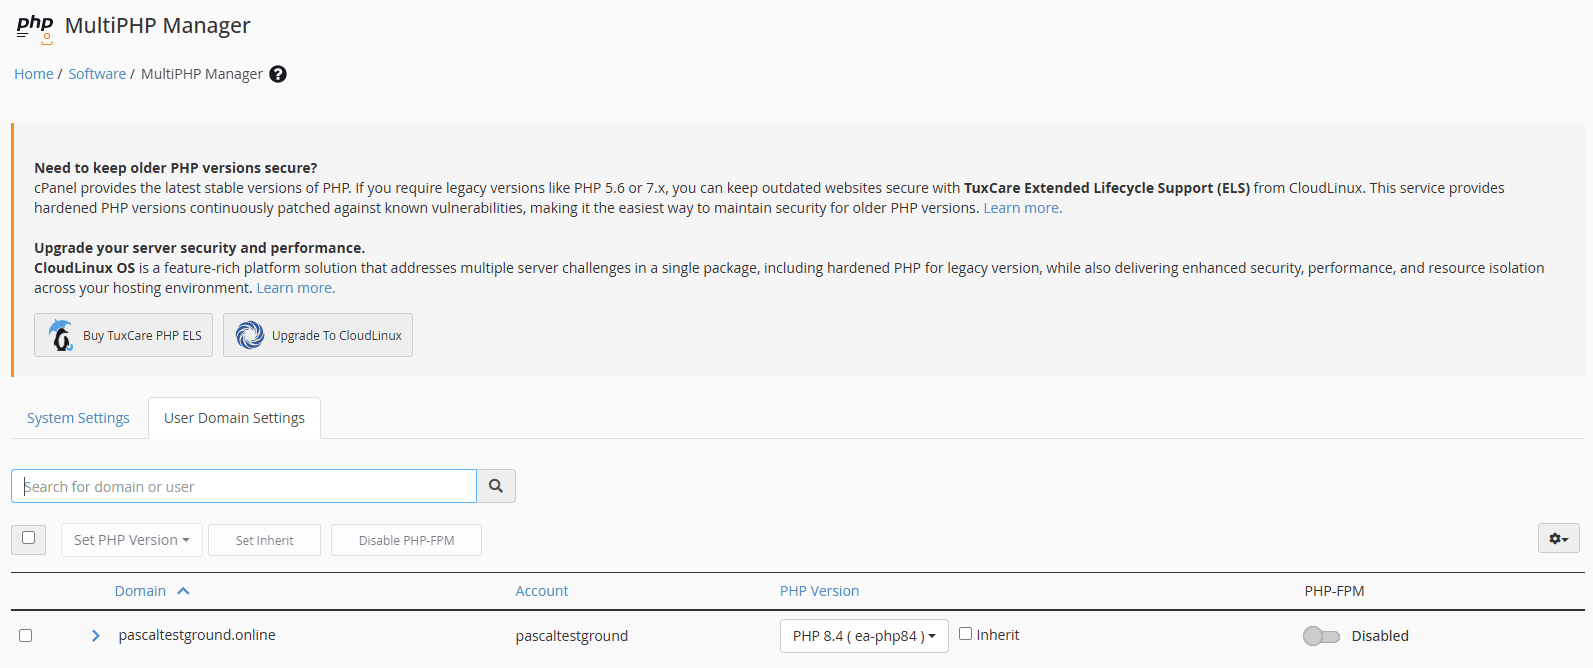
User Domain PHP Version Breakdown
The Database Engine (MySQL/MariaDB)
Your database version must be a close match however if in older version, it is recommended facilitating into a newer version.
- Version Alignment: If your old server uses MariaDB 10.5, your new server’s cPanel DB engine version should be set to 10.5, 10.6 or 1.11. You can review existing DB engine version using
mysql -v.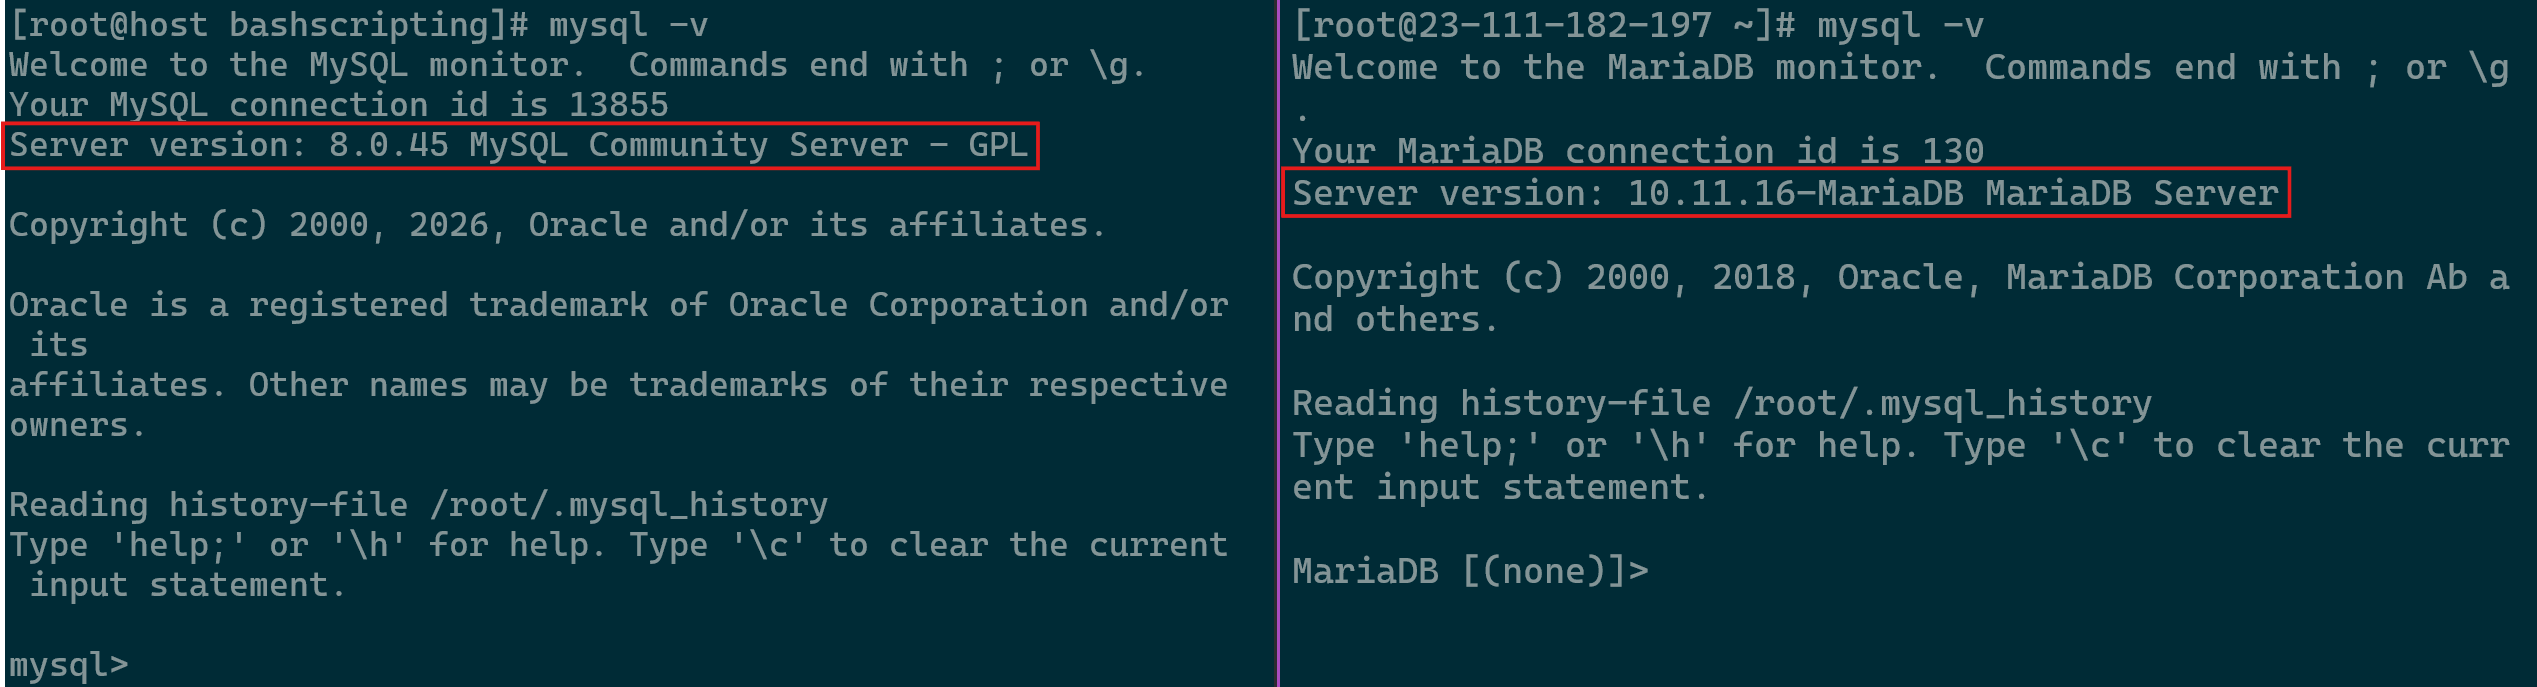
Database Version Comparison Between Source and Target - Upgrading Version: We recommend moving to the closest stable version, such as MySQL 8.0 or MariaDB 10.6, to ensure long-term security if you’re coming from a 5.x version.
- The Strict Mode Trap: This is a common post-migration headache. If your old server had “Strict Mode” disabled but your new Hivelocity server has it enabled, your website may fail to save data or process forms. Your migration should include checking the my.cnf configuration file on both servers to ensure these settings match.
- Handling Large Databases: If your
/var/lib/mysqldirectory is massive, the automated Transfer Tool might time out. In these cases, Hivelocity pros often perform a manual “Dump and Rsync”:- Create a compressed backup (
mysqldump) on the old server. - Use
rsyncto move that file to Hivelocity via their high-speed backbone. - Import the data directly into the new engine. Always check your database mapping after the move. Occasionally, a database moves over but loses its connection to the specific cPanel user. Using the WHM Database Map Tool quickly re-links them so your site can talk to its data again.
- Create a compressed backup (
Executing the Transfer
Now for the actual move. We use the WHM Transfer Tool because it is the safest, most comprehensive method.
- Automated Transfer: Log into your Hivelocity target server’s WHM, enter your old server’s root password, and the tool will list all your accounts.
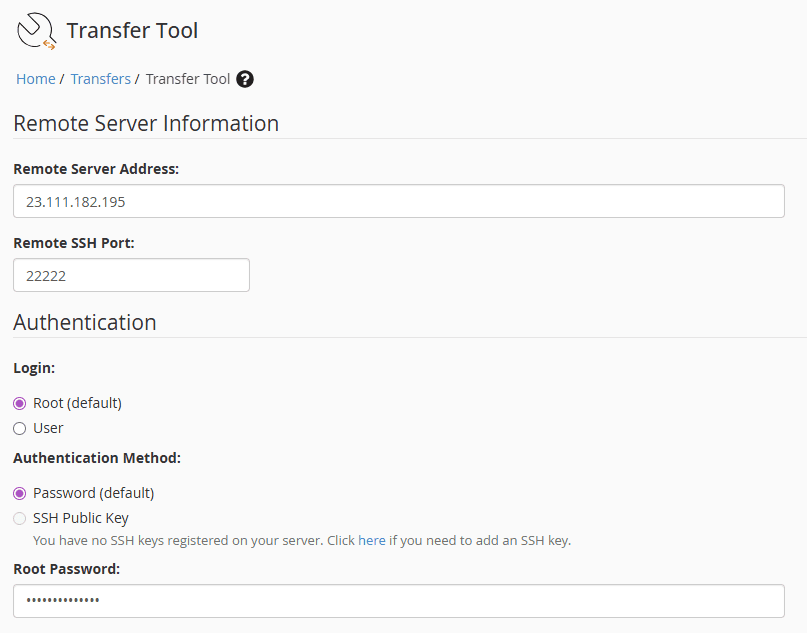
Using Transfer Tool to Scan Source Server - Live Transfer Feature: For most users, we recommend disabling “Live Transfer” to avoid any configuration conflicts, then enabling it for the final sync once you’ve tested the sites. To ensure a seamless transition and keep webpages serving from the old host during a DNS cutoff, follow these steps:
- Disable the “Update DNS Zone” option. This prevents premature propagation and keeps your site live on the old server while you work.
- Select your Packages and Service Configurations (typically all of them).
- Once confirmed, click the Copy button to begin the transfer.
- Once the transfer is complete, you will find the new account in the target server.
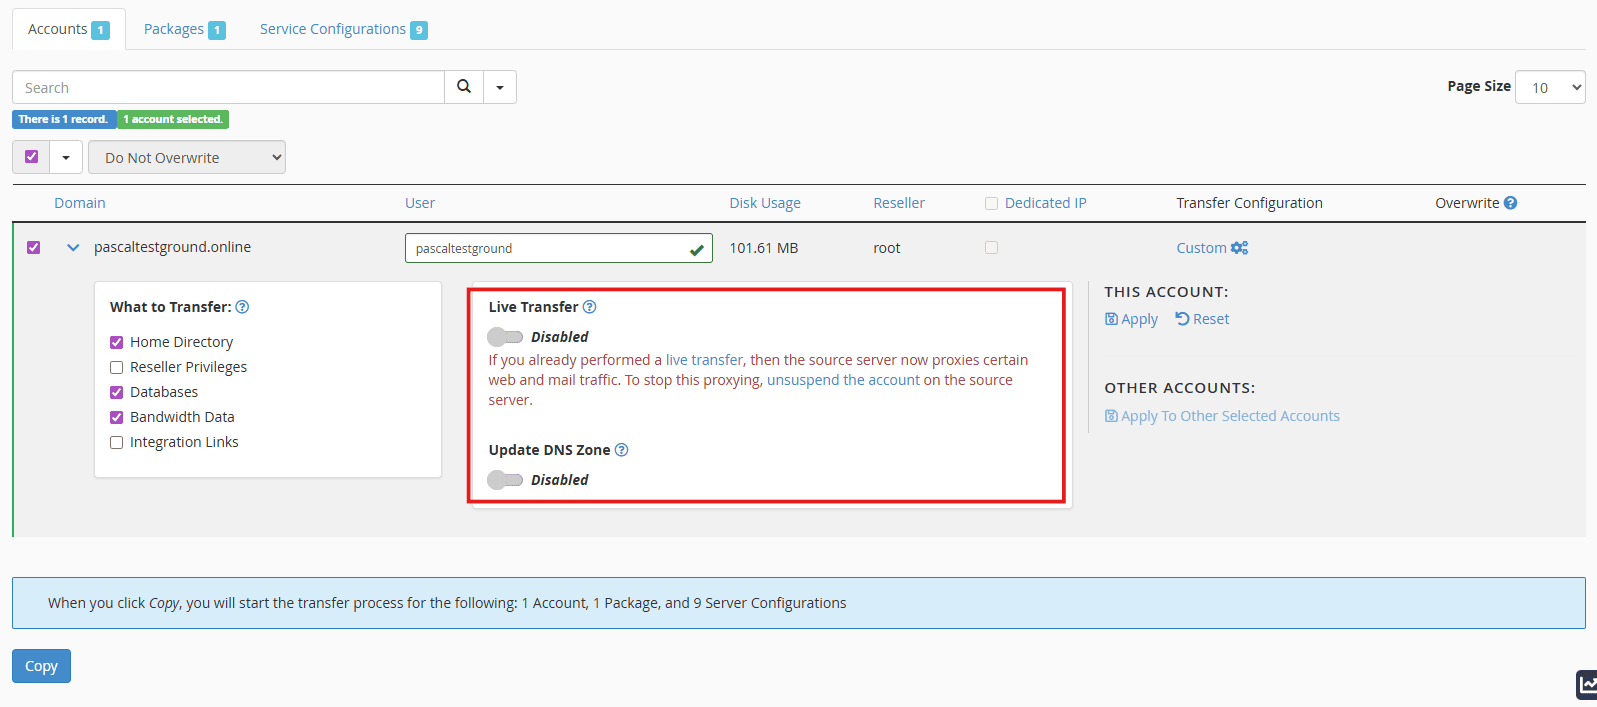
Account Transfer via WHM Transfer Tool 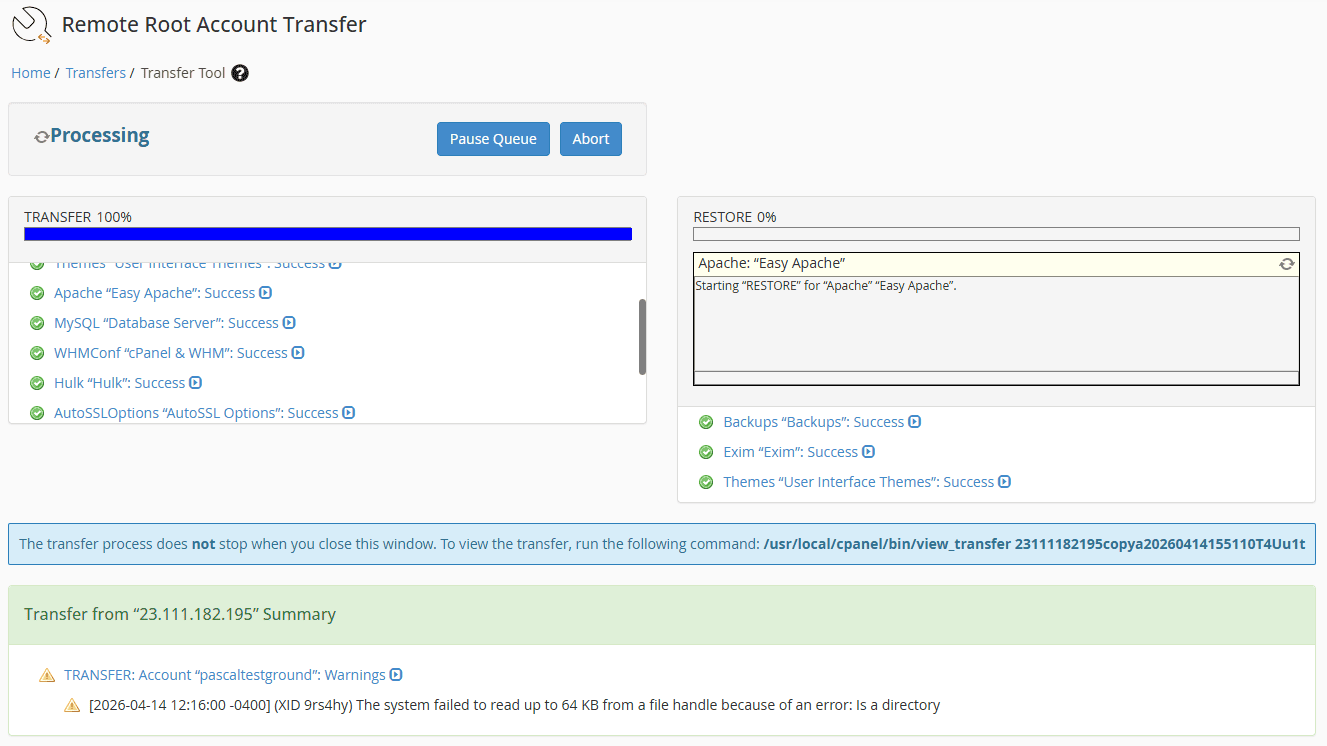
Account Transfer
Testing with the “Hosts File”
This is the secret weapon of pro migrators. You can view your website on the new Hivelocity server before you change your DNS to the new server.
- By editing a small file on your own computer (the “hosts” file), you tell your browser to look at the Hivelocity IP for your domain.
- In windows you can find it in C:\Windows\System32\drivers\etc\hosts and it can be opened with Notepad. In Linux you can find it in /etc/hosts and it can be opened with vi/vim/nano.
- This allows you to log into your site, click around, and ensure everything is perfect while the rest of the world still sees the old server.
Final Sync & DNS Handoff
Once you are 100% happy with your tests, it’s time to finalize the move.
- The Final Sync: If your site is active (like a shop or a busy blog), run the Transfer Tool one last time to sync only the newest database entries and emails. Make sure you select the items below only for said account.
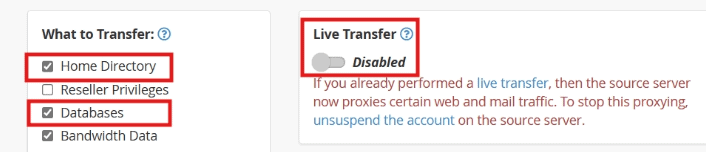
Final Sync - DNS Update: Log into your domain registrar and point your nameservers to your new Hivelocity IPs and ensure to utilize the DNS Zone Manager in WHM to configure your nameservers and DNS records.
- Changes to the nameservers to be used in the server can also be done through WHM’s Basic WebHost Manager® Setup which is recommended.
- The site dnschecker.org can assist with inspection of DNS records.
Most Common Issues After Website Migration
Even with a perfect plan, migrations can occasionally hit a technical snag. Most issues during a cPanel-to-cPanel move stem from credential mismatches or account size. Here is how to resolve the most frequent hurdles.
“Error Connecting to Database”
If your website loads a white screen with this error, the application cannot talk to the MySQL engine.
- Check Credentials: Verify the MySQL root password. If there is a mismatch, reset the password via WHM » MySQL Root Password.
- Database Mapping: Sometimes the database transfers but loses its “link” to the cPanel user. Use the WHM Database Map Tool to reassign the database to the correct account.
- Manual Migration: If the automated tool fails to move a specific database, perform a manual export via
mysqldumpon the source and import it via CLI on your Hivelocity server.
Large Accounts Failing to Migrate
High-capacity accounts with massive /home directories can cause the Transfer Tool to time out or crash.
- The Manual Package: If the tool fails, log into the source server and package the account manually using
/scripts/pkgacct [username]. Move the resulting file to the target server and restore it via WHM » Restore a Full Backup within the cPanel account itself. - The “Skip Home” Strategy: If packaging still fails due to size, package the account using the
--skiphomedirflag. This moves the “bones” of the account (emails, DBs, and settings) quickly. You can then usersyncto move the actual web files in the/homedirectory over Hivelocity’s high-speed backbone separately.
Failed to Login as Root at Localhost
If you find yourself locked out of the command line or WHM despite having the correct credentials, it is often a configuration or shell issue.
-
The Fix: Reach out to the Hivelocity team to reset the password or utilize the IPMI console to perform a root password reset.
Permission Denied (13) During Rsync
You may see errors like rsync: opendir "/home/user/public_ftp" failed: Permission denied (13).
-
The Fix: These are typically non-fatal errors. cPanel often creates system folders with restricted permissions that the transfer tool cannot read. As long as your
public_htmlandmailfolders sync successfully, these warnings can usually be safely ignored.
Reaching out to Hivelocity Support
If your server goes dark or your migration hits a wall at 3:00 AM, the Technical Support team is on-site and ready. You can reach them via live chat, the myVelocity portal, or by calling (888) 869-4678. Beyond emergency fixes, our experts are available to discuss high-level infrastructure strategy and custom architecture. We can help you map out the ideal migration path and ensure your hardware scales alongside your business. Whether you need a midnight reboot or a long-term growth consultation, we are here to act as an extension of your team.
