Overview
Logical Volume Manager (LVM) is a layer of abstraction between your physical storage and your operating system. In a traditional setup, your OS looks directly at disk partitions. With LVM, the OS looks at Logical Volumes which can span across multiple physical disks and be resized on the fly.
LVM consists of three pillars with a distinct hierarchy:
- Physical Volumes (PV) are your raw storage devices such as
/dev/sdbor/dev/sdc1. Before LVM can use a disk, it must be initialized as a PV. - Volume Groups (VG) is the pool of storage. You combine one or more Physical Volumes into a single Volume Group. Think of this as a giant bucket of storage capacity.
- Logical Volumes (LV) are the partitions you use. You carve LVs out of the Volume Group and format these with a filesystem (like ext4 or XFS) and mount them just like a regular disk.
Unlike rigid standard partitioning, LVM (Logical Volume Manager) treats storage as a flexible pool which has various benefits if you deploy your system with LVM.
- Dynamic resizing allows you to expand volumes instantly while the system is running. Shrinking is also supported (Requires unmounting).
- Disk spanning combines multiple physical drives into a single, massive logical volume.
- Snapshots can create frozen point-in-time copies of your data for safe backups or risk-free testing.
- Thin Provisioning allows you to allocate virtual space beyond your physical capacity, adding real hardware only as needed.
Due to the complexity involved in converting an existing operating system to LVM, this article assumes the OS was installed with LVM configured during the initial setup.
Can I Modify My Existing OS to Use LVM?
Performing an in-place LVM conversion on a live operating system forces you to modify the disk’s underlying structure while the kernel is actively reading and writing to it. Because the OS cannot unmount itself to relocate data blocks, any attempt to rewrite the partition table or inject LVM metadata will cause a critical mismatch between the system’s memory and the physical disk, resulting in an immediate crash and total data loss.
The best path to create a system with LVM is to deploy it accordingly during the OS installation process.
Retrieving Status Information
These commands form the essential toolkit for managing and auditing your LVM hierarchy, ranging from scanning raw disks to inspecting specific logical layers.
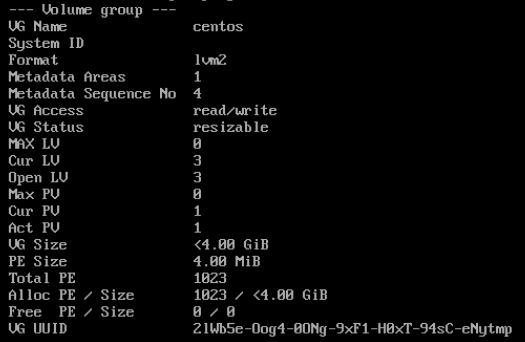
The vgdisplay command will output the Volume Group layout of your LVM setup.
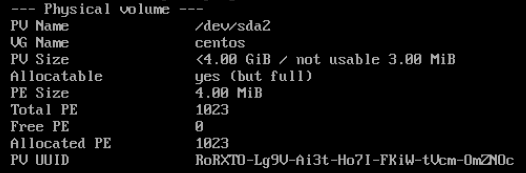
The pvdisplay command will output the Physical Volume layout of the involved partition used within the LVM.
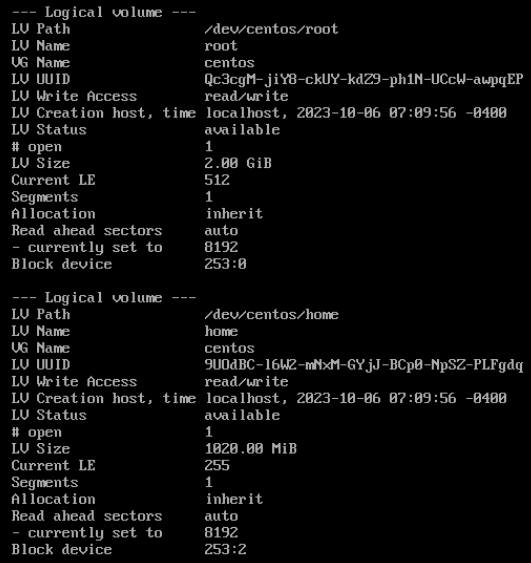
The lvdisplay command will output the Logical Volume which consists of each and every LV in the system.
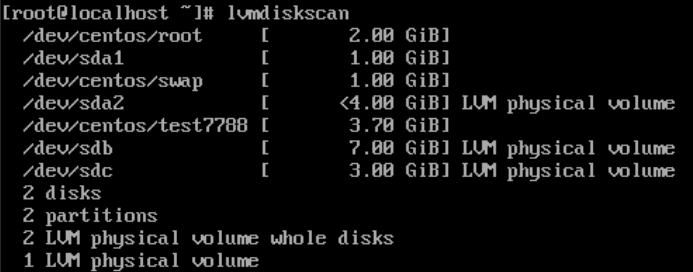
The lvmdiskscan command displays existing storage devices.
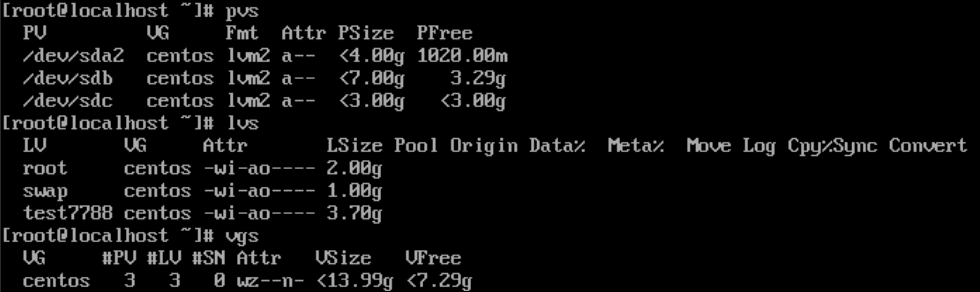
- The pvs command provides a summary of each Physical Volume, showing its associated Volume Group and free space.
- The vgs command displays a high-level overview of Volume Groups, including the number of LVs they contain and total capacity.
- The lvs command lists each Logical Volume with its current size, attributes, and the Volume Group it belongs to.
Renaming VGs and LVs
While VGs and LVs can be renamed using the steps below, proceed with caution to avoid configuration errors or mount failures.
Renaming VGs
- The command to utilize is
vgrename -v <old VG name> <new VG name>as per the template. - Update the /etc/fstab by changing the VG names wherever they are to the new one.
- Update the grub2 conf file at /boot/grub2/grub.cfg by changing each old VG name entry to the new one for each kernel version, if applicable.
- old_VG_name/root
- /dev/mapper/old_VG_name
- Rebuild the kernel initramfs file to reflect the LVM VG name change.
ls -al /boot/initramfs-and tab it to complete and find the latest kernel.uname -rto view the current kernel and see that it matches the above.mkinitrd -f -v /boot/initramfs-$(uname -r).img $(uname -r)ls -al /boot/initramfs-and tab it to complete and find the latest kernel to see that it has a new date and time on its creation to ensure it was completed.
Renaming LVs
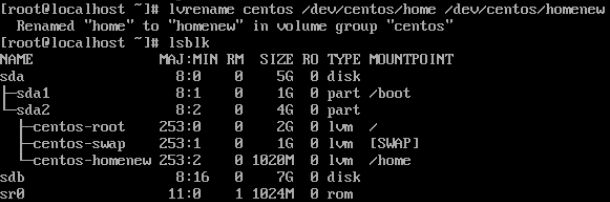
- Renaming a logical volume is done via command
lvrename <VG name> <LV_path_old> <LV_path_new>as per the template. - Ensure to make that change in /etc/fstab as well.
- Note that there is no need to make grub and initramfs changes as above for this change.
Increasing a LV Size After Adding a Storage Device (New PV)
Expanding a Logical Volume with new hardware requires first adding the new disk as a Physical Volume to your Volume Group to increase the total storage pool. Once the pool is enlarged, you can extend the Logical Volume and its underlying filesystem to immediately utilize the fresh capacity without unmounting. In this example we are adding /dev/sdb to the drive pool.
- The command
vgdisplaywill show the VG name. - The command
vgextend <VG name> /dev/sdbwill add /dev/sdb to the drive pool.
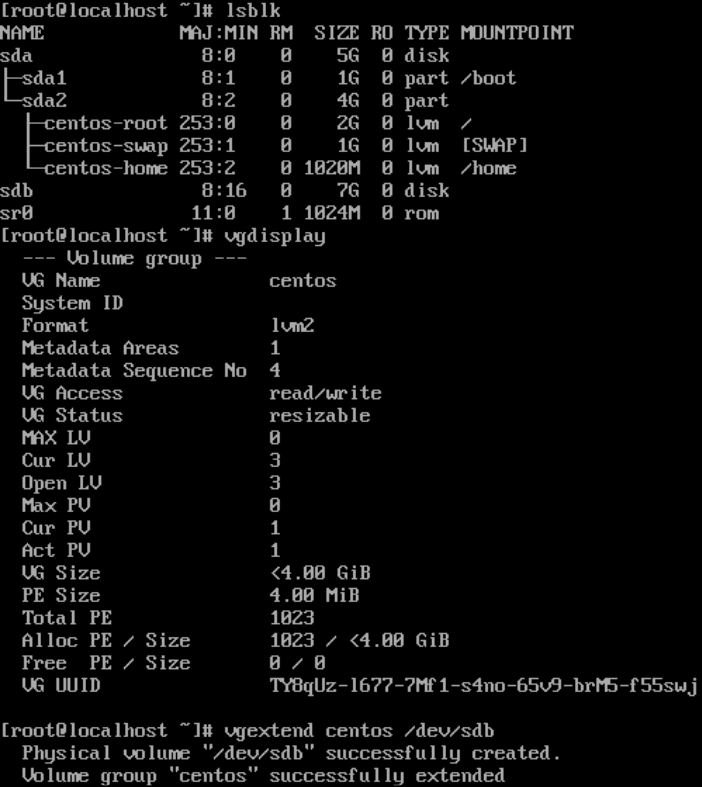
Viewing Volume Group and Adding a Drive - Post extension you will see the new size on the VG which took the 7G drive and added it to the existing 4G VG to total 10.99GiB. Note that doing so will actually act as if you used pvcreate on the new drive.
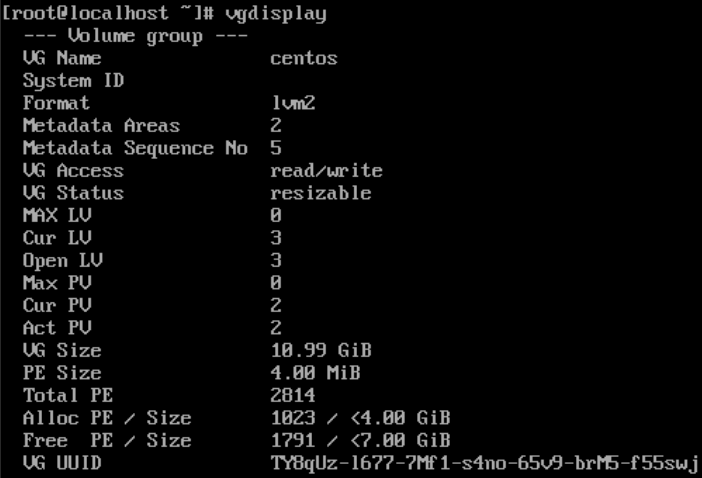
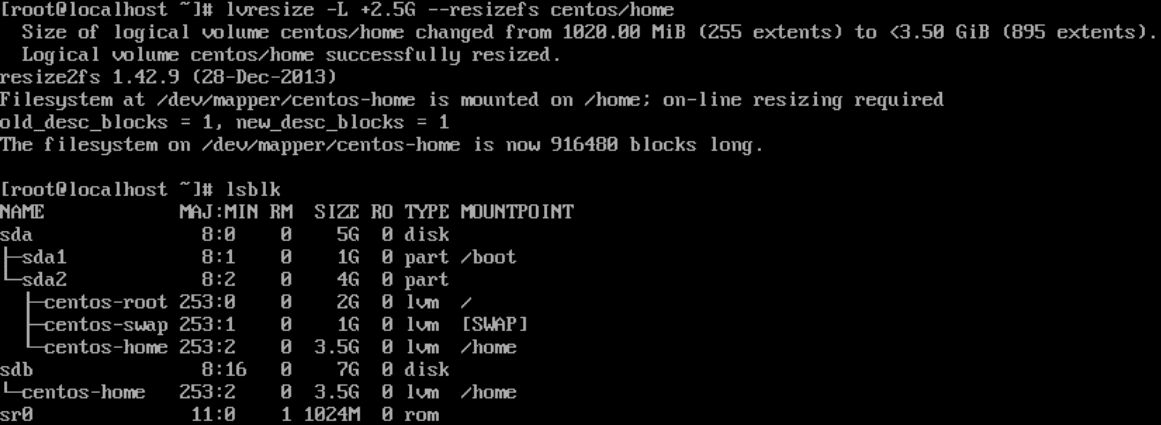
Extended VG - The command
lvresize -L +2.5G --resizefs <vg name>/<lv namewill increase the size of /home by 2.5G from the new PV. Note that you will see the same mount point in both drives because they share that space.- If you do not use the –resizefs flag then you need to increase the size of your filesystem. The resize2fs command will be required while specifying the logical volume to be expanded.
Resizing LV
- If you do not use the –resizefs flag then you need to increase the size of your filesystem. The resize2fs command will be required while specifying the logical volume to be expanded.
Reducing a LV Size
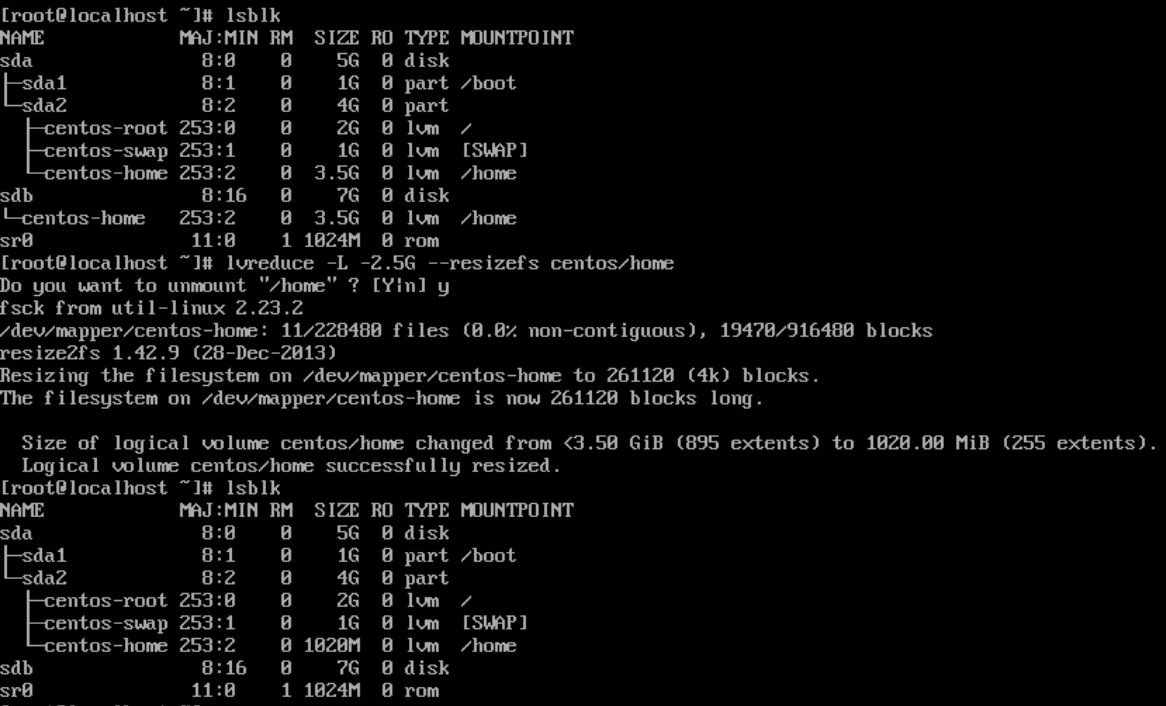
Reducing a Logical Volume is a high-risk operation that must be done in reverse order: you must first shrink the filesystem to fit within the new boundaries before reducing the Logical Volume itself. Because many filesystems (like XFS) do not support shrinking, this process often requires unmounting the volume to prevent catastrophic data corruption. In this example the command will shrink the filesystem and reduce the LV size.
Run the command lvreduce -L -2.5g --resizefs <vg name>/<lv name with the relevant information to reduce the size of /home by 2.5G from the PV.
Removing a LV
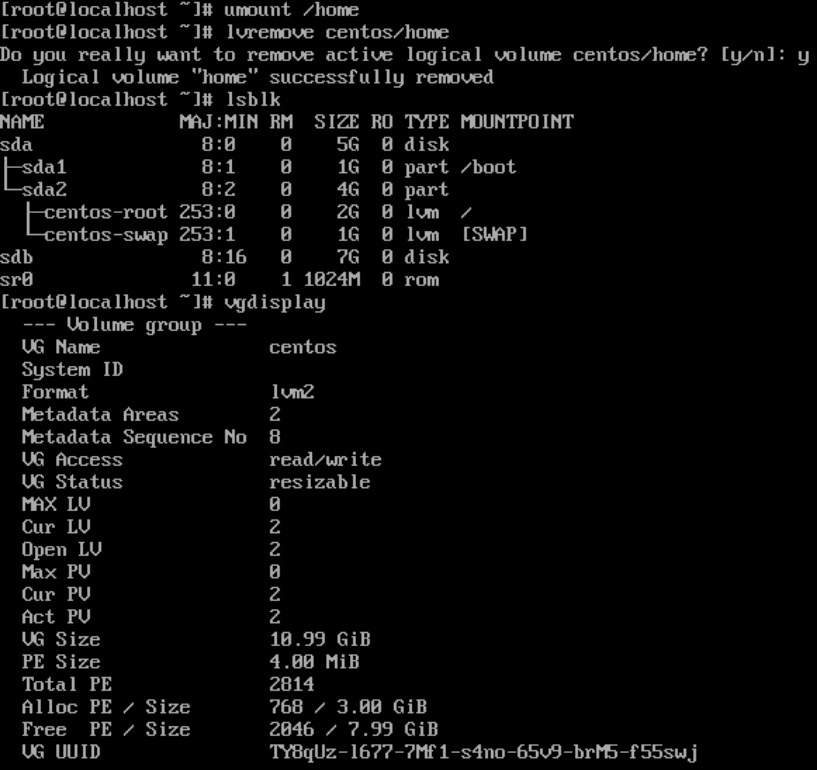
To remove a Logical Volume, you must first unmount it and remove its entry from /etc/fstab to prevent system boot errors. Once the volume is inactive, the lvremove command deallocates its space, immediately returning those extents back to the Volume Group for reuse by other volumes.
- Proceed to unmount the LV using
umount <mount point> - Ensure to remove or comment out the entry from the /etc/fstab file.
- Run the command
lvremove <vg name>/<lv name>to remove the LV.
Creating and Formatting a LV
LVM allows you to create virtual partitions that can be easily resized or moved across multiple physical disks. To set one up, you simply allocate space from a Volume Group using lvcreate and then apply a filesystem like Ext4 or XFS so the operating system can store and manage files.
- Using
lvcreate -L 3.7G -n <LV name> <VG name>will create a LV in your VG with the size of 3.7G as an example.
Devices List Before LV Creation 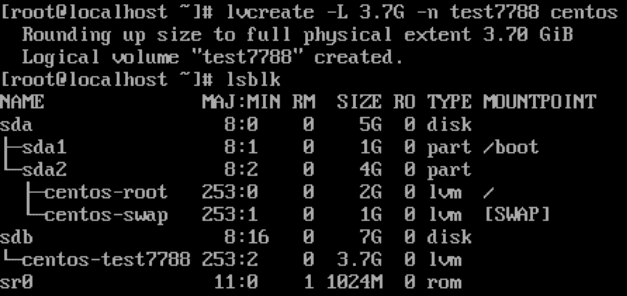
Drive Layout Post LV Creation - Format the new LV partition you made with
mkfs -t <FS type> <Logical Volume you created>. - Make sure to use
blkidand get the UUID to apply it properly to /etc/fstab after you created the mount point.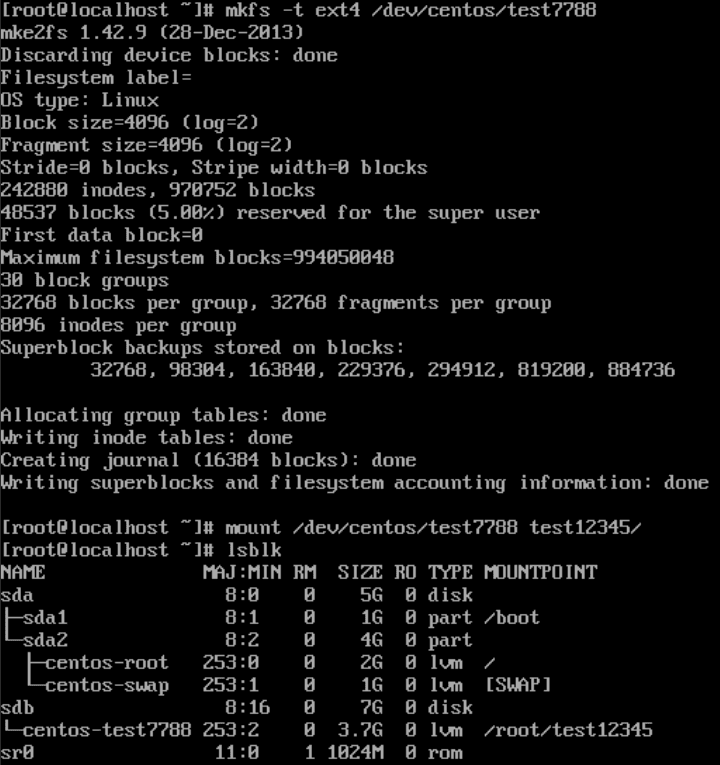
Creating a Filesystem on the New LV
Adding a Storage Device to a New PV
Initializing a storage device as a Physical Volume (PV) is the foundational step where LVM marks a raw disk as a usable building block for your virtual storage pool. This process writes a specific metadata header to the drive, allowing the operating system to recognize it as a dynamic resource rather than a static, fixed-size partition. Once a device is a PV, its capacity is ready to be merged into a larger Volume Group, providing the flexibility to expand your storage as needed.
- System status prior to adding a storage device to a new PV.
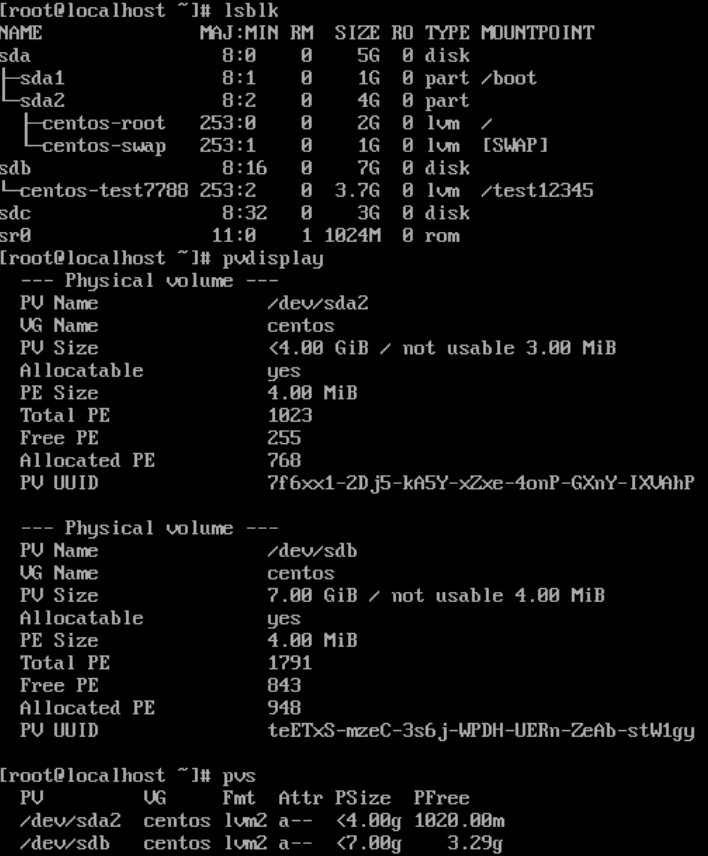
System Prior to Adding a Storage Device - Utilize the command
pvcreate /dev/sdcto create a PV with the new drive.
Creating a PV with the New Drive - Extend the new PV to a new VG or the existing VG using the command
vgextend <vg_name> <drive path>
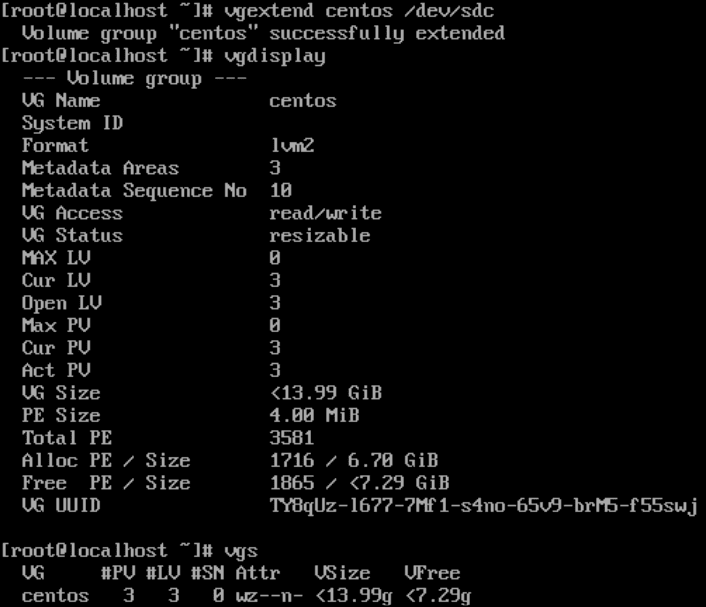
Extending the VG
Decreasing a LV Size and Increasing Another
To decrease one Logical Volume and increase another, you must first shrink the filesystem and the volume itself to free up capacity within the Volume Group pool. This released space can then be instantly reallocated to a different Logical Volume, allowing you to shift storage between partitions dynamically to meet changing data demands.
In this example we will be taking 5GB from /home and reallocating it to /
Current system layout:
[root@23-111-182-196 ~]# lsblk
NAME MAJ:MIN RM SIZE RO TYPE MOUNTPOINTS
sda 8:0 0 50G 0 disk
├─sda1 8:1 0 1G 0 part /boot
└─sda2 8:2 0 49G 0 part
├─almalinux-root 253:0 0 34G 0 lvm /
└─almalinux-home 253:1 0 15G 0 lvm /home
sr0 11:0 1 1.7G 0 rom
- Unmount the home directory
umount /home - Check the filesystem for errors
e2fsck -f /dev/mapper/almalinux-home\ - Resize the /home filesystem to 10G from 15G
resize2fs /dev/mapper/almalinux-home 10G - Reduce the /home logical volume to 10G
lvreduce -L 10G /dev/mapper/almalinux-home - Mount the home directory
mount /home - Extend the root logical volume by 5G
lvextend -L +5G /dev/mapper/almalinux-root - Resize the root filesystem to use the new space
resize2fs /dev/mapper/almalinux-root
[root@23-111-182-196 ~]# lsblk
NAME MAJ:MIN RM SIZE RO TYPE MOUNTPOINTS
sda 8:0 0 50G 0 disk
├─sda1 8:1 0 1G 0 part /boot
└─sda2 8:2 0 49G 0 part
├─almalinux-root 253:0 0 34G 0 lvm /
└─almalinux-home 253:1 0 15G 0 lvm /home
sr0 11:0 1 1.7G 0 rom
[root@23-111-182-196 ~]# umount /home
[root@23-111-182-196 ~]# e2fsck -f /dev/mapper/almalinux-home
e2fsck 1.46.5 (30-Dec-2021)
Pass 1: Checking inodes, blocks, and sizes
Pass 2: Checking directory structure
Pass 3: Checking directory connectivity
Pass 4: Checking reference counts
Pass 5: Checking group summary information
/dev/mapper/almalinux-home: 11/983040 files (0.0% non-contiguous), 88340/3932160 blocks
[root@23-111-182-196 ~]# resize2fs /dev/mapper/almalinux-home 10G
resize2fs 1.46.5 (30-Dec-2021)
Resizing the filesystem on /dev/mapper/almalinux-home to 2621440 (4k) blocks.
The filesystem on /dev/mapper/almalinux-home is now 2621440 (4k) blocks long.

[root@23-111-182-196 ~]# lvreduce -L 10G /dev/mapper/almalinux-home
File system ext4 found on almalinux/home.
File system size (10.00 GiB) is equal to the requested size (10.00 GiB).
File system reduce is not needed, skipping.
Size of logical volume almalinux/home changed from 15.00 GiB (3840 extents) to 10.00 GiB (2560 extents).
Logical volume almalinux/home successfully resized.
[root@23-111-182-196 ~]# mount /home
[root@23-111-182-196 ~]# lvextend -L +5G /dev/mapper/almalinux-root
Size of logical volume almalinux/root changed from 33.99 GiB (8702 extents) to 38.99 GiB (9982 extents).
Logical volume almalinux/root successfully resized.
[root@23-111-182-196 ~]# resize2fs /dev/mapper/almalinux-root
resize2fs 1.46.5 (30-Dec-2021)
Filesystem at /dev/mapper/almalinux-root is mounted on /; on-line resizing required
old_desc_blocks = 5, new_desc_blocks = 5
The filesystem on /dev/mapper/almalinux-root is now 10221568 (4k) blocks long.

[root@23-111-182-196 ~]# lsblk
NAME MAJ:MIN RM SIZE RO TYPE MOUNTPOINTS
sda 8:0 0 50G 0 disk
├─sda1 8:1 0 1G 0 part /boot
└─sda2 8:2 0 49G 0 part
├─almalinux-root 253:0 0 39G 0 lvm /
└─almalinux-home 253:1 0 10G 0 lvm /home
sr0 11:0 1 1.7G 0 rom
Further Assistance
The Hivelocity team is able to assist with LVM setup, further configuration, or any troubleshooting 24/7 by simply reaching out to us via phone (888-869-4678), chat, or a support ticket.
— Written by Pascal Suissa
