Welcome back to our series covering all things Docker. In our previous article, An Introduction to Docker: What is Docker & What Are Its Benefits?, we covered the basics of what the Docker platform is as well as some of the advantages containers provide over traditional deployment methods. But now that you know that your organization would likely benefit from using a containerization solution like Docker, how do you get started?
Well, first we need to understand a few key components of Docker, specifically Docker Volumes and Docker Networking, and how these help optimize your containers system-wide.
Eager to start experimenting with Docker? For those ready to install Docker on their system, feel free to jump ahead to the Installing Docker section at the bottom of this article, for an overview of how to easily install Docker onto your preferred Linux operating systems.
Docker and Persistent Data
One of the key differences between Docker and traditional deployment methods is in how data is stored. Containers are considered to be “ephemeral”. This means that containers do not persistently store any data. This is a key aspect of stateless architecture, which means that referencing previous data (state) is not tied directly to running instances of a server.
Stateless architecture provides a few key advantages, including easier to scale applications, simpler methods of implementing failover, and increased flexibility between services.
For example, if you have a currently running container containing a service and you enter the command docker kill container-name (replacing “container-name” with the name of your designated container) followed by docker rm container-name, Docker will completely remove the container along with any changes made to the service inside the container. Re-running the docker run command would then provide a fresh instance of the container, with no changes surviving from the previous instance.
So How Does Docker Persistently Store Data?
Docker stores lasting data in something called volumes or bind mounts.
A volume is a store for data that is managed by Docker. You simply name your volume and provide it a directory within the container to map to. Volumes are the preferred choice for storage in Docker. This is because volumes can be shared between containers and easily backed up or migrated to a different container, in addition to other Docker storage features. Docker volumes can be managed with ease via the Docker API or CLI tools.
A bind mount is a mapping from the host directory to a directory within the container. This is accomplished by stating a location on the host, say /home/user/application, and mapping it to a directory on the container. This is useful if there are config files that need to be edited frequently, as this can be done conveniently using a cli text editor on the host.
To help illustrate these differences, I’ve included a diagram below with a bind mount and volume configured as persistent storage for a MySQL container alongside Ghost (an alternative to WordPress). In the diagram, our persistent storage is mapped to the /var/lib/mysql container side.
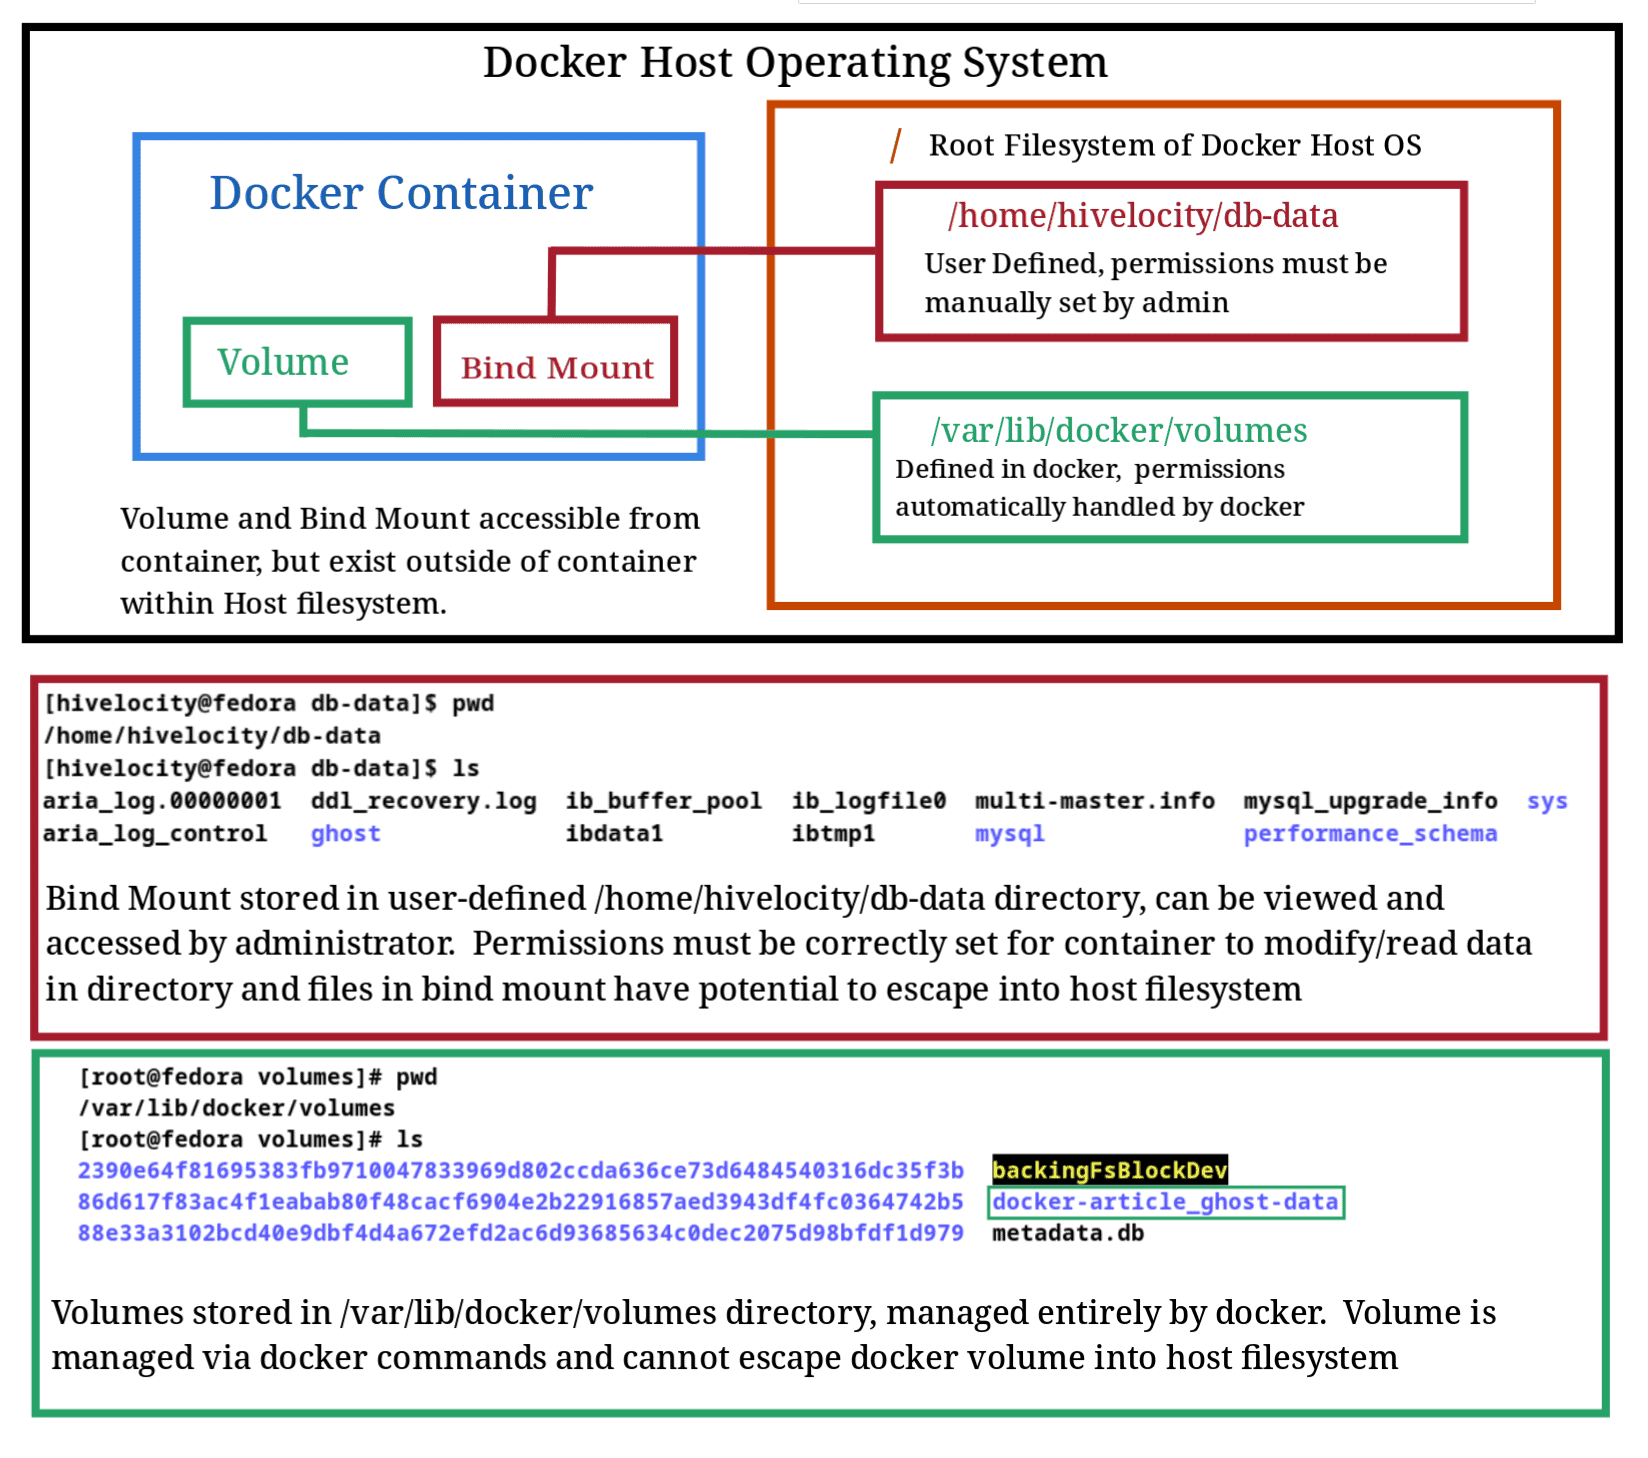
In the diagram above, we can see some differences in how our files are easily accessed in a bind mount, but more secure and manageable with a volume.
So, Should I Use a Volume or a Bind Mount?
In general, it’s best to use volumes for storage in Docker. Volumes allow for greater flexibility within deployments and give way to more features. Another key advantage of volumes is that they are inherently more secure. Since the data stored for each container is completely managed by Docker, any malicious data cannot escape Docker to infect the host system, whereas with a bind mount, any files within the container storage exist on the host filesystem.
In a Docker host with potentially hundreds of containers running, allowing any single container to breach the host is not ideal.
Docker Networking
Now that we understand how storage works in Docker, it’s time to understand how Docker containers are interlinked. Docker networking is the component of Docker that allows for complex networks connecting groups of containers all on a single operating system.
You can think of Docker networks as individual LAN networks that only exist inside Docker for use with containers.
A Visual Representation of Docker Networking
In the diagram below, we’ve illustrated how Docker containers connect with each bubble representing a container and the lines connecting them serving as network mappings.
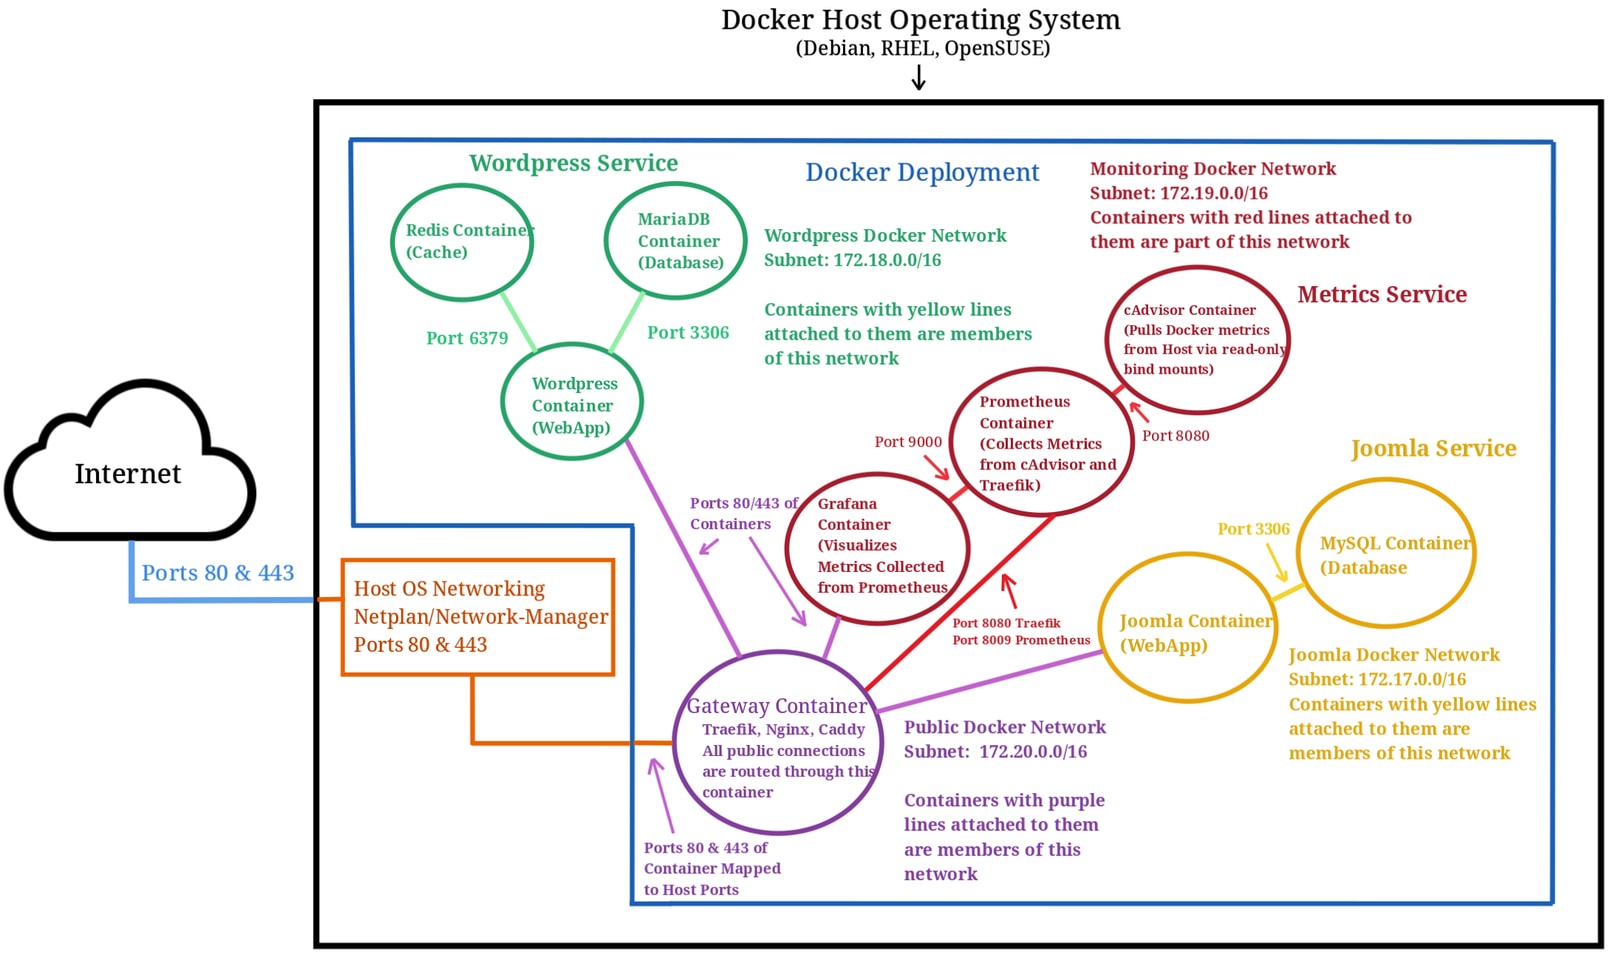
One of the first things you’ll notice in the diagram above is how we have our red, green, and yellow internal networks isolated from each other. These networks are intentionally set up so that they are only able to communicate with other containers in the same network. The purple network is the only network that hits the gateway container, exposing the services to the internet.
We can use these mappings to join containers to shared networks to allow them to communicate with one another or isolate containers that we want secured. Think of the division between these internal and public networks as VLANs defined within Docker.
Also note that we have a metrics service defined via Prometheus and Grafana, which can pay close attention to our public gateway network via Traefik metrics for any suspicious activity and gather statistics.
A key advantage of the Docker networking model is that since all the networks are defined in Docker, we could export our entire deployment in the blue box above to a completely different machine with ease. We wouldn’t need to configure any physical routers, switches, or firewalls. All we would need to do is copy over our Docker configuration files and volumes.
Useful Facts About Docker Networking
When working with Docker Networking, it’s important to remember that all containers use the service name as their hostname, unless explicitly defined with the container_name: parameter. These hostnames are only available to neighboring Docker containers. Even the host OS has no knowledge of these hostnames outside of Docker.
However, these Docker hostnames are still useful within Docker when we want to connect our containers to create complex services. We can define a cache such as redis, a database, a storage bucket (such as MinIO), and a webserver that all communicate within Docker.
Since Docker containers have their own ports and hostnames that don’t conflict with our host OS, deployments can be reproduced across infrastructure without modifying Docker configurations. This also means that large and complex networks are not accessible outside of the host operating system, which means fewer attack vectors for malicious activity.
We will learn how to define Docker networks using Docker-Compose in a later article in this series, Docker Advanced: Deploying with Docker-Compose.
Installing Docker
Now that you understand how Docker’s containers work, the next step is to install Docker onto your system and start experimenting with it. Assuming you have a Linux test server or Linux computer, you can install Docker quickly and easily by typing the following commands into your terminal.
For Debian/Ubuntu:
sudo apt install docker
For RHEL/CentOS/Fedora/Almalinux:
sudo dnf install docker (or if on older version of CentOS: sudo yum install docker)
Once Docker is installed, unless using root (which is not recommended in production environments), adding the user to the Docker group will allow running the docker command without sudo privileges. To accomplish this, enter the following:
sudo usermod -aG docker $USER
Then, just logout and log back in for the changes to take effect.
Working with Docker
Now that you have Docker installed, it’s time to start deploying your first containers and seeing firsthand the ways in which Docker can help your system become more efficient.
In our next article in this series, Docker for Beginners: Deploying Containers & the Anatomy of Commands, we’ll cover the step-by-step instructions for deploying a basic container as well as breaking down the anatomy of commands essential for working with Docker. Read on to learn more or check out our blog and knowledge base for more great content and industry insights from the hosting experts at Hivelocity.
– written by Eric Lewellen
