


You’ve slain the Ender Dragon, conquered the Nether, and built your own pixelated replica of King’s Landing. Now what? Minecraft may be a game of endless possibilities, but once you’ve seen everything the base game has to offer, you may be asking yourself “how do I recapture that magic I felt on my first play-through?” Thanks to the plethora of options available with custom Minecraft servers, building your own Minecraft server could be just the remedy you’re looking for.
Maybe you’ve played around with some mods on your own. Perhaps you’ve tried your hand at one of the thousands of player-run servers available online. You might be a total Minecraft noob who’s just getting started or it’s possible you’re not even a player at all. Either way, if you’re reading this article then chances are you’re wondering how to make a Minecraft server. Let’s start with the basics.
But wait! Are you interested in hosting your own Minecraft server but don’t want to deal with the inconvenience of building your own? Check out our friends at Gravel Hosting for easy, affordable Minecraft server hosting, all optimized to have you provisioned and ready to play in just minutes!
History of Minecraft
First released in 2011, Minecraft is a sandbox survival game created by Swedish developer Markus Pearson. With its distinctive visual style, comprised entirely of blocky characters and objects, Minecraft has quickly transcended the world of video games and grown into a household name.
Minecraft is special because it gives players the freedom to play how they want. Featuring gameplay elements that mix environmental destruction, architectural construction, exploration, combat, resource gathering, and crafting, Minecraft offers something for everyone. In fact, as of May 2019, Minecraft has sold over 176 million copies across multiple available platforms. This impressive stat makes Minecraft the best selling video game of all time.
Featuring gameplay elements that mix environmental destruction, architectural construction, exploration, combat, resource gathering, and crafting, Minecraft offers something for everyone.
Part of this success can be attributed to the high degree of customization available. This is not only true of the single-player game, but within the multiplayer experience as well. After all, isn’t mining imaginary diamonds and chopping down blocky trees more fun with friends?
Here’s where the role of privately-owned Minecraft servers comes into play.
Minecraft Servers
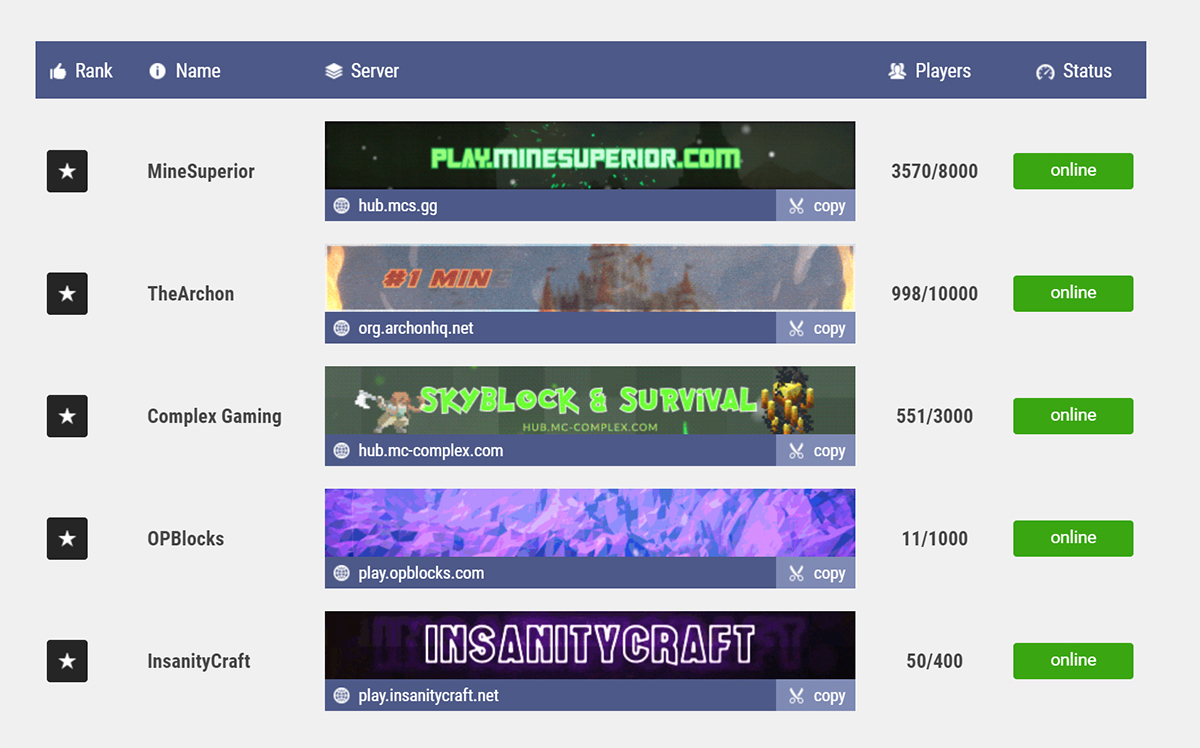
For those of you looking to change up your Minecraft experience but feeling hesitant about the added responsibilities of running your own server, there are a wide variety of specialized servers available online. The website MinecraftServers.org lists thousands of popular privately-hosted servers. Alongside each option, it features in-depth information on what makes each server unique. By offering different experiences such as PvP, Roleplaying, Factions, and Challenges, these servers can vary widely from one to another. The result is an almost infinite number of new experiences within the familiar setting of Minecraft’s existing framework.
However, sometimes, playing on a server built to someone else’s specifications just isn’t enough. We all crave a certain degree of control in our lives. Why would our digital lives be any different? By hosting your own Minecraft server, you are gaining exactly that: the power to build your world the way you desire and share that world with other players.
Hosting your own server gives you the authority to modify variables intrinsic to Minecraft. By tweaking things like spawn rates of enemies and NPCs, overall difficulty, and physical parameters, you can shape the internal parameters of the game. That’s not all though. You can also add modifications server-wide from the wide list of available mods developed outside of the game.
In addition to having control over how the game is played, hosting your server gives you control over who plays the game. Maybe you’re a parent desiring greater control over your child’s online interactions, or an avid role-player seeking like-minded players. By setting up your own server you can determine the type of community you want to build.
Like most things in Minecraft, the only real limit is the user’s own imagination.
Getting Started
Starting out, there are a few things you should know:
- First, a Minecraft server doesn’t have to be on a top-of-the-line machine. That being said, it is advised to use a desktop over a laptop. Typically the performance and hardware will be better when compared to that of a notebook or equivalent. This is especially true if a user is playing on the same machine that is hosting the server. Doing both simultaneously requires much more processing power to keep everything running smoothly.
- Second, a wired ethernet connection is recommended over the use of wireless internet. The faster connection will improve game performance and reduce lag for users.
- Third, home-hosting, while possible, is not recommended. Home connections tend to be slower, and personal computers are typically weaker. Without adequate RAM, the game’s quality will be low. For this reason, you are better off utilizing professional hosting services.
*NOTE: If you’re curious about what specs to look for in a Minecraft server, check out Jason’s guide on Minecraft Server Buying. Still have questions or concerns? Contact our sales team and let them know you’re looking to build a server specifically for Minecraft. They’ll be happy to walk you through it.
- Fourth, it is recommended when starting out to use a server hosting service running Debian 9 or Ubuntu 18.04. Both options provide safe and stable environments ideal for learning the basics.
- Fifth, Minecraft runs using Java. Before setting up your server, you’ll want to make sure you have the latest version of Java installed. You can download it from Java’s official website. If you are not sure if you have Java or which version you have, you can check by opening the command window and using the command java -version. If Java is installed, this query will return a version number. By comparing this number against the most recent version listed on Java’s site, you can ensure that your version is current.
- Finally, keep your server secure from the start. It’s easier to prevent access from unauthorized users than it is to remove access once they’re already in. Install updates as they are released. By keeping your system up-to-date, you stand a better chance of closing loopholes before they become exploited.
Setting Up Your Minecraft Server

Don’t worry, the above image is intentionally misleading. You won’t need any power tools to set up your server, assuming you’re not building it from scratch.
A Minecraft server doesn’t have to be on a top-of-the-line machine.
However, before you can set up your Minecraft server, you will need the following:
- A copy of Java Minecraft, which can be purchased through Minecraft’s official website
- The latest version of the Minecraft Multiplayer Server
- OpenJDK (an open-source implementation of Java): installation instructions for OpenJDK can be found on their official website
Now it’s time to setup your server. Follow these steps to get your server up and running:
- Open your terminal and enter the command mkdir Minecraft_Server. This creates a directory specific to your Minecraft server.
- Next you’ll want to place your recently downloaded server.jar into your newly created directory.
- Enter the command ls to list out your directories.
- Use cd Minecraft_Server to change your current directory to your server’s designated folder.
- To launch the server, use the command java -Xms1G -Xmx1G -jar server.jar. Xms and Xmx represent the starting and maximum RAM respectively, and server.jar is the name of your Minecraft server’s version number. If you’re using Minecraft server.1.15.2.jar (current as of this articles publication), then your command should look something like this:
java -Xms1024M -Xmx1024M -jar minecraft_server.1.15.2.jar
If needed, additional information can be added to the end of this line. Use nogui if you want to start the server without its graphical user interface, or -o true to tell the server to run in online mode, only allowing access by authenticated users.
- After entering the command above, you should see the following output:
[main/ERROR]: Failed to load properties from file: server.properties
[main/WARN]: Failed to load eula.txt
[main/INFO]: You need to agree to the EULA in order to run the server. Go to eula.txt for more info.
- If this is your first time running the server, an EULA (End User License Agreement) file should be generated. Before you are able to play, you must agree to the EULA. This can be done using your favorite text editor or through your command window using the following command: nano eula.txt.
- Once you’ve opened the text file, change the eula field from false to true: eula=true. This indicates that you’ve read and agreed to the license agreement.
- Now you can save the file and launch your server again. Failure to change this field within the eula.txt document will result in your server continuing to shut down immediately upon start up.
Creating a Startup Script
If you want to, you can run your server each time using the full command line featured above. Alternatively, it’s a good idea to create a script that will run the command for you instead.
- Start by creating a new document. You can name this document whatever you like, but for the sake of this article, lets name it server.sh.
- Within the new document, enter the following lines:
#!/bin/sh
java -Xms1024M -Xmx1024M -jar minecraft_server.1.14.4.jar
- Now that you’ve created your document, in the terminal, type chmod +x server.sh.
- Now, whenever you want to start your server, you can use the command ./server.sh to start it up and stop to stop it.
- Lastly, to make sure your server runs correctly without an SSH connection, it is advised to run your server from within a GNU Screen session. To do this, use the screen command before running your startup script. Assuming you’ve already agreed to the EULA, the console should begin generating the required configuration files automatically.
When you’re ready to begin playing on your new server, just follow these 4 easy steps:
- start by opening your Minecraft client and logging in.
- Select “Multiplayer” from the list on the home screen and click on “Add Server.”
- Create a name for your server, enter its IP Address into the appropriate form fields and click “Done” when you’re finished.
- Then, in order to play, just click “Join Server.”
Your server is now up and running. If you encounter any issues, have additional questions, or are looking to run your server through a different operating system, check the Minecraft Wiki. It contains a surplus of additional information you may find useful for your specific needs.
Customizing Your Minecraft Server
When your server.sh script is first run, a world is generated using the default set of variables. Let’s say though, that you want to create your own custom variables for the world on your server. After all, customization is probably what got you interested in hosting your own server in the first place.
So how do you do that? Easy.
Start by opening the server.properties file. Once open, you should see a long list of properties with numbers and true/false statements associated with them. By tweaking the variables in this list, you can control how the world on your server is generated.
For example, if you want a world where no monsters spawn, scroll down the list until you see the line spawn-monsters=true. Change the true to false. Now, until this value is changed back to its default setting, monsters won’t spawn in your world.
Pretty cool right?
For a full list of available variables and explanations of the parameters they control, check out this page of the Minecraft wiki. just keep in mind, in order for any changes to take effect, you’ll need to restart your server.
What if these options aren’t enough though? Maybe you’re interested in customizing your server beyond those variables intrinsic to the game. Doing this is quite possible, but requires the use of external modifications.
The internet is full of websites and videos listing the best available Minecraft mods. With so many options, it’s important to understand how each mod functions as well as any potential conflicts it may have with other mods. If you’re interested in adding mods to your server, a quick Google search should get you well on your way to doing just that.
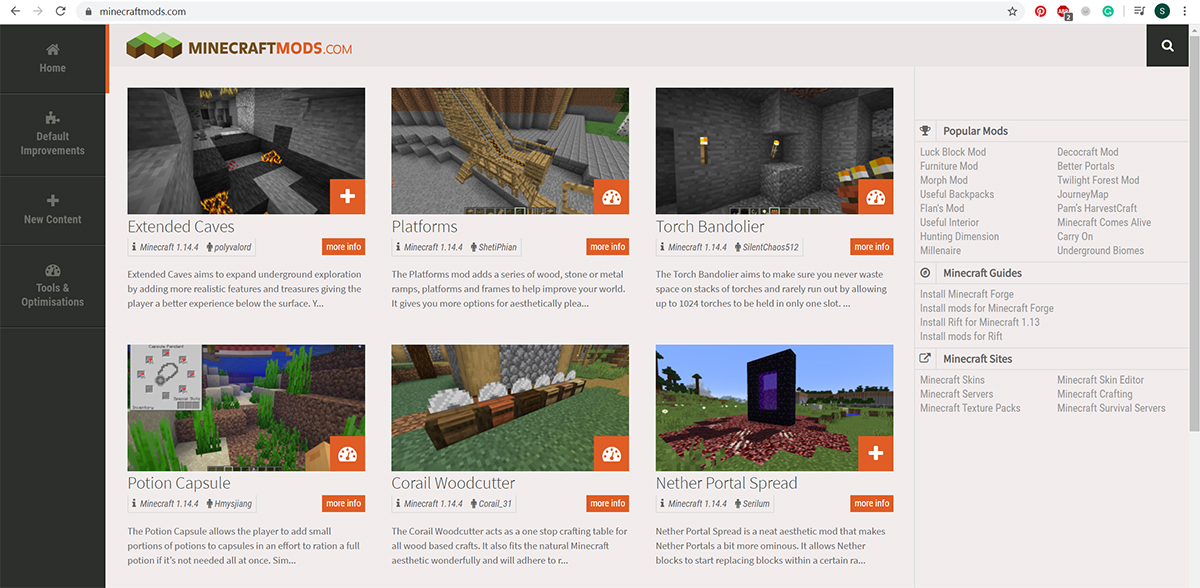
Looking for a good starting point? For an extensive list of downloadable mods you can begin experimenting with, check out MINECRAFTMODS.com.
Next Steps
So, your server is up and running, you’ve altered the default variables, and you’ve even added a few external mods. Now what?
Well, now that you know how to make a Minecraft server, it’s time for the fun part: enjoying the fruits of your labor. Unless you intend to play in an empty world though, you’ll need other players to join your server. These might be friends or possibly even strangers. Either way, if you want people to play on your server, you’ll need to offer them something unique.
Ultimately, what truly separates the best Minecraft servers from the rest is the community that supports them. Establishing guidelines for your community; hiring staff to police and enforce expectations; coming up with intriguing events that keep your players engaged. These are the things that will transform your server into something truly special. By posting videos online, either through Youtube or Twitch, you can even advertise your server, motivating new players to join.
A strong Minecraft server can even be profitable for its owner. Through the integration of membership fees or by selling unique cosmetic items, you can turn your digital world into a source of income. Some of the largest and most popular servers house thousands of players. By leveraging this the right way, they can rake in six figures each month.
Chances are you’ve still got a ways to go before you reach the level of these top-performing servers. After all, communities aren’t built overnight. Regardless, the fact remains that these Minecraft servers all started the same way. Someone took a chance and made the decision to host their own server.
Ultimately, what truly separates the best Minecraft servers from the rest is the community that supports them.
Now that your world is up and running too, where you go and what you do is entirely up to you.
Now it’s your turn!
Have a question about Minecraft servers or a specific story you’d like to share? Leave a comment in the section below.
If you found this article helpful, please be sure to share it on your favorite social media platforms, and remember to like us on Facebook!
– Written by Sean Kelly
Additional Links:
Looking for more information on Minecraft? Be sure to check out our comprehensive Minecraft Server Buying Guide.
When you’re ready to build your ideal Minecraft server, head over to our complete list of instant deployment and custom built dedicated servers. Need personalized help with your server build? Contact our sales team!
Searching for more great content? Interested in cPanel, Virtual Private Servers, or Colocation? Check out our recent posts for more news, guides, and industry insights!
