


Most people who have managed a website are familiar with cPanel. With its high functionality, ease-of-use, and user-friendly graphical interface, cPanel has become the market standard for remote-access control panels.
Whether you’re a webmaster running your own site, a hosting provider selling space on a shared server, or an individual seeking the best way to remotely access and maintain your dedicated server, cPanel continues to be one of the most highly-sought-after control panels among both novice and seasoned users.
But why? What sets cPanel apart and why does it continue to lead the industry?
In this article, we’ll explore the fundamentals of cPanel and how its features have kept it above the competition. We’ll also look at some recent developments and changes every cPanel user should be aware of.
For now though, let’s start with the basics.
What is cPanel?
cPanel is a Linux-based Graphical User Interface (GUI). Featuring readily accessible metrics and a host of built-in modules, it allows users across the globe to remotely access and maintain their servers from anywhere. With its mix of form and functionality, cPanel offers users a streamlined and efficient means of server maintenance.
cPanel has become the market standard for remote-access control panels.
If you’ve ever managed a website or server, you’re probably familiar with the idea of a “control panel.” A control panel is a visual tool allowing remote users to modify a server without relying on lines of code typed into the command shell. Most control panels offer similar functions:
-
Checking bandwidth and other computing resources
-
Connecting domain names to hosting services
-
Installing useful software like WordPress, as well as add-ons and plug-ins
-
Setting up emails and databases
-
Uploading and managing files
-
Modifying security settings
-
Creating backups of content
Although there are dozens of control panels on the market, chances are if you’re familiar with control panels, then your experience has probably been with cPanel specifically.
There are multiple reasons for this.
Many control panels claim to offer features similar to or better than cPanel’s. However, none of these lesser known control panels carry with them the brand recognition that cPanel has maintained.
Initially released in 1996, cPanel has survived over 20 years of market fluctuation and technical advancement. In an industry that’s always changing, cPanel has remained a fixture.
Before cPanel, managing websites was a difficult and time-consuming endeavor. It required an advanced level of technical know-how. For this reason, usually, only those with above-average tech skills could pull it off. When cPanel hit the markets though, it changed the way we look at servers. Literally.
With its mix of form and functionality, cPanel offers users a streamlined and efficient means of server maintenance.
Possibly the greatest advantage of cPanel is that it has done away with the need for a command shell and lines of code. By doing this, it has streamlined, automated, and visualized complex and timely tasks. This has not only opened site and server-management up to a wider group of users but has also reduced the time required to complete important functions. Now, what would have previously taken minutes, hours, or even days to develop, can be implemented with only a few clicks.
Lots of control panels have visual interfaces though, so what makes cPanel special?
Besides being one of the first control panels on the market, cPanel’s list of built-in features help it maintain authority among its competition:
-
Software Autoinstallers
-
File Managers
-
Backup Wizards
-
Chronological Jobs
These are just a few of the many useful features pre-packaged with cPanel. Together, these features let users manage their resources with ease. This allows users to spend more time on the content their server hosts and less time on administrative responsibilities.
With more hosting providers offering it and more users seeking it out, cPanel has quickly become THE control panel solution for site owners and shared hosting providers.
So why should you be using cPanel?
Advantages of cPanel
![]()
When looking at the advantages and disadvantages of cPanel, it’s important to keep in mind both sides of the equation. We don’t want to consider just the advantages that apply to the end-user but the hosting provider as well. After all, the wide-spread acceptance by those on both sides of the divide is the reason why cPanel continues to lead the industry.
cPanel’s biggest advantages come down to the following three categories:
- Ease-of-use
- Efficiency
- Reliability
While these advantages are largely applicable to both users and providers, the way they manifest for each is different.
1. Ease-of-use
Featuring easy navigation and pre-organized option categories, cPanel is a program that can be learned by anyone. By giving technical tasks a visual interface, the need to develop is all but eliminated. This vastly reduces the technical expertise needed to maintain a server or website.
Now, what would have previously taken minutes, hours, or even days to develop, can be implemented with only a few clicks.
While the number of options available may be overwhelming to those just learning cPanel’s interface, the divided sections and re-organizable layout allows users to format their interface to their own preferences.
Found an icon you’re unfamiliar with? Built-in help guides and tutorials within cPanel offer insights into the functions of its various features.
Still not sure how something works? If the information available within cPanel isn’t enough to solve your issue, a surplus of external user-generated support content developed over the last 23 years should provide all the information you need.
This excess of available information is a boon to both users and web hosting providers alike.
Many modern providers choose to rely on custom-built control panels to set themselves apart from their competition. Unfortunately, this tactic can be a double-edged sword.
A new interface means a larger learning curve for clients. Even if a custom control panel offers better features, convincing users to learn a new interface is often an uphill battle.
To facilitate user adoption, hosting providers using custom control panels may also need to produce specialized documentation. This process can prove time-consuming and potentially costly.
By using cPanel, providers can avoid the headache of producing their own technical documents. Instead, they can rely on the expertise of those who have been using the software for years.
An additional advantage of cPanel is that it remains relatively consistent across the board. This is a perk for both users and hosting providers. This consistency means cPanel integration allows for easier site migration should a site owner choose a new hosting service.
The end result is a smaller learning curve for users and a greater chance they can be convinced to leave their current provider for a competitor who is offering better perks alongside cPanel.
2. Efficiency
cPanel has grown under the assumption that its average users are not full-fledged developers. As a result, the various features that lend to its ease-of-use also contribute to a greater overall efficiency.
One of the ways cPanel achieves this is through the use of autoinstallers.
Autoinstallers are useful programs within cPanel that allow for popular software to be installed instantly. Through the use of these programs, typically Softaculous or Fantastico, applications like WordPress and phpBB can be easily installed onto your server with minimal effort.
Featuring easy navigation and pre-organized option categories, cPanel is a program that can be learned by anyone.
Because complex tasks can be achieved with a few clicks, they can be completed in a fraction of the time. This not only saves the user time but cuts down on potential costs as well. When users can run their servers themselves, it reduces the need to hire developers to manage them for you.
3. Reliability
cPanel is a tried and tested solution. Because it’s been around for years, cPanel has only grown and perfected its features in that time. Beyond the stability of the tool itself, a wealth of tutorials and information about cPanel exists online. When these aren’t enough, official support is available through the company’s website as well.
Additionally, while mistakes and their negative consequences will always be possible, stop-measures placed within cPanel make it difficult to cause truly catastrophic damage to your website or server.
Alongside these safety measures designed to prevent large-scale errors, small mistakes are harder to make as well. Since many built-in features completely handle tasks for you, the room for error is minimized.
Reducing the potential for mistakes is a feature that serves the interests of both the users and host providers.
Because cPanel prevents clients from taking actions that are too risky or are specifically prohibited, host providers retain greater control over what happens on their servers. This control can be further amplified by combining cPanel with its counterpart, Web Host Manager (WHM).
WHM is another program created by cPanel which gives administrative access to the back-end of cPanel.
Since cPanel and WHM are designed to work in tandem, the use of both by hosting providers gives users a more consistent experience across the board. This allows providers to manage multiple client sites while ensuring their servers remain properly secured.
Reductions in wasted-time and associated mistakes also lead to a decrease in overall stress for both users and hosting providers. This combination of simplicity and superior features makes cPanel not only an ideal solution for the servers themselves, but for the humans who interface with them as well.
Disadvantages of cPanel

As we all know, nothing is perfect. For every solution that exists, there are upsides and downsides. While the disadvantages of cPanel are relatively few, they are none-the-less worth discussing.
The primary disadvantage of cPanel is a matter of cost.
Unlike many of its smaller competitors, cPanel is seen as the premium control panel on the market. This higher status carries with it an understandably higher price tag and a number of consequences.
Because of cPanel’s associated price, it is rare to find cPanel offered through free hosting providers. After all, you get what you pay for.
That said, it isn’t difficult to find cPanel offered through non-free but still inexpensive hosting providers. Because shared hosting providers use single servers split between multiple clients, the costs are split between multiple users. This means that through shared hosting, users can take advantage of cPanel’s features for a fraction of the usual cost.
But what if you’re an individual user looking to purchase cPanel?
Let’s say you own a dedicated server. Now whether you keep that server onsite or store it at a remote location, unless you intend to interact with it only through a terminal, you’re probably going to need some kind of control panel.
While it is certainly possible to purchase cPanel for usage on a single account, it is among the more expensive control panels available. For larger companies, this may not be an issue. For small businesses or individuals running websites on private servers though, this cost can factor heavily into their decision making.
To make matters worse, cPanel recently changed its payment structure completely. In addition to raising prices, they’ve implemented an additional fee per account for users that have over 100 accounts. This has led to a great deal of confusion within the industry. Some hosting providers have even stopped offering cPanel altogether.
We’ll discuss these recent changes and their effects on both users and service providers in greater detail a bit later on.
Using cPanel: Tips and Tricks
If you’re new to cPanel, there are a few things you’ll want to know. In this section, we’ll go over some basics as well as a few tricks you might be unaware of.
Curious if cPanel is the right tool for you? Check out this official cPanel demo and try it out for yourself!
Accessing Your cPanel Dashboard
 If you’ve just started working on your first website, you might be wondering how to access your cPanel Dashboard.
Typically when purchasing services through a shared hosting provider, upon signup, you’ll receive a selection of welcome emails. If your hosting services include cPanel, then one of these emails should feature a link to the login page.
However, for the sake of explanation, let’s assume you are unable to locate this information in your email. No worries. Accessing cPanel is easy and there are multiple ways to do it.
If you don’t have a direct link, then start by looking at the URL for your website.
If your website begins with “http“, then at the end of your domain add the following port number: “:2082”. It should look something like this:
- https://www.yourwebsitename.com:2082
On the other hand, if your website begins with “https”, then at the end of your domain add: “:2083”. When done correctly, you should end up with:
- https://www.yourwebsitename.com:2083
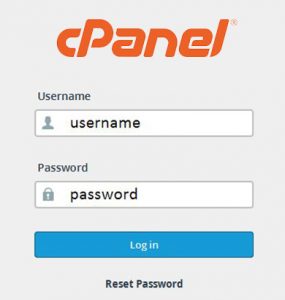
Once you’ve added the port number to the end of your domain name, assuming everything is correct, you’ll be brought to your cPanel login page.
If you don’t know what your login information is, look through the welcome emails sent by your host provider. Typically you can find your username and password here. If you’re still unable to locate them, you’ll need to reach out to your hosting provider’s support and ask for help with your login credentials.
Looking for an alternative means of accessing cPanel that doesn’t involve port numbers? Typing in your host’s URL followed by “/cpanel” will also take you to the same login portal.
But what about for users who rely on cPanel to access an entire dedicated server as opposed to a specific website hosted on someone else’s server? Although there are differences, the process is similar.
The first step is to obtain a cPanel license. This can be done through cPanel’s official website, or through one of a multitude of official resellers. If you’re purchasing a dedicated server through an offsite data facility, they may even offer an option for managed cPanel servers. In this instance, staff at the facility will usually handle installation and setup for you.
Once you have your license, you’ll need to install cPanel on your server. Start by opening the command shell, then run the following commands:
-
cd /home (this command takes you to the home directory)
-
wget – N https://httpupdate.cpanel.net/latest (this command downloads the most up-to-date version of cPanel from their website)
-
sh latest (this command runs the installation files associated with cPanel)
-
/usr/local/cpanel/cpkeyclt (this final command activates the cPanel license, allowing you to access the control panel)
Once you’ve completed these steps and installed cPanel (or if it’s already been installed ahead of time for you), you just need to open a web browser and in the URL search bar enter:
- https://IPaddress:2087 (You’ll need to replace “IPaddress” with your server’s specific IP address)
Now, just like when accessing it for a website, you’ll be brought to a login page. After entering your credentials, you’ll be taken to your dashboard.
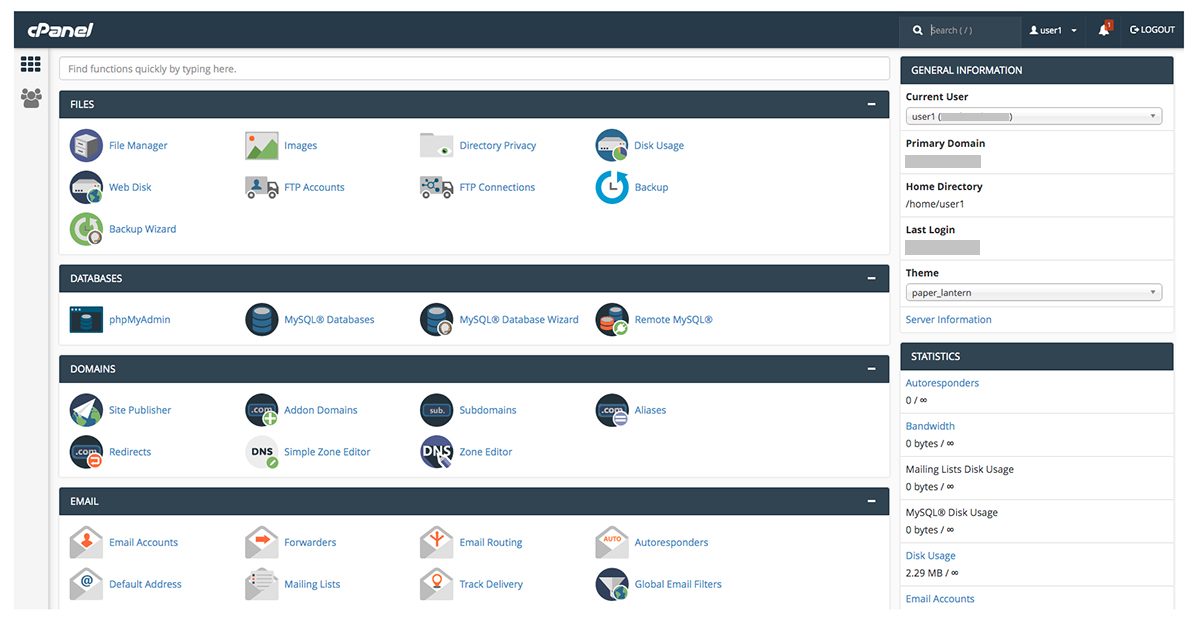
For those who’ve grown accustomed to it, navigation in cPanel is rather straightforward. However, when you’re just starting out or don’t know exactly what you’re looking for, it can take time to locate specific features.
Thankfully, a search bar is placed in the top right corner of the dashboard. This means that as long as you know the name of what you’re looking for, you can locate any of cPanel’s features without having to search manually.
In order to know what you’re looking for though, you must first understand which features are available. While cPanel licenses obtained through web hosting providers may differ slightly, most will incorporate the following sections:
-
Preferences – this section houses tools that are designed to help users modify their individual versions of cPanel to better suit their needs. It features resources that let you change the default language settings and update contact information. This is also where useful features such as the “Getting Started Wizard” and “Video Tutorials” are found.
-
Software – the majority of the tools in this section are for advanced users and mostly revolve around PHP and Perl. However, this is also the section where the “Softaculous Apps Installer”, or whichever autoinstaller your cPanel features, will be located. If you’re planning on installing apps such as WordPress, then you’ll want to explore this section early on.
-
Web Applications – this is the section where the apps installed by your autoinstaller will be added. As you install more applications, you should see this section grow. Common apps you’ll find here include “WordPress”, “Drupal”, and “phpBB”.
-
Email – if your shared hosting provider includes both email and cPanel, then this section is where you’ll manage your email accounts. It features a multitude of useful tools including an “Email Wizard” for setting up email addresses and an “Autoresponder” for setting away messages.
-
File Modules – a section for tools related to uploading and managing files within cPanel. This section gives users a range of additional options including setting privacy levels for individual files and making data backups using the “Backup Wizard”.
-
Databases – if your server stores information using databases, then this section of cPanel is where you will find all the tools needed to create and manage these databases. Tools you will typically find here include “MySQL Databases” and “phpMyAdmin”.
-
Metrics - this section is full of useful tools to help you track stats related to your website and server usage. Features such as “Awstats”, “Errors”, and “Bandwidth” give users useful insights, allowing them to make better-informed decisions.
-
Domains – if you’re hosting additional domains or subdomains and redirects related to your primary domain, then this section will give you the tools needed to create and manage these. Using tools such as “Addon Domains” and “Subdomains” you can create new or associated domains as needed.
-
Security – this section houses tools related to the security of your website or server. For webmasters who are storing private information such as usernames and passwords, or for eCommerce sites storing customer payment information, this section is especially important.
-
Advanced – as you can guess from the name, this section of cPanel features tools mostly related to advanced users. While tools such as “Chron Jobs”, which lets you schedule the execution of scripts on specific time frames, are especially useful, they are typically not something new users will spend much time on.
If you’re having trouble finding what you’re looking for, the sections on your dashboard can be rearranged as needed. Simply click on the top bar of each segment and drag it to the desired position. Sections can also be minimized to reduce on-screen clutter.
So now that you have a better idea of what each section of the cPanel interface covers, what’s next?
6 First Steps for cPanel Beginners
In this section, we’ll cover my six recommended first steps for new users. These are important tasks most people will want to complete shortly after gaining access to cPanel. If you’re a cPanel veteran and have already completed these steps, feel free to skip ahead and read on about cPanel recent developments.
1. Changing your cPanel Password
I highly recommend changing your password when logging into cPanel for the first time. The reasons for this should be pretty obvious. Since your web hosting or license provider sets you up with your initial password, until you change it, that information will continue to be out there.
Thankfully, changing your password in cPanel is very easy.
First, navigate your way to the “Preferences” tab. You can also use the search bar located at the top of your dashboard to search for the “Password & Security” tool.

From there you’ll be taken to a screen where you’ll be asked to enter your old password followed by your new one. After coming up with a new password, you’ll be shown an associated password strength on a scale of 1-100. Simply confirm by typing your new password again and click “Change your password now!”
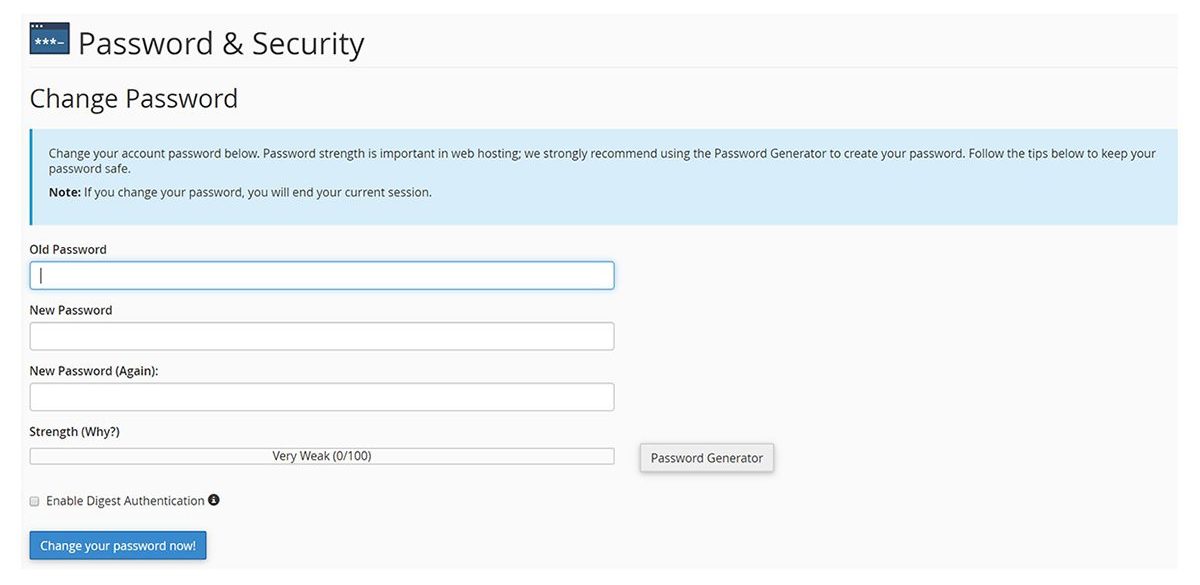
An interesting feature of cPanel is the inclusion of an automatic password generator. If you’re concerned about maintaining strong security, it is advised that you take advantage of the password generator, as the passwords it creates are highly secure.
If the resulting password is something too difficult to remember (and chances are it will be, that is the point after all), you can save it into a password manager such as LastPass or 1Password, to ensure it remains both secure and easily accessible.
2. Setting Your Contact Information
While setting your contact information may not seem like a crucial step, when using cPanel, it carries an important significance.

First, navigate to the “Contact Information” tool under the “Preferences” tab. From there, you should see a window asking you to enter an email address in order to receive account notifications.
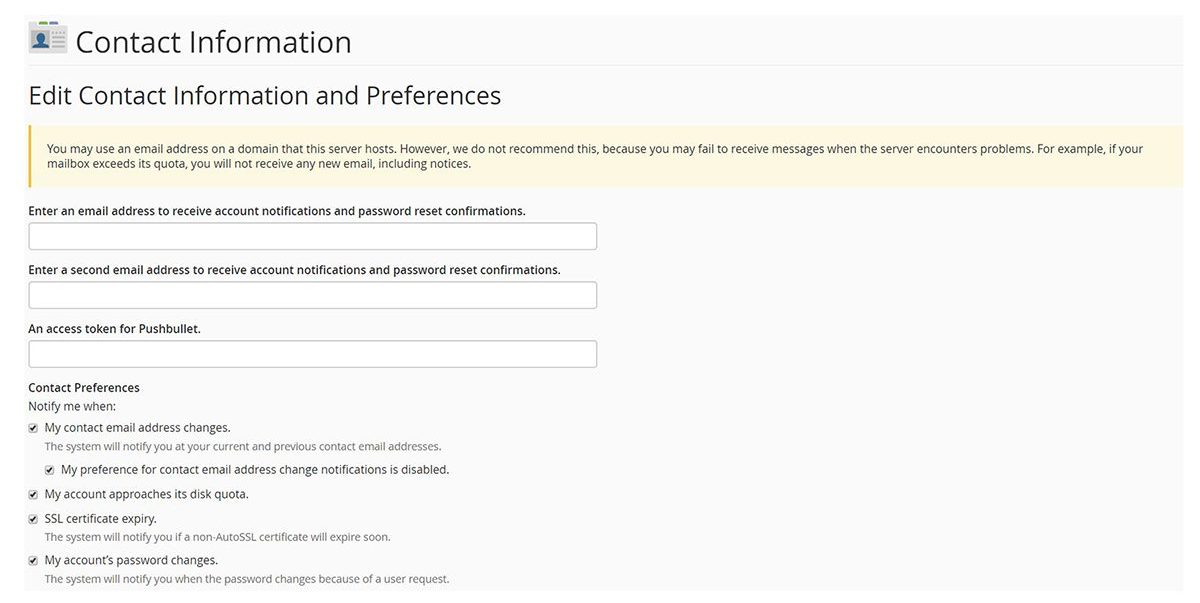
This step is important because, without an email address entered in this field, cPanel will have no way of contacting you should anything change with your server’s configuration. By entering your email address here, you can have crucial information forwarded directly to your inbox.
3. Setting Up an Email Account
If you’re a webmaster and your hosting provider includes email in your service package, or if you’re seeking to transform your server into a dedicated email host, then you’ll be able to set this up through cPanel.
First, navigate to the “Email” tab in your cPanel window. As you can see, cPanel includes many useful tools relating to email, ranging from “Spam Filters” to “Forwarders”. The tools here allow users to both create new email accounts and manage them all from within cPanel.
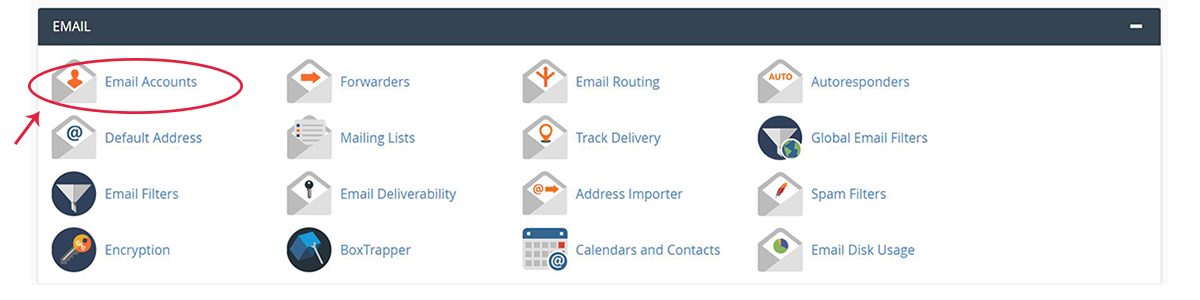
To start, you’ll need to locate the tool for “Email Accounts”. This will allow you to create an email address associated with your domain name. In the new window that opens, make sure you’re entering your information in the fields at the top of the page labeled “Add Email Account”.
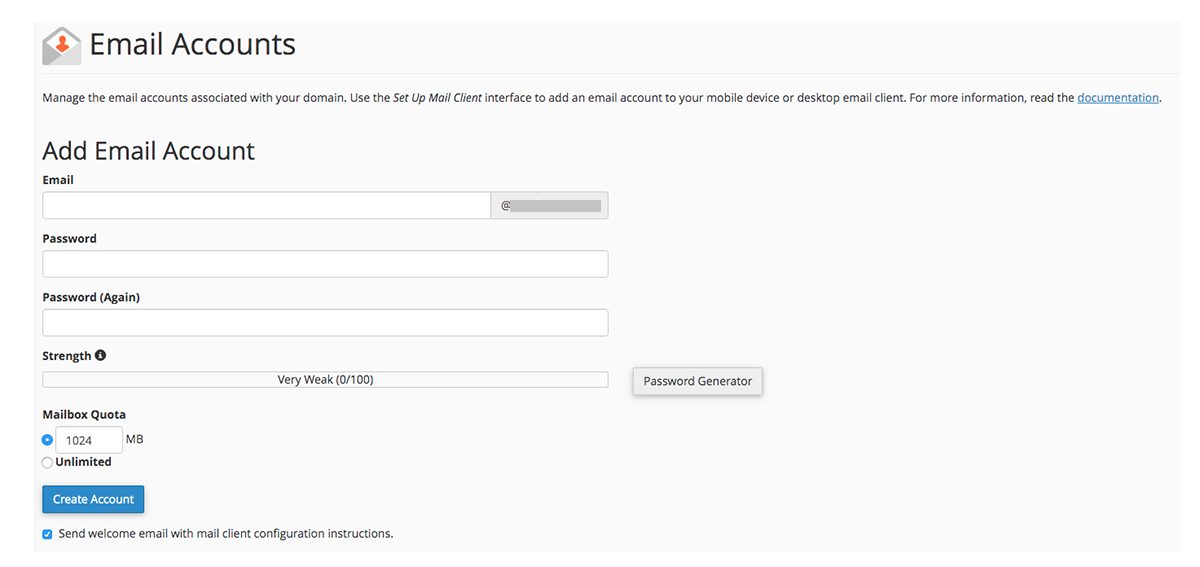
From here, you’ll need to fill out a name for your new email. Next, select your domain name from the dropdown field, input a password, and set a mailbox quota.
While most of these requirements are self-explanatory, the mailbox quota may be an unfamiliar concept to new site owners. Because your emails will be stored on your server where they will take up space, it is encouraged to set a quota that is reasonable, but not overly large. 1GB (1024MB) is an ideal starting amount. Should you need to expand this later, you are able to do so through your email account’s settings.
Once you’ve filled out the form, click on “Create Account“ to finalize your email’s setup.
Now, in order to access your account, you’ll need to take one of two options. Either configure your email to an external email client such as Outlook or Gmail, or access it through Webmail.
Regardless of which you choose, you’ll first need to scroll down to “Email Accounts“. You should see your newly created account listed here.
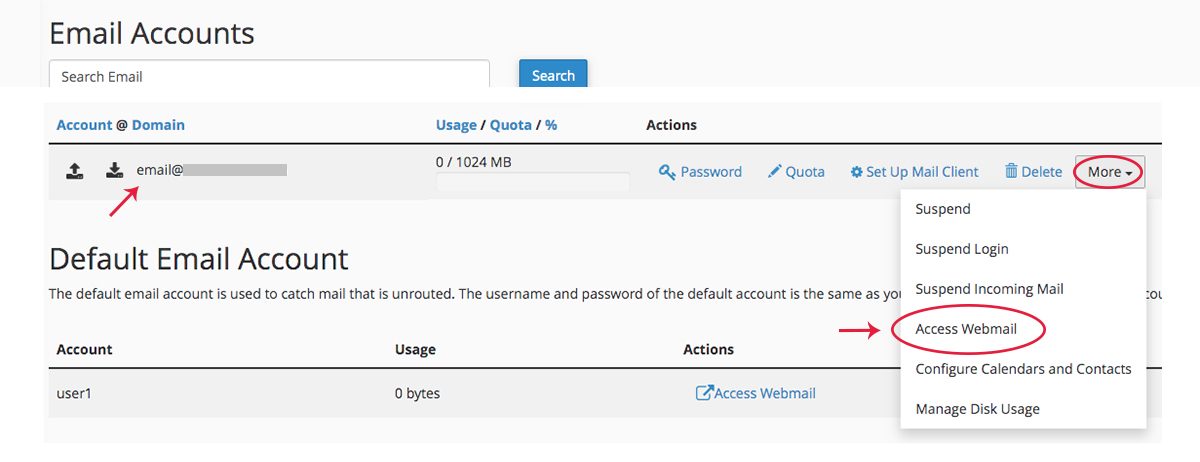
In the “Actions“ box to the right, select the dropdown menu labeled “More“, and select the “Access Webmail“ option.
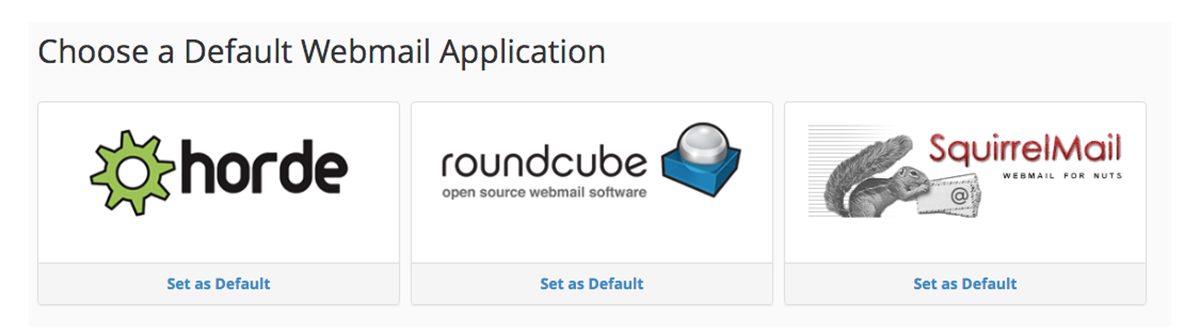
At this point, if you are choosing to access your email through Webmail, simply select your preferred Webmail application from those provided and set it as your default. This will immediately take you to your inbox.
If you choose instead to configure your email to an external mail client, you’ll want to scroll down the page to the section labeled “Mail Client Automatic Configuration Scripts”. You should see a list of popular email clients pop up. Links along the right offer helpful shortcuts and some mail clients even include an “Auto Config“ option.
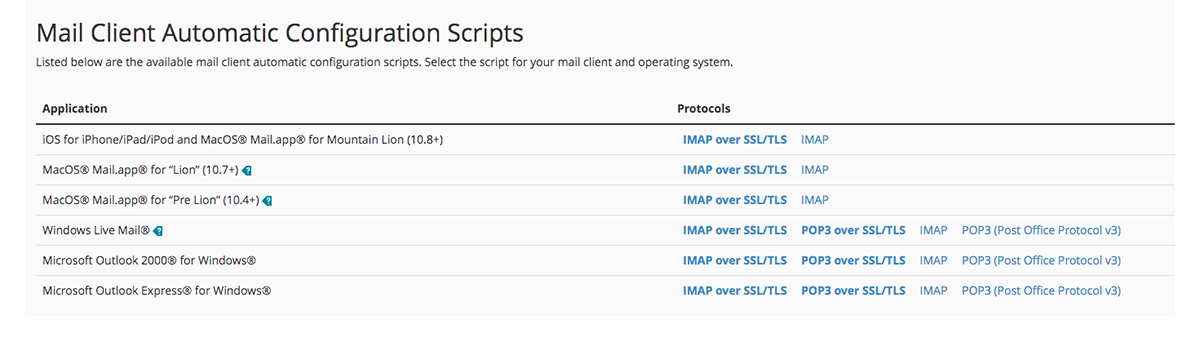
There is another section below this one labeled “Mail Client Manual Settings“. This section allows users to manually configure specific external email clients by designating the incoming and outgoing servers. This section is useful if you don’t see your favorite client in the list above or if you prefer to handle these things without the help of built-in shortcuts.

4. Creating a Database
Databases are where a website or server stores information. Things like content, pages, posts, and user data are all stored within databases. For this reason, establishing databases is an important skill for any site or server owner to possess.
Luckily, like many things in cPanel, building databases is as easy as locating the right tool.
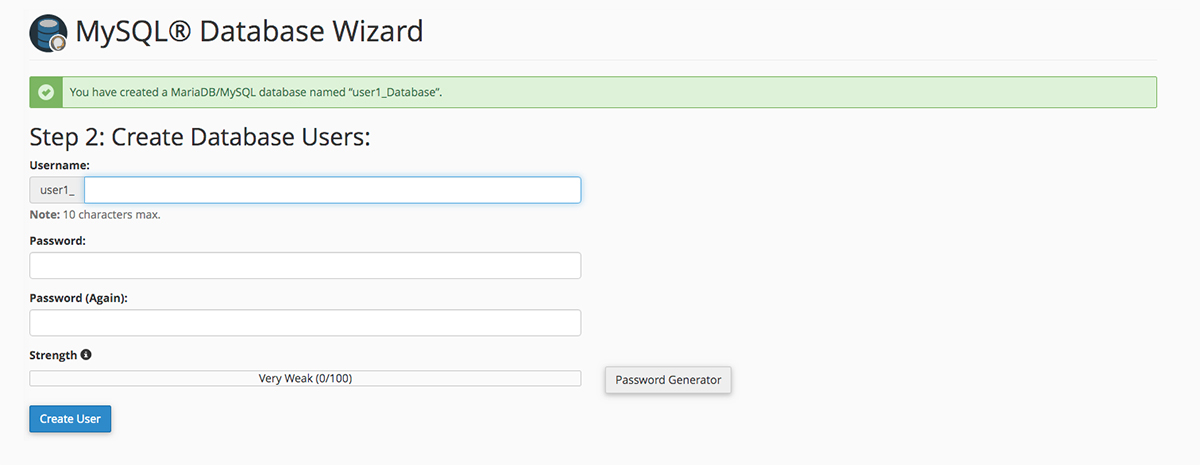
First, you’ll need to navigate to the “Databases“ section on your cPanel dashboard. From there, select the “MySQL Database Wizard“.

After naming your database you’ll be asked to create a database user. Enter a username and password for your new database user and click on the “Create User“ button.
The final step is to set your user’s privileges. Since presumably this first user is you, go ahead and click the checkbox next to “ALL PRIVILEGES“. After clicking on “Next Step“, the process will finalize itself and your database will be created.
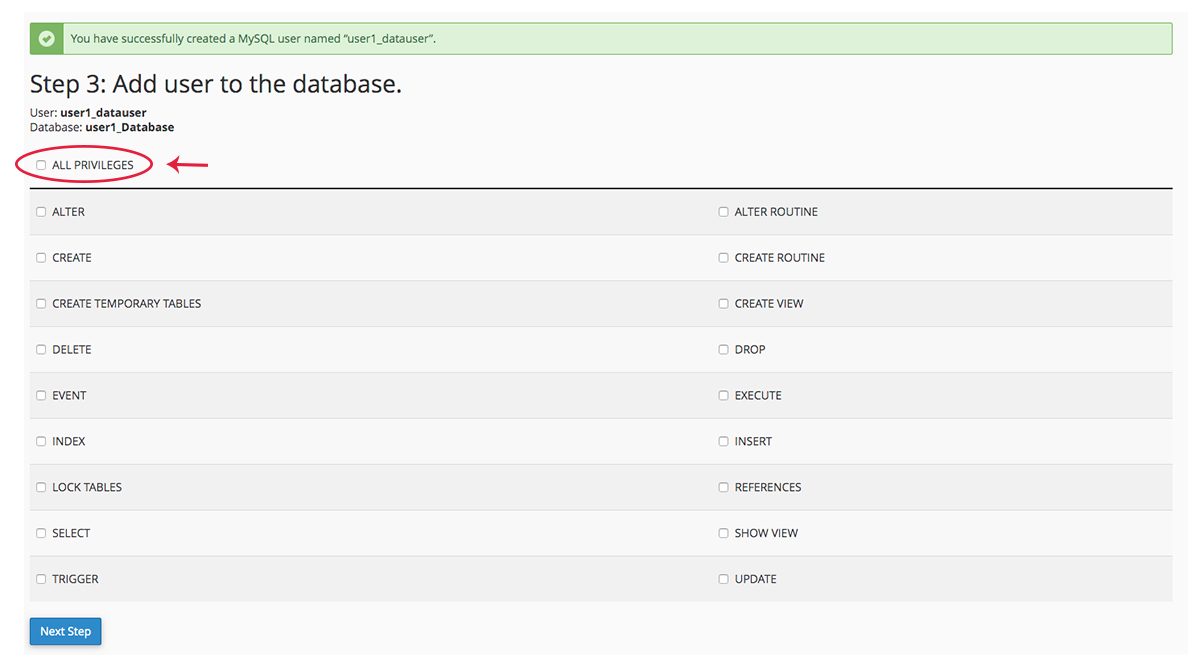
If you’d like to see or manage your newly created database, you can now use the “MySQL Databases” tools on your cPanel dashboard to locate and modify your existing databases.

5. Installing WordPress
If you’re intending to use WordPress on your site, then you’ll probably want to install it early in the process. Thanks to cPanel’s autoinstallers, doing so is very simple.
First, you’ll need to find your way to the “Software” section and locate the “Softaculous Apps Installer“. Depending on which features are included with your hosting provider’s version of cPanel, you may have a different autoinstaller available. With small exceptions though, they all work similarly.

After selecting the Softaculous icon, you’ll be taken to a new page where apps and scripts are listed. A list of categories on the left organizes available downloads into different sections based on type and functionality.
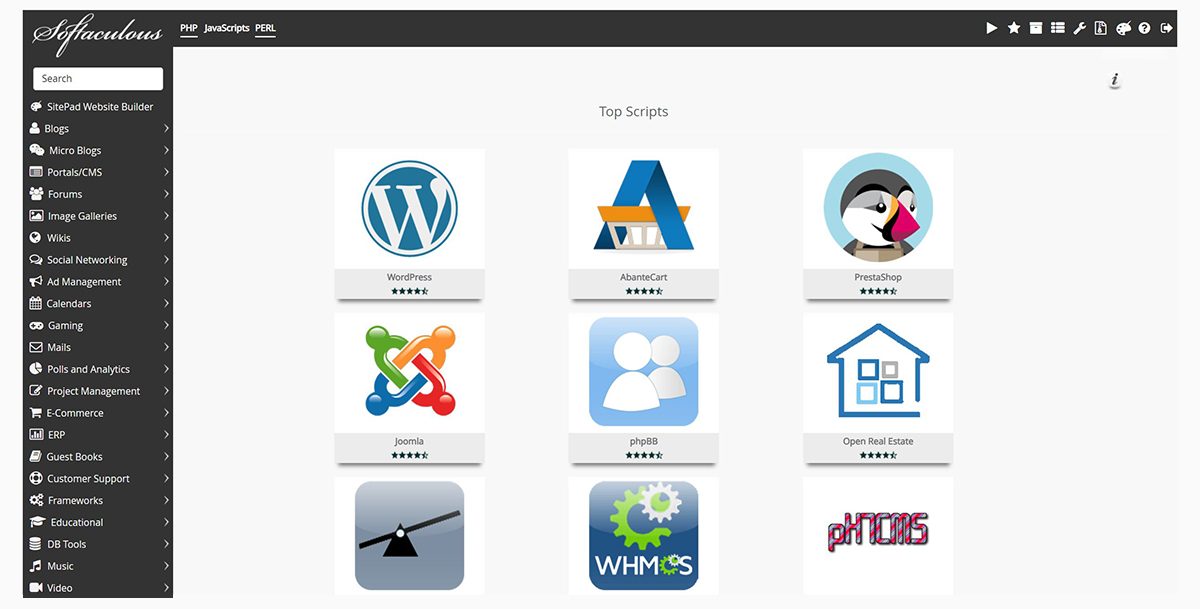
For now, locate and select the WordPress icon at the top of the first page. You’ll be brought to a new page with information about WordPress as well as an option to “Install Now“.
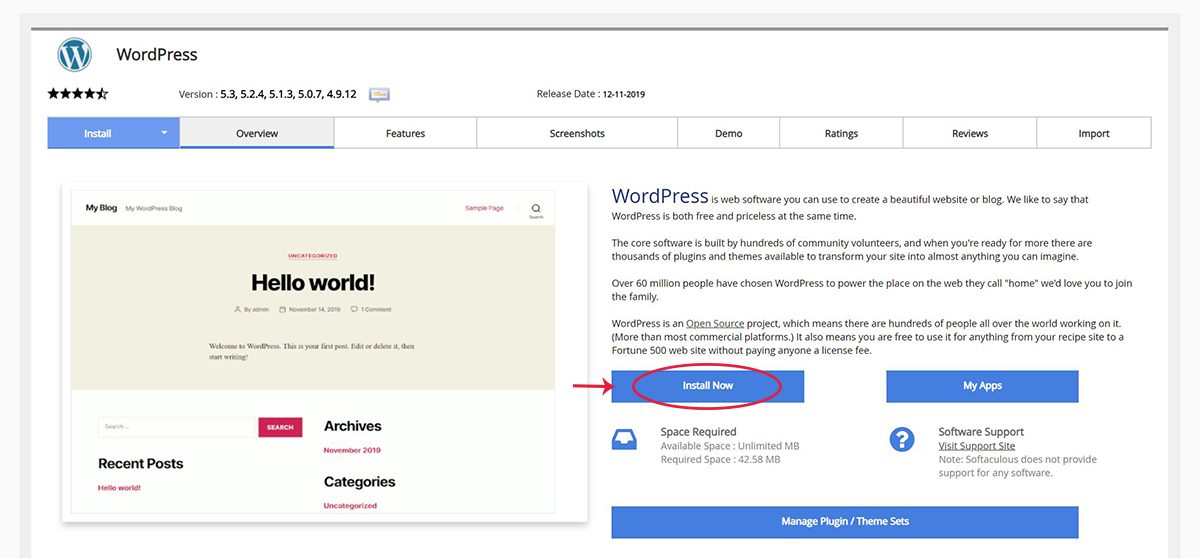
At this point, you’ll be given several options. Choose the latest version of WordPress and your domain name from the drop-down menus. Where it says “Choose Protocol“, if your site has SSL then make sure to select the “https://” option. Otherwise, you’ll want to use the standard “https://“.
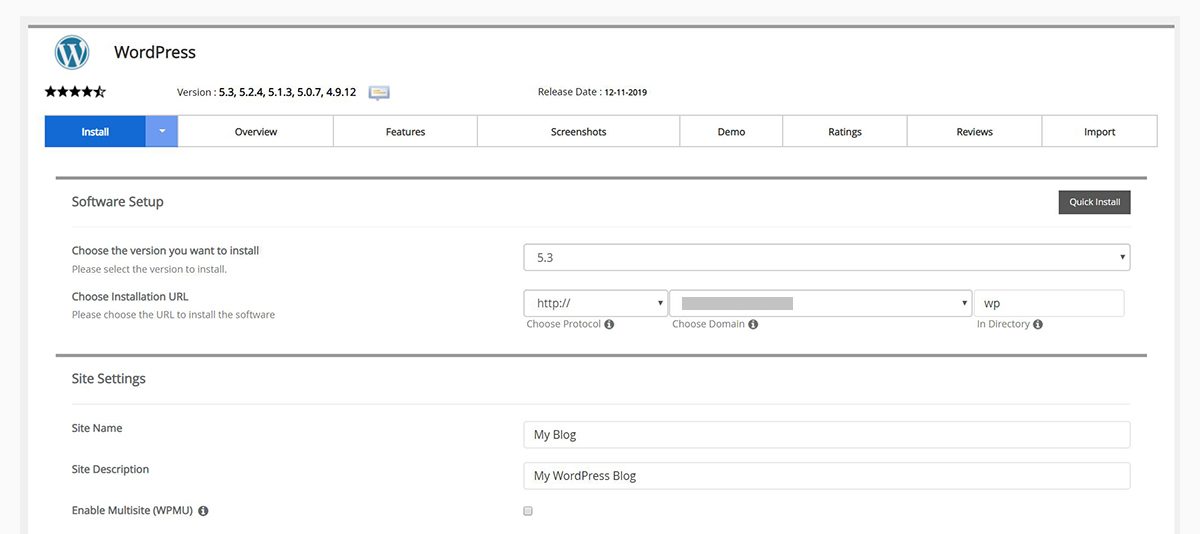
In the “Admin Account” section, make sure to update your username and password to something secure.
Most of the remaining options, such as plugins and themes, can be installed and changed later easily from within WordPress. These can be ignored for now.
When everything is ready, click the “Install” button at the bottom of the screen. Once the install is complete, you’ll receive a notification from Softaculous that WordPress has been successfully installed.
To log in to your WordPress, either follow one of the links provided after installation or add “/wp-admin/” to the end of your domain name.
6. Creating Backups
Creating a backup of your content this early into development might seem unnecessary. Unless your provider includes automatic backups as part of your service package though, then knowing how to perform these manually will prove an invaluable skill in the future.
After all, for anyone who’s lost something, either physical or digital, having to start again and replace what you already had is never desirable. For most people running a website or personal server, chances are high that the information stored there is valuable. It might even be your livelihood.
Thanks to cPanel’s built-in “Backup Wizard” you can save a compressed copy of your server at any time.
First, you’ll need to navigate to the “Files” section of your cPanel dashboard. From here, locate the icon for the “Backup Wizard” and select it.

You’ll be brought to a separate screen where you’ll be given the option to “Back Up” your information or “Restore” it to an earlier version by uploading a previously created backup.
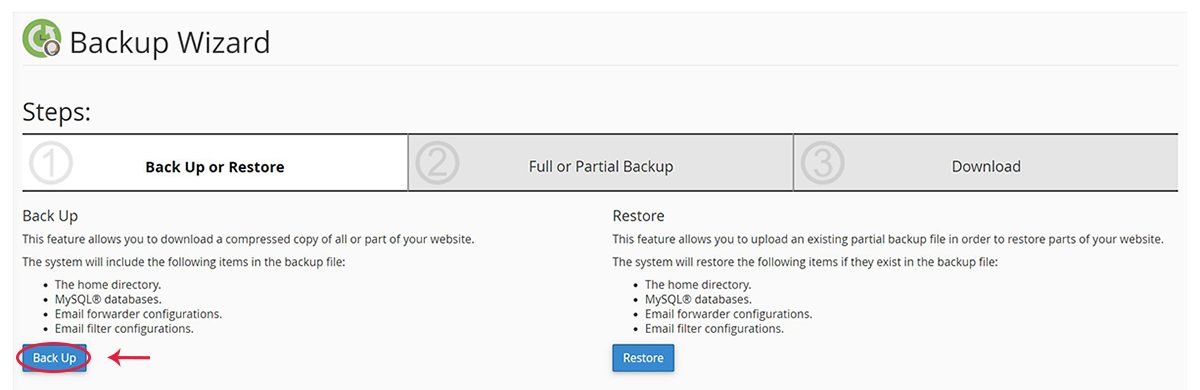
For now, click on the blue “Back Up” button. You’ll be given the option to do a full backup, which will include all files and configurations on your server, or a partial backup, which will only duplicate certain segments such as the home directory, databases, or email.
For the sake of ease, you’re better off downloading a full backup of your server. You can then store it on an external hard drive where it will remain safe.
Now that you know how to perform manual backups, you can continue to do so on a regular basis. By replacing older versions with more recent ones, you can help ensure that in the event of the unexpected, restoring your data to a recent iteration will be a simple matter.
Now What?
So now that you have a basic understanding of how to navigate cPanel, and have performed some necessary preliminary procedures, the next steps are yours to decide.
If you’d like further explanation into some of the features mentioned here, check out this cPanel Docs. It features step-by-step instructions, plenty of images, and a wealth of information covering basic cPanel features.
Once you’re ready, start experimenting with cPanel and learn its uses for yourself. After all, your website or server is yours to do with as you see fit.
cPanel Recent Developments
For those users already familiar with cPanel, you may have heard about the recent cPanel pricing changes that have been negatively affecting users and providers. You may have even read the company’s official announcement on the cPanel blog. For those unfamiliar with what’s been happening though, let’s rewind a bit.
With the introduction of the per-account fee, for some users, the cost of using cPanel has risen upwards of 800%.
In the early months of 2019, a venture capitalist group known as Oakley Capital finalized their purchase of cPanel. Understandably, this move created a sense of unease within the industry. At the time, Oakley Capital already owned Plesk, one of cPanel’s biggest competitors, as well as several web hosting providers. This combination of acquisitions means they’ve effectively established a monopoly over the entire control panel market.
The result is, Oakley Capital now holds the power to manipulate control panel prices as they see fit. Insiders knew this purchase would result in a price increase for cPanel’s line of products. Even the most extreme predictions failed to anticipate how large this price jump would actually be though.
On June 27th, 2019, an announcement was posted on cPanel’s blog revealing the new pricing structure changes. The announcement was immediately met with criticism from many of cPanel’s users and partners. In the weeks that followed, the new pricing structure was updated to include more options and greater flexibility for existing users making the switch.
While the updates to the new pricing do offer better flexibility than what was first announced, it remains a huge change from the previous payment model. This has left many users asking if cPanel is still a viable option for their businesses.
Here’s what’s changed:
1. Yearly License Payments are Now Monthly
At first, this change might not seem like a huge departure from the previous model. After all, cPanel has offered monthly payment options for a while now. While paying on a yearly basis did offer users a better overall price and a single consistent payment schedule, how much difference could it really make that users now have to pay monthly?
Although the changes to the individual user might seem mild, the issue here lies in how this change pairs with the other pricing changes. This is especially true once scaled beyond the individual level up to the scale of large businesses and resellers. For businesses, these pricing changes have resulted in a handful of major consequences.
For resellers providing cPanel products to their customers, this change means they are no longer collecting yearly payments from their customers. Now, to remain compliant with cPanel, these businesses must collect payments on a monthly basis.
For some companies, this means completely restructuring their collections procedure. Some may even require new systems to monitor payments on a monthly rather than yearly schedule.
With the update released in early July, a provision has been added that grants additional leeway to cPanel partners regarding these monthly payments. The provision states that should a provider’s client fail to pay their monthly fee for their cPanel license, the provider may request a one-month service credit on a per license basis. This is designed to allow for extra time to collect on delinquent accounts.
This update does help ensure providers aren’t stuck paying for licenses they haven’t received payment for. However, it does little to alleviate the core issue of changing from yearly to monthly payments. Additionally, this leniency is only granted to designated cPanel partners, meaning those who aren’t on the list will see no benefit.
2. Pricing is Tiered by the Number of Associated Accounts
With the change to a monthly payment system, cPanel has also begun factoring in the number of associated accounts per license into their payment structure. This is the biggest change from their previous payment model.
Originally, clients purchasing a cPanel license had two options: VPS or Dedicated. While both of these options could be purchased on a monthly or yearly payment plan, pricing was based on a flat per-license fee. This meant that users and providers were only paying on a per-server basis and the number of accounts on each server made no difference in their payment totals.
With the new payment structure however, licenses are divided by the number of accounts used. The tier levels are as follows:
Solo – 1 account per license:
- Cloud (VPS) pricing = $15.99/month
- Metal (Dedicated) pricing = N/A
Admin – Up to 5 accounts per license:
- Cloud (VPS) pricing = $27.99/month
- Metal (Dedicated) pricing = N/A
Pro – Up to 30 accounts per license:
- Cloud (VPS) pricing = $39.99/month
- Metal (Dedicated) pricing = N/A
Premier – Up to 100 accounts per license with an additional fee for each account beyond 100:
- Cloud (VPS) pricing = $59.99/month + $0.39/extra account
- Metal (Dedicated) pricing = $59.99/month + $0.39/extra account
Now, there are a couple of takeaways from this.
For starters, while cheaper plans exist for users with fewer accounts, these options are only available to those who are purchasing the VPS plan, now renamed “Cloud.” For users whose licenses are for dedicated (“Metal”) servers specifically, only the premier plan is available.
Additionally, with the introduction of the per-account fee, for some users, the cost of using cPanel has risen upwards of 800%. There are even reports of larger price increases for businesses running cPanel servers with thousands of accounts on them.
This immense price increase has forced many users to reconsider their dependence on cPanel. For some companies, this change has rendered their business models unviable. Others are pledging to drop cPanel out of principle.
Oakley Capital now holds the power to manipulate control panel prices as they see fit.
The number of users voicing their concerns has resulted in modifications to the payment options originally stated. The options you see here are actually slightly better than the original proposal. Unfortunately for many clients though, these changes won’t be enough.
To make matters worse, when this announcement was made, clients who were on the annual payment plan were given only two months to adjust to the new payment structure. This includes many who had been loyal cPanel customers for years. Users who had already been paying on a monthly basis, were told their payments would change at the start of the next month: 3 days after the announcement was made.
This obviously profit-oriented move has ostracized many cPanel loyalists. The results have damaged users’ trust in the company and is causing many to seek out alternatives. For users who have been reliant on cPanel for years though, what options do they have?
Alternatives to cPanel
As stated earlier, cPanel is hardly the only control panel on the market. Unfortunately for those seeking a more cost-effective solution, cPanel holds its name recognition for a reason. While there are many competitors out there, few are capable of offering the ease, efficiency, and level of support provided by cPanel.
For years, cPanel’s biggest competitor has been Plesk. Overall, the divide comes down to a matter of preference. While the layouts of the interfaces are different and content cannot be exported from one to the other, in many ways both control panels offer users the same advantages.
Arguably the biggest difference between the two is that unlike cPanel, which is entirely Linux based, Plesk is available for servers running both Linux and Windows operating systems. Additionally, many of the admin options only available to cPanel users through WHM are implemented directly into Plesk.
These differences might make Plesk seem like a strong contender for a cPanel alternative. However, both panels suffer from the same critical issue: they’re both owned by Oakley Capital. Therefore, while Plesk is currently less expensive than the new cPanel pricing and does still offer the option to purchase licenses on a yearly basis, chances are high this won’t remain the status quo for long.
In the months since the cPanel price change announcement, one control panel, in particular, has seen a large rise in user adoption: DirectAdmin. DirectAdmin has many similarities to cPanel and offers the same essential functions. The difference is, DirectAdmin does so in a way that is faster and less resource-intensive.
Price-wise, DirectAdmin’s upfront cost is comparable to cPanel’s, however, it’s standard package offers users unlimited accounts and domains with no extra fee per account. Additionally, DirectAdmin’s cost comes with the promise of “protection against price increases.”
The issue is, at the moment, there is no complete means of transferring content created through cPanel over to DirectAdmin smoothly. This means that switching to this particular control panel may prove more difficult for some users than other alternatives.
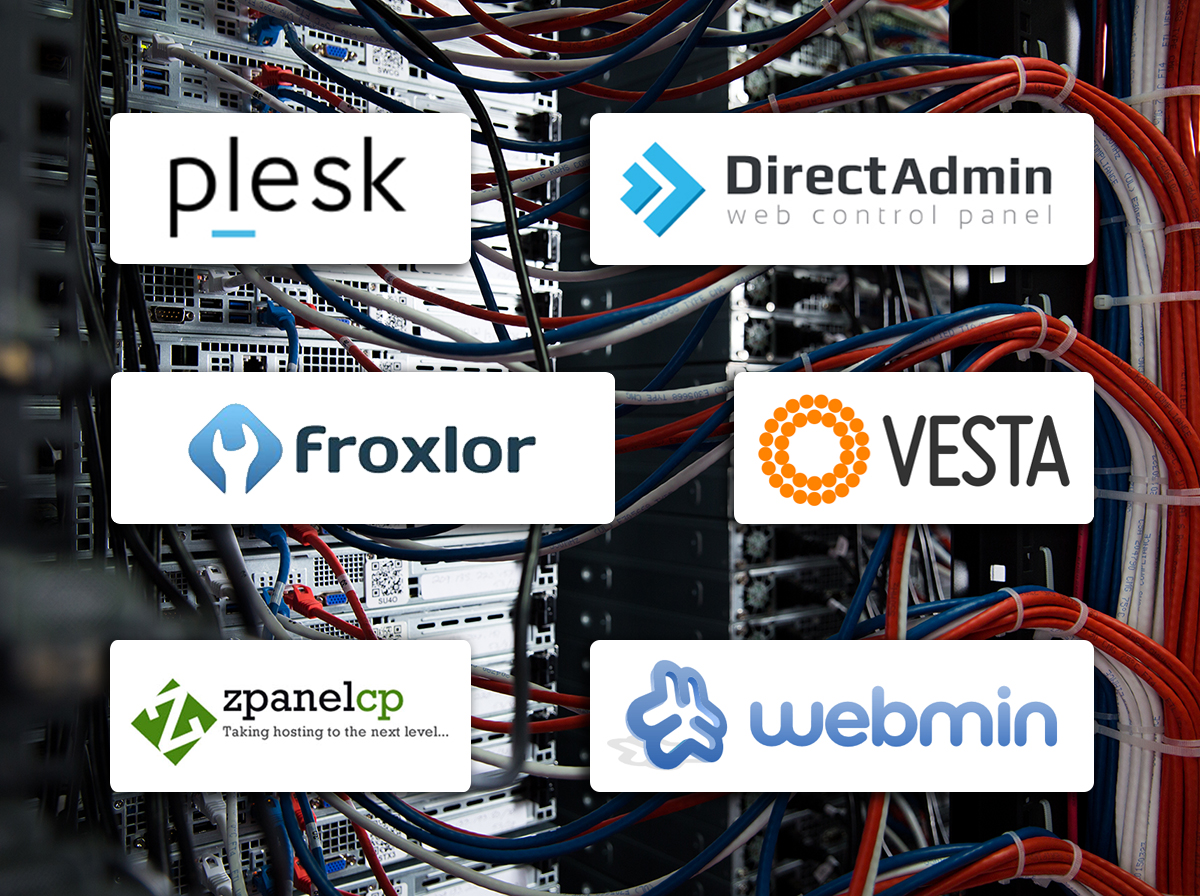
In addition to these paid-for control panels, there are also a multitude of free alternatives on the market that offer decent substitutions to cPanel as well. Unfortunately, few, if any, are able to offer ALL the features of their paid counterparts. Depending on your experience level though, some of these options may prove ideal for your specific needs. Froxlor, VestaCP, ZPanel, Webmin: these are only a few of the many free alternatives out on the market, each offering distinct advantages and weaknesses.
For those accustomed to the level of functionality offered by cPanel though, these alternatives might leave you feeling that something is missing.
Even if a custom control panel offers better features, convincing users to learn a new interface is often an uphill battle.
cPanel is by no means perfect. However, it has been the go-to control panel solution for the last two decades because of its wide-spread acceptance by users. For some of these particular users, the price increase may be a source of frustration. Regardless, the thought of abandoning cPanel entirely just doesn’t seem realistic either.
But what options are left for those looking to stick with cPanel without breaking the bank?
Introducing Hivelocity’s new flat-rate cPanel pricing structure.
Hivelocity cPanel Flat-Rate Pricing

At Hivelocity, we operate on a simple idea: the stronger and more successful our customers are, the stronger and more successful we are.
For this reason, we’ve decided to offer our dedicated server customers cPanel licensing for an easily calculated flat rate. Rather than forcing users to follow cPanel’s confusing new price structure, we’re offering our customers licensing on a simple four-tiered plan.
Should you purchase a dedicated server cPanel license directly from cPanel, you’d be looking at a base cost of $59.99 plus an additional $0.39 per account for every account over 100. By purchasing your license through Hivelocity however, you can have up to 300 accounts for just $60 a month or up to 500 accounts on your license for a flat monthly fee of $85.
Let’s do the math on that real quickly.
Say you have 500 accounts. If you purchased your license directly through cPanel, you’d be looking at a recurring bill of $59.99 + (400 x $0.39) or $215.99 per month. That’s over $2,500 each year just for your cPanel license. In this scenario, switching to Hivelocity would save you over $130 per month or just over $1,500 a year.
What if you have more than 500 accounts though? No problem. Our third tier cPanel licensing grants users between 501-1000 accounts for only $140 a month.
Lastly, our newly introduced fourth tier plan is designed for users with 1000+ accounts. It’s priced at a monthly rate of $237 + $0.225 per account for each account beyond 1001. While this option does include a per account fee, it is the only of our four options that actually follows cPanel’s newly designated payment structure. Even so, it still remains significantly less expensive than purchasing a license directly through cPanel.
Switching to Hivelocity could save you over $130 per month or just over $1,500 a year.
For comparison, we’ve put together this chart listing cPanel pricing through Hivelocity as compared to cPanel’s official store:
Monthly Account-Based cPanel Pricing
| Provider | 50 Accounts | 250 Accounts | 500 Accounts | 750 Accounts | 1000 Accounts |
|
Hivelocity |
$60.00 | $60.00 | $85.00 | $140.00 | $237.00 |
| cPanel | $59.99 | $118.49 | $215.99 | $313.49 | $410.99 |
As you can see, here at Hivelocity, we’re committed to helping our customers grow. For users who want to continue with cPanel but are in need of a more structured and predictable pricing model, moving to Hivelocity is the perfect solution. We’ll even assist you in migrating to one of our dedicated servers free of charge!
So, if you’re in need of a cPanel solution for your business or personal use, check out our cPanel pricing, give our sales team a call, or send us an email. Hivelocity helps businesses all over the world by offering a multitude of versatile server and hosting solutions built to each clients’ specific needs.
Contact us today and let us show you how Hivelocity can help your business thrive.
Now back to you!
With all the recent changes to cPanel’s pricing, many users are left asking “what’s next?” Whether you’re a cPanel novice or veteran, how are these changes affecting you and your business? Will you be making the switch to a new control panel, or seeking out the best available option to remain a cPanel user? Leave a comment below and let us know.
If you found this article helpful, please be sure to share it on your favorite social media platforms, and remember to like us on Facebook!
– Sean Kelly
Additional Links:
Searching for more great content? Interested in Private Cloud, Virtual Private Servers, or Colocation? Check out our recent posts for more news, guides, and industry insights!
