


Overview
Setting up a Solana node is a crucial step for anyone looking to actively participate in the Solana blockchain network, whether as a validator or a general node operator.
This guide consolidates key instructions from official and community sources to help you smoothly install, configure, and run your own Solana node.
You’ll learn how to prepare your environment, create essential accounts like the vote account, sync with the blockchain, and maintain your node for optimal performance.
Whether you’re following the official Solana installation steps or diving into 3rd-party instructions, this article will provide a clear roadmap to get your Solana node up and running confidently.
What Does Running a Solana Node Mean?
A Solana node is a computer or server that participates in the Solana blockchain network by validating transactions, storing a copy of the ledger, and relaying data to other nodes. Nodes can serve different roles—some act as validators that help secure the network by producing blocks and voting on consensus, while others operate as RPC nodes to provide data access for applications. Running a node contributes to the decentralization and security of the Solana ecosystem, and it allows operators to engage directly with the blockchain infrastructure, whether for earning rewards as validators or supporting dApps through RPC services.
Understanding Common Terms
Common terms related to the Solana blockchain are outlined below to help expand your understanding.
- Validator — A node that validates transactions and produces blocks on the Solana network.
- RPC Node — A node that provides an interface for applications to communicate with the blockchain.
- Vote Account — A special account validators use to participate in consensus by casting votes.
- Stake — Tokens delegated to a validator to support their role and earn rewards.
- Ledger — The blockchain’s recorded history of all transactions.
- Epoch — A period in the Solana network after which stakes and rewards are calculated.
- Slot — A short time interval during which the network produces a block.
- Cluster — A group of Solana nodes working together (e.g., Mainnet Beta, Testnet, Devnet).
- RPC Endpoint — The URL where applications connect to an RPC node to interact with Solana.
- Transaction — A record of actions on the blockchain, like transferring tokens.
- Consensus — The process validators use to agree on the current state of the blockchain.
- Program — Solana’s version of smart contracts that run on-chain code.
- dApps (Decentralized Applications) — Applications that run on the blockchain, interacting with Solana nodes via RPC to perform tasks like token transfers or smart contract calls.
Connecting the Concepts
All these terms connect and work together like this:
- Validators maintain the Solana blockchain by validating transactions and producing blocks (A validator groups transactions and adds them to the blockchain as a new record), ensuring the network’s security and reliability.
- RPC Nodes serve as gateways, allowing dApps (decentralized applications) and other software to communicate with the blockchain by sending transactions and retrieving data through RPC Endpoints.
- These dApps rely on RPC Nodes to interact with the network seamlessly. Meanwhile, stakeholders delegate Stake tokens to Validators to support their work and earn rewards by participating in Consensus during each Slot and Epoch.
- All validated transactions are recorded on the Ledger, which forms the complete history of the blockchain.
- Within this ecosystem, Programs—Solana’s version of smart contracts—run on-chain code that enables dApps to execute complex logic directly on the blockchain. Together, these components create a decentralized, efficient, and secure system where nodes validate and record transactions, applications interact smoothly, and users benefit from a robust blockchain infrastructure.
Server Hardware & Software Specification
Minimum SOL requirements
There is no strict minimum amount of SOL required to run an Agave validator on Solana.
However in order to participate in consensus, a vote account is required which has a rent-exempt reserve of 0.02685864 SOL. Voting also requires sending a vote transaction for each block the validator agrees with, which can cost up to 1.1 SOL per day as per recent requirements.
Server Hardware Specification
The information below is available online as the recommended server hardware specification. A community-maintained list of currently optimal hardware can be found at solanahcl.org. It is updated automatically from the solanahcl/solanahcl Github repo.
| Component | Validator Requirements | Additional RPC Node Requirements |
|---|---|---|
| CPU | 2.8GHz base clock speed, or faster 12 cores / 24 threads, or more SHA extensions instruction support AMD Gen 3 or newer Intel Ice Lake or newer Higher clock speed is preferable over more cores AVX2 instruction support (to use official release binaries, self-compile otherwise) Support for AVX512f is helpful |
16 cores / 32 threads, or more if possible |
| RAM | 256GB or more Error Correction Code (ECC) memory is suggested Motherboard with 512GB capacity suggested |
512 GB or more for all account indexes |
| Disk | PCIe Gen3 x4 NVME SSD, or better, on each of: Accounts: 500GB, or larger. High TBW (Total Bytes Written) Ledger: 1TB or larger. High TBW suggested Snapshots: 250GB or larger. High TBW suggested OS: (Optional) 500GB, or larger. SATA OK |
The OS may be installed on the ledger disk, though testing has shown better performance with the ledger on its own disk Accounts and ledger can be stored on the same disk, however due to high IOPS, this is not recommended |
| GPU | X |
GPUs are not necessary at this time |
| Networking |
Internet service should be at least 1GBbit/s symmetric, commercial |
10GBit/s preferred (especially for mainnet-beta) |
Server Software Specification
- Build and run on Ubuntu 24.04.
- Port Forwarding
- It is not recommended to run a validator behind a NAT. Operators who choose to do so should be comfortable configuring their networking equipment and debugging any traversal issues on their own.
- For security purposes, it is not suggested that the following ports be open to the internet on staked, mainnet-beta validators.
- 8900 TCP – JSONRPC over Websockets. Derived. Uses RPC_PORT + 1
- 8899 TCP – JSONRPC over HTTP. Change with `–rpc-port RPC_PORT“
- The following ports need to be open to the internet for both inbound and outbound
-
8000-10000 TCP/UDP – P2P protocols (gossip, turbine, repair, etc). This can be limited to any free 13 port range with –dynamic-port-range.
-
- Running a node or validator in the cloud or inside Docker requires advanced operational expertise and is generally discouraged for live clusters due to stability, performance, and support limitations.
- Current Solana CLI software release is available in the following article.
- Building from source is required for all other supported target platforms (MacOS and Windows) today and suggested for Linux as it will soon be required there as well.
For a list of available servers with Hivelocity you can review the current server offerings. If you require a custom setup, feel free to reach out to our Sales team for assistance using the dedicated form on our website.
Step-by-Step Process
Note that the Solana CLI is now maintained by Anza and rebranded as the Agave release. As a result, the Solana website links to Anza’s documentation for installation. While the name has changed, the Agave CLI offers the same functionality and remains fully compatible with the Solana blockchain.
The steps below will describe start to finish all the required items necessary to complete the process.
Installation of the Required Command-Line Interface Tool
To begin this guide, you’ll run commands on your trusted computer and not on the remote machine intended for validator operations.
- Start by opening the terminal application on your trusted computer. For this article we will use an Ubuntu system.
- on Mac, you can search for the word terminal in spotlight.
- on Ubuntu, you can type
CTRL + Alt + Tto open a new terminal in the GUI version. - on Windows, you will have to open the command prompt as an Administrator.
- To create your validator vote account, you need to install the Solana command line interface on your local computer. The link in this step presents multiple methods to continue with the installation. We will proceed with the Solana Install Tool.
This installation article might be out of date with certain links, specifically version related, hence the recommendation to review the official installation doc for the updated versions and commands. - Proceed within your terminal with the command
sh -c "$(curl -sSfL https://release.anza.xyz/v2.2.14/install)".- You can replace v2.2.14 with the release tag matching the software version of your desired release, or use one of the three symbolic channel names: stable, beta, or edge.
- If prompted with the following during installation proceed to run the command that is presented as below and attempt to reinstall.

PATH Related Error - Once reinstallation is done an initialization message will appear as below. Run the command
solana --versionto ensure installation is complete.
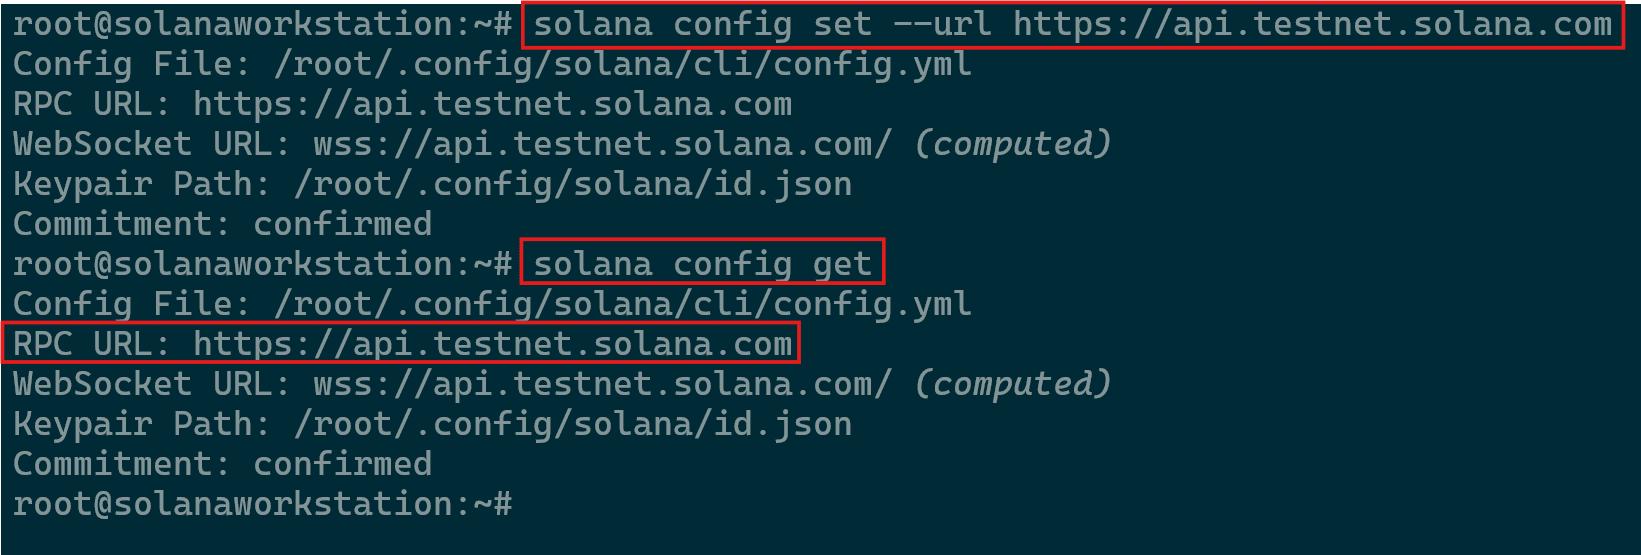
Solana Installation Confirmation - After successfully installing the CLI, the next step is to update your configuration to point to the testnet cluster using the command below.
solana config set --url https://api.testnet.solana.com
- To verify, run the command
solana config get- You should see a line that says: “RPC URL: https://api.testnet.solana.com”
Acquiring Updated Configurations
- You should see a line that says: “RPC URL: https://api.testnet.solana.com”
Keypairs Creation
In the Solana network, validators maintain the blockchain and validate transactions. Vote accounts track validator activity and help establish consensus. Authorized withdrawers are designated entities with permission to withdraw funds from the associated account.
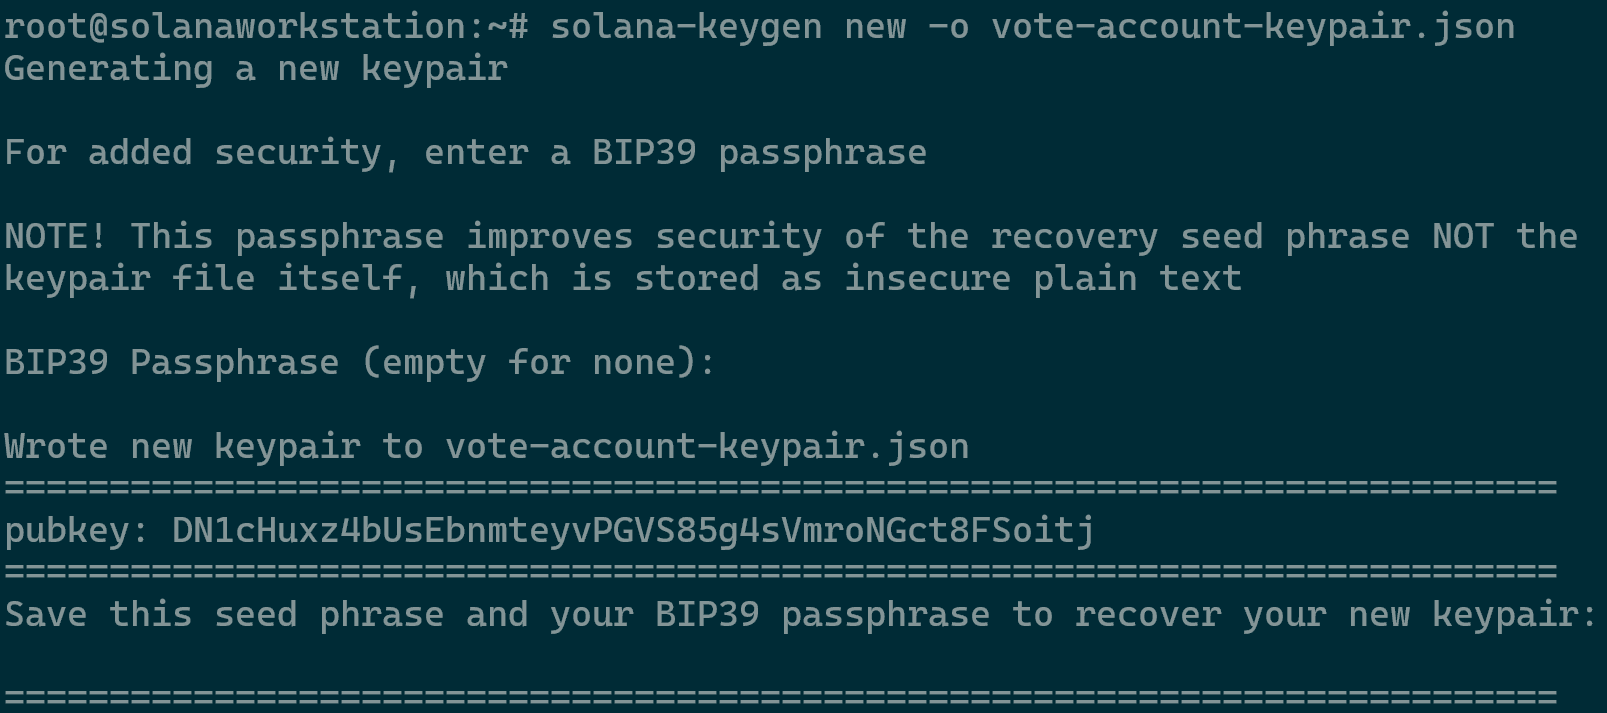
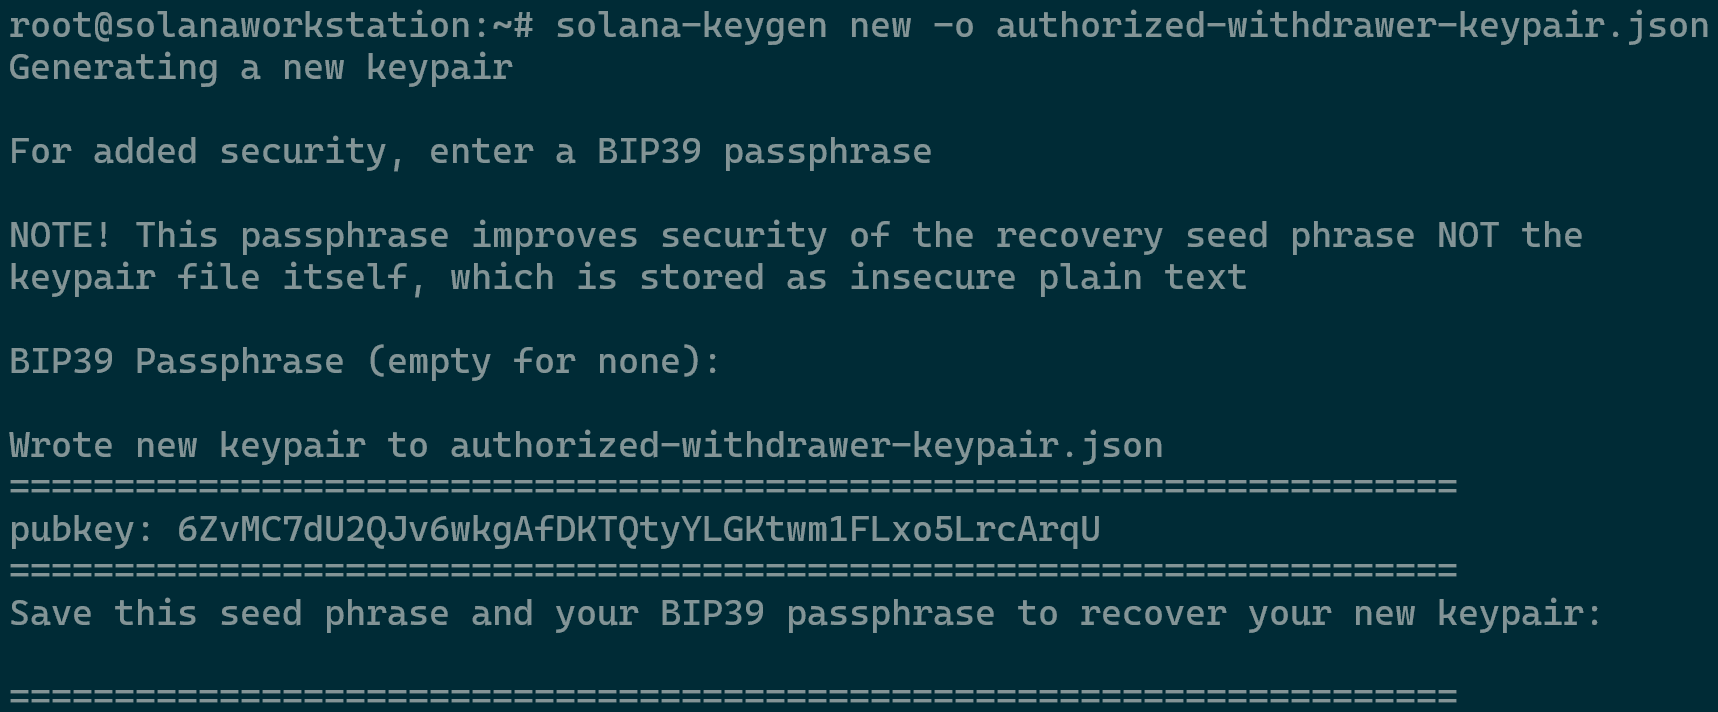
Now we are required to generate the three keypairs required to run your validator. This can be done on your local workstation.
- One key for the validator
- One key for the vote account to track
- One key for the authorized withdrawer
Run the following three separate commands to create the required key pairs.
solana-keygen new -o validator-keypair.json
solana-keygen new -o vote-account-keypair.json
solana-keygen new -o authorized-withdrawer-keypair.json

Creating a Vote Account
Initial Configuration and Airdropping SOL
Before you can create your vote account, you need to configure the Solana command line tool a bit more.
- The command below sets the default keypair that the Solana CLI uses to the
validator-keypair.jsonfile that you just created in the terminal.solana config set --keypair ./validator-keypair.json

- Setting the validator keypair as the default in the Solana Configuration
- Now verify your account balance of zero using the command
solana balance.
Solana Balance Check
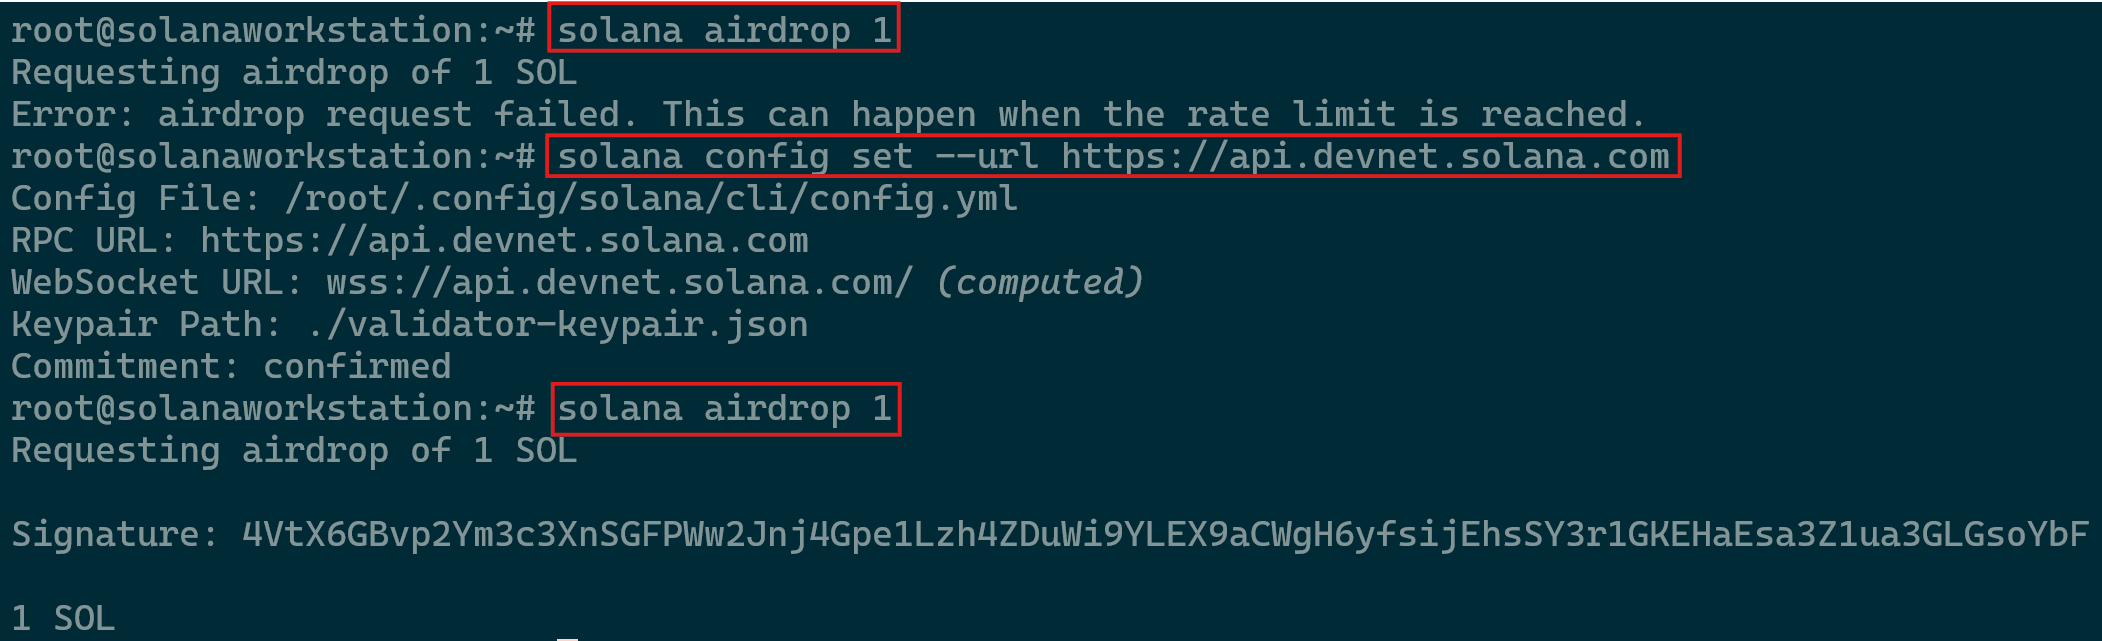
- Next you will need to deposit some SOL into that keypair account in order to create a transaction (in this case, making your vote account). Notice that we’re still on testnet so this activity here is not an actual SOL being used as it is simply an example. The command required is
solana airdrop 1.- If met with “Error: airdrop request failed. This can happen when the rate limit is reached.” Then you can use https://faucet.solana.com/ to load the account (Preferred for testing purposes).
- Alternatively, you can use devnet by running the command
solana config set --url https://api.devnet.solana.comfollowed bysolana airdrop 1however the keypairs would have to be recreated on the new RPC. - If required, you can get the public key using
solana-keygen pubkey /home/sol/validator-keypair.json.
|
The airdrop sub command does not work on mainnet, so you will have to acquire SOL and transfer it into this keypair’s account if you are setting up a mainnet validator. |
Creating the Vote Account in the Solana Cluster
- Next, use the Solana cluster to create your vote account. Important: Run this and all previous commands from your trusted local machine — not from the server where you’ll run your validator. This step, in particular, must be executed on a secure, trusted computer. At the end of entering all the commands, press Enter to continue.
- Note
-uttells the cli command that we would like to use the testnet cluster.--fee-payerspecifies the keypair that will be used to pay the transaction fees. Both flags are not necessary if you configured the Solana cli properly above, but they are useful to ensure you’re using the intended cluster and keypair.
- Note
solana create-vote-account \
   ./vote-account-keypair.json \
   ./validator-keypair.json \
   ./authorized-withdrawer-keypair.json \
   --fee-payer ./validator-keypair.json

|
Make sure your authorized-withdrawer-keypair.json is stored in a safe place. If you have chosen to create a keypair on disk, you should first backup the keypair and then delete it from your local machine. IMPORTANT: If you lose your withdrawer key pair, you will lose control of your vote account. You will not be able to withdraw tokens from the vote account or update the withdrawer. Make sure to store the authorized-withdrawer-keypair.json securely before you move on. |
Creating and Configuring the Server
It is time to begin working on the validator server itself.
Initial Setup & User Creation
- Connect to your remote validator server via SSH.
- Make sure you have the latest package versions on your server using the commands
sudo apt updatefollowed bysudo apt upgrade. When prompted, approve any keys or package installations accordingly. - Proceed to reboot the device once all packages have been installed/updated using the command
reboot. - Create a new user, named sol, for running the validator with the command
sudo adduser sol. Fill the required password when prompted and confirm.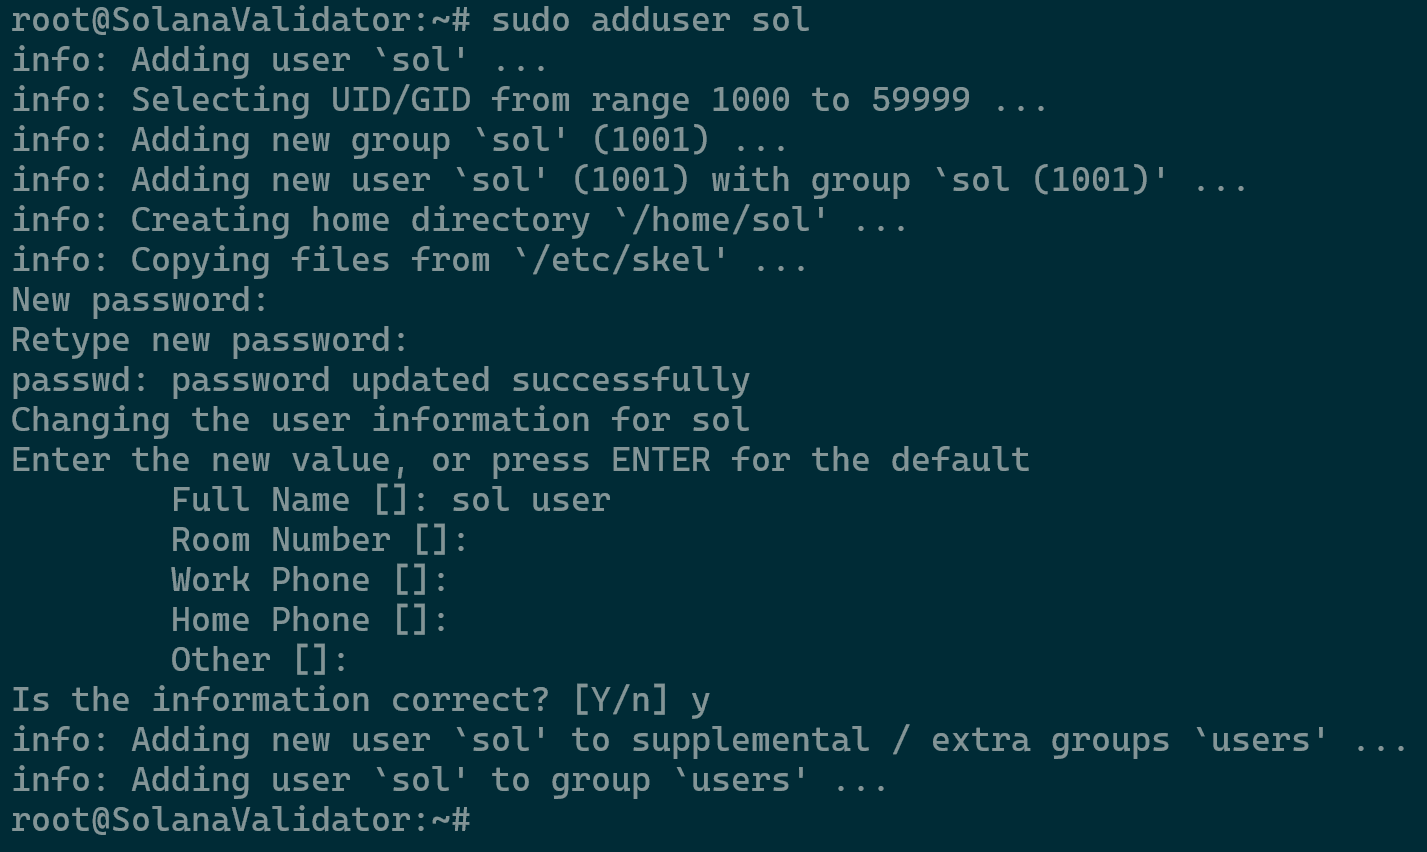
Creating the “sol” User
Firewall Setup
For this setup we can use iptables or CSF however a more robust built-in feature would be UFW. Run the following commands in that order to apply all the necessary rules.
Below we will be allowing the validator P2P traffic, allow the entry point port, public RPH HTTP port, public WebSocket (PubSub) port, and enable the firewall.
sudo ufw allow "OpenSSH"
sudo ufw allow 8000:10000/udp
sudo ufw allow 8000:10000/tcp
sudo ufw allow 8000/tcp
sudo ufw allow 8001/tcp
sudo ufw allow 8899/tcp
sudo ufw allow 8900/tcp
sudo ufw enable
sudo ufw status

Storage Configuration
You would need to meet the minimum requirements as per the instructions in this article. As stated above, accounts are to be 500GB, or larger and ledger at 1TB or larger. Partition the drives as below if they are untouched.
- You can view current status with the commands
df -h
lsblk
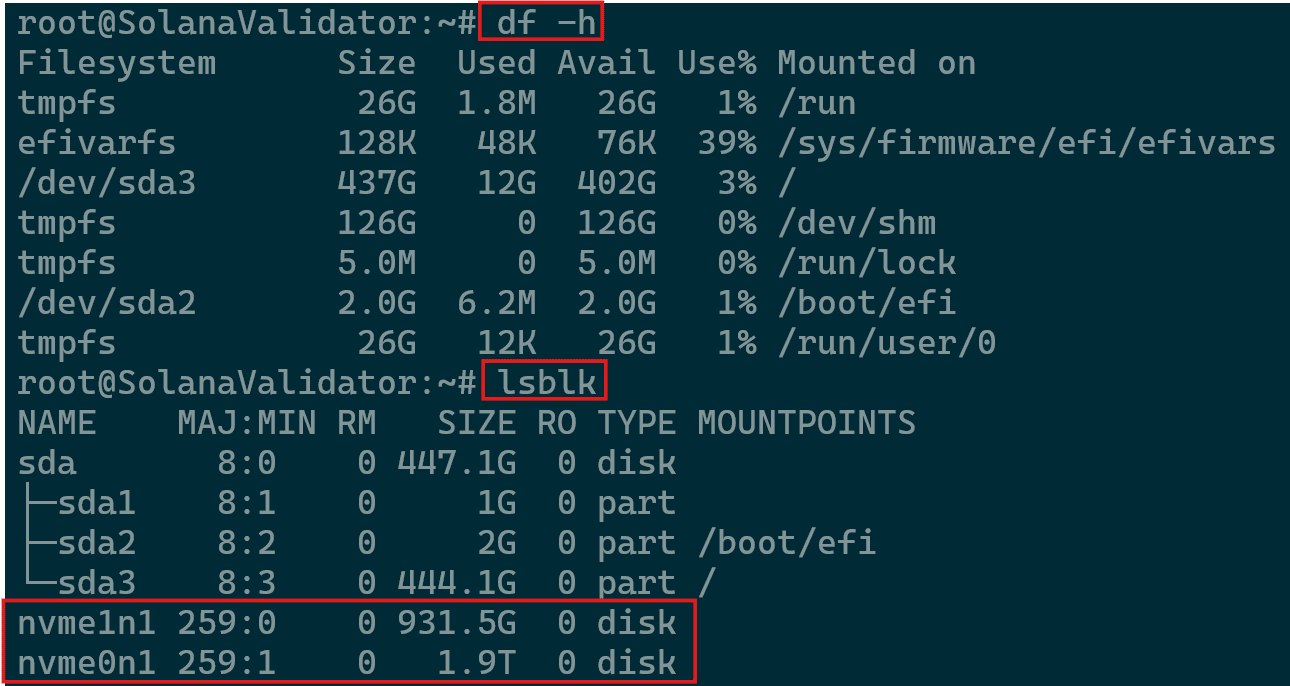
Available Storage and Current Mounting Points
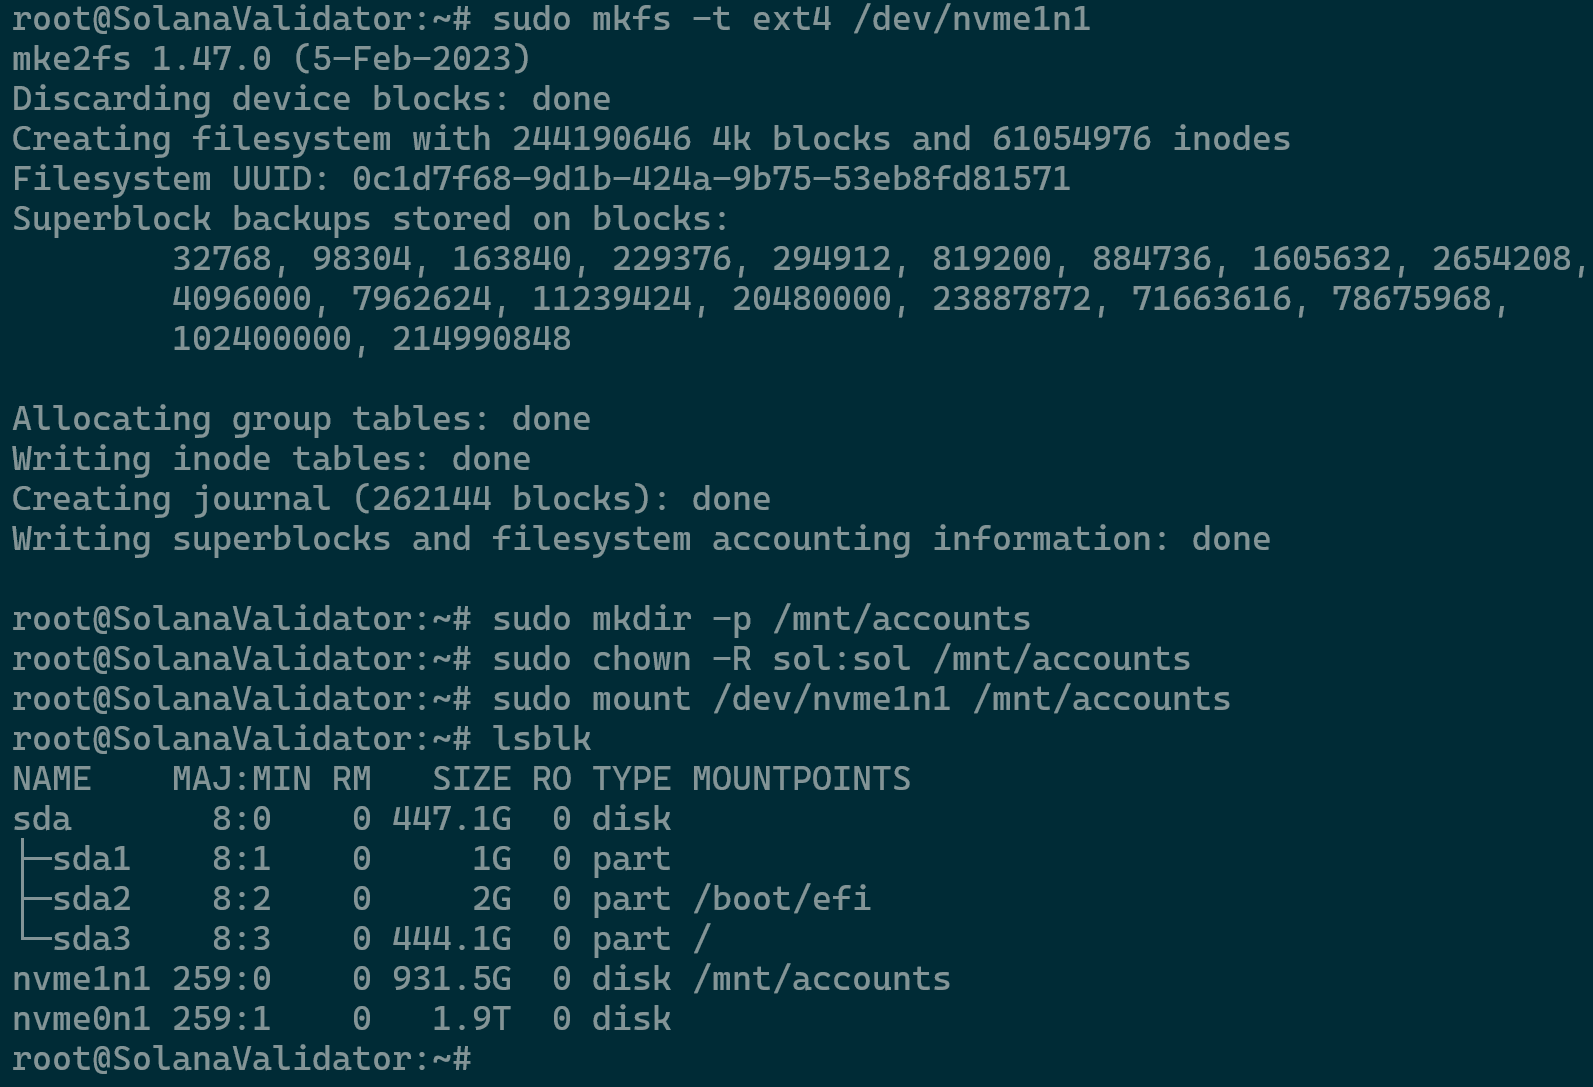
- For this example, we will use the nvme1n1 for the accounts. Proceed as per the commands below.
sudo mkfs -t ext4 /dev/nvme1n1
sudo mkdir -p /mnt/accounts
sudo chown -R sol:sol /mnt/accounts
sudo mount /dev/nvme1n1 /mnt/accounts
lsblk
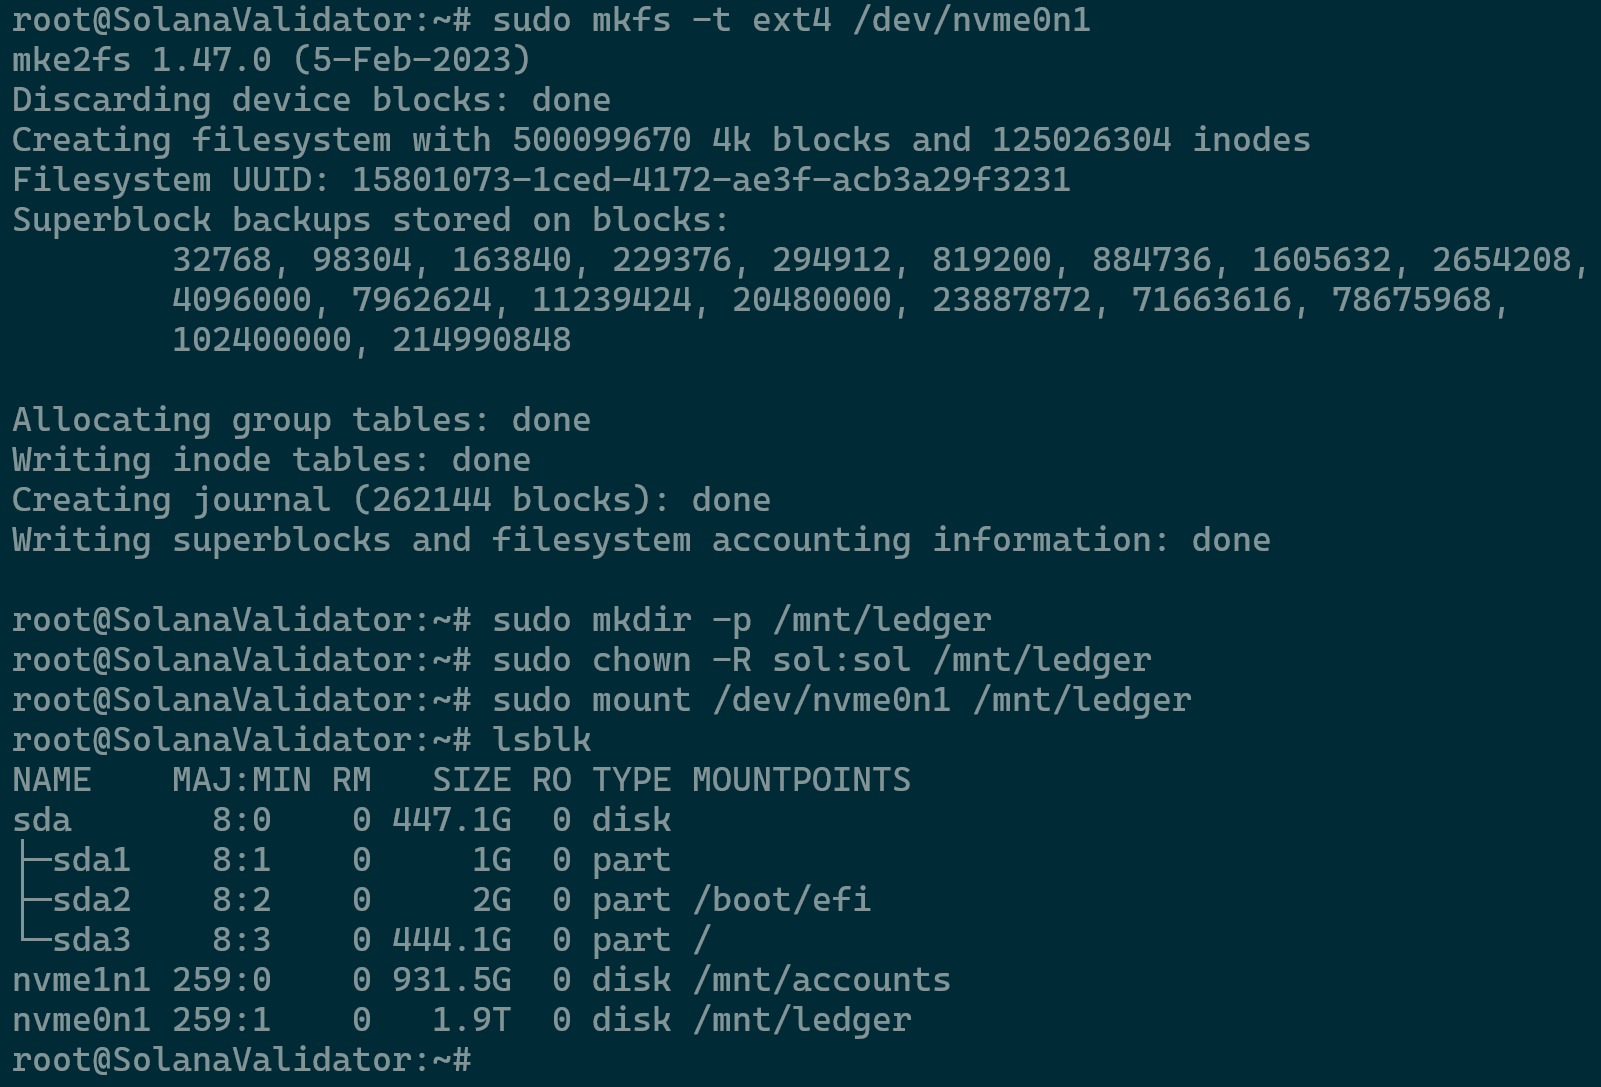
Accounts Partition - Proceed as per the commands below for setting nvme0n1 for the ledger.
sudo mkfs -t ext4 /dev/nvme0n1
sudo mkdir -p /mnt/ledger
sudo chown -R sol:sol /mnt/ledger
sudo mount /dev/nvme0n1 /mnt/ledger
lsblk
Ledger Partition - Retrieve the UUID of each partition so that it can be entered into /etc/fstab. This change will ensure that upon reboots the mounting points will remain persistent. Use the commands
lsblkandblkidto retrieve the UUIDs.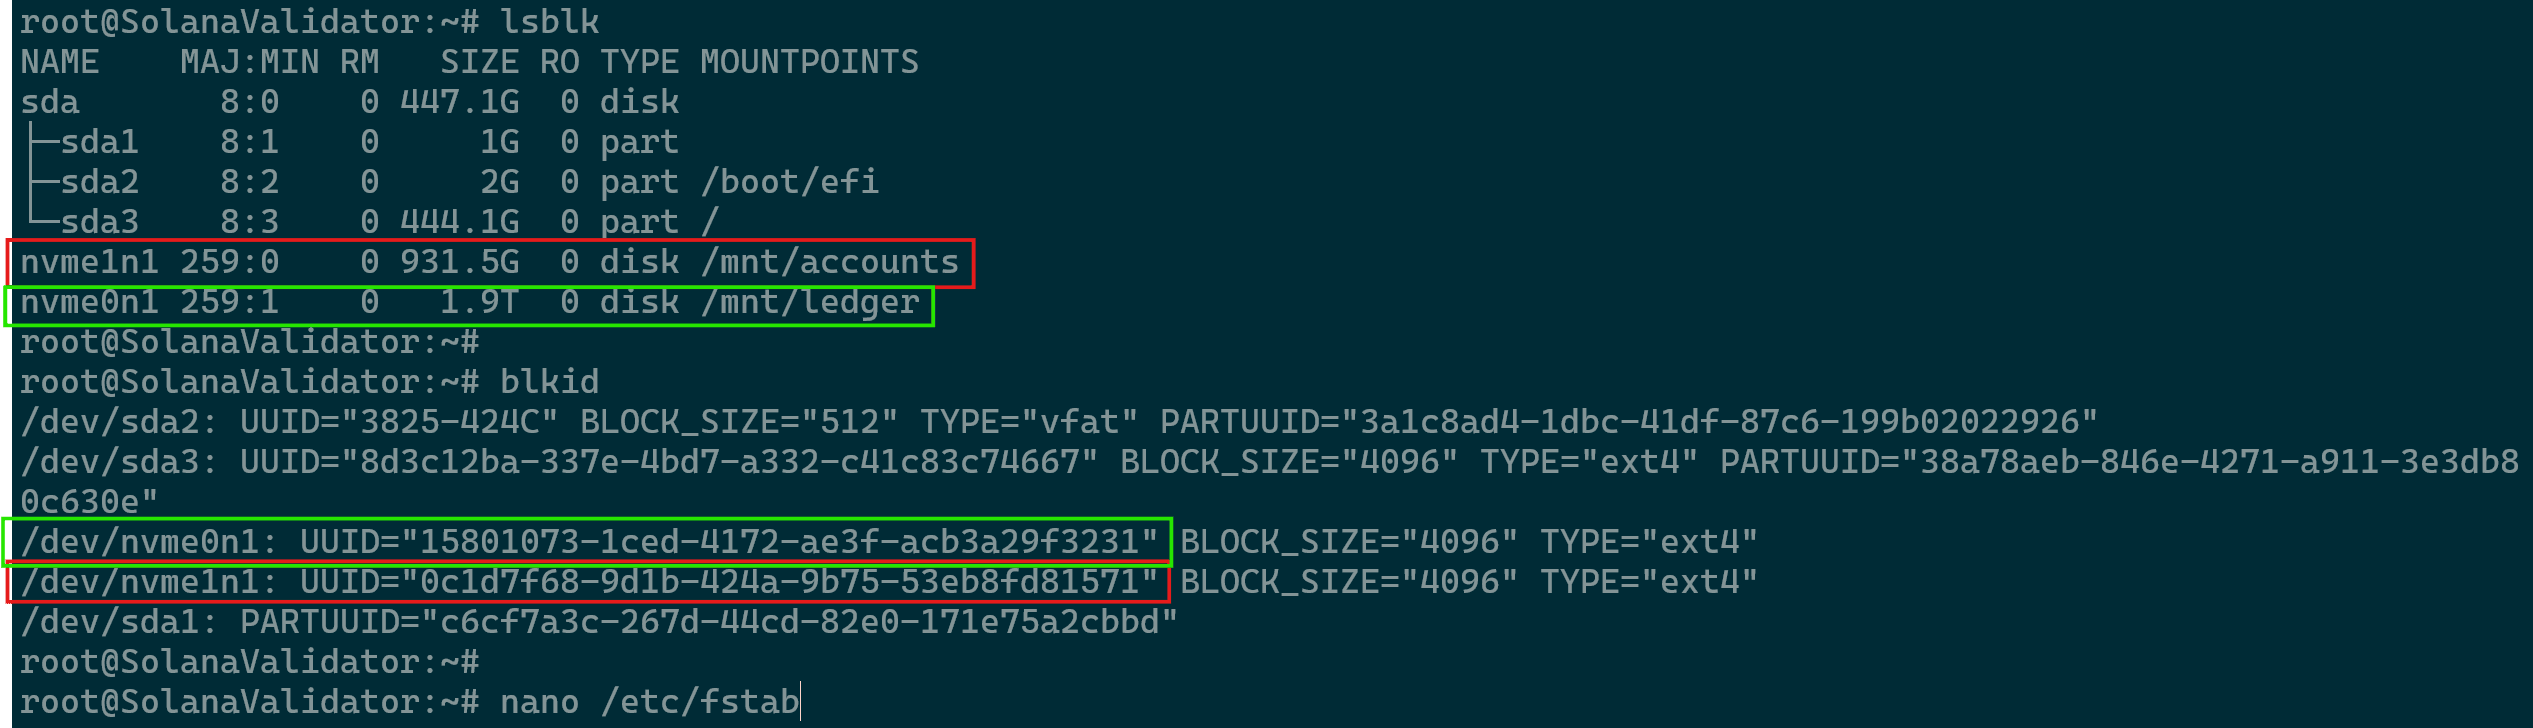
UUIDs - Run the command nano
/etc/fstabto edit the fstab file and enter the entries with the correct UUID and mounting points as below for the example.UUID=15801073-1ced-4172-ae3f-acb3a29f3231 /mnt/ledger ext4 defaults,nofail 0 2 UUID=0c1d7f68-9d1b-424a-9b75-53eb8fd81571 /mnt/accounts ext4 defaults,nofail 0 2
- Save the /etc/fstab file upon making the changes.
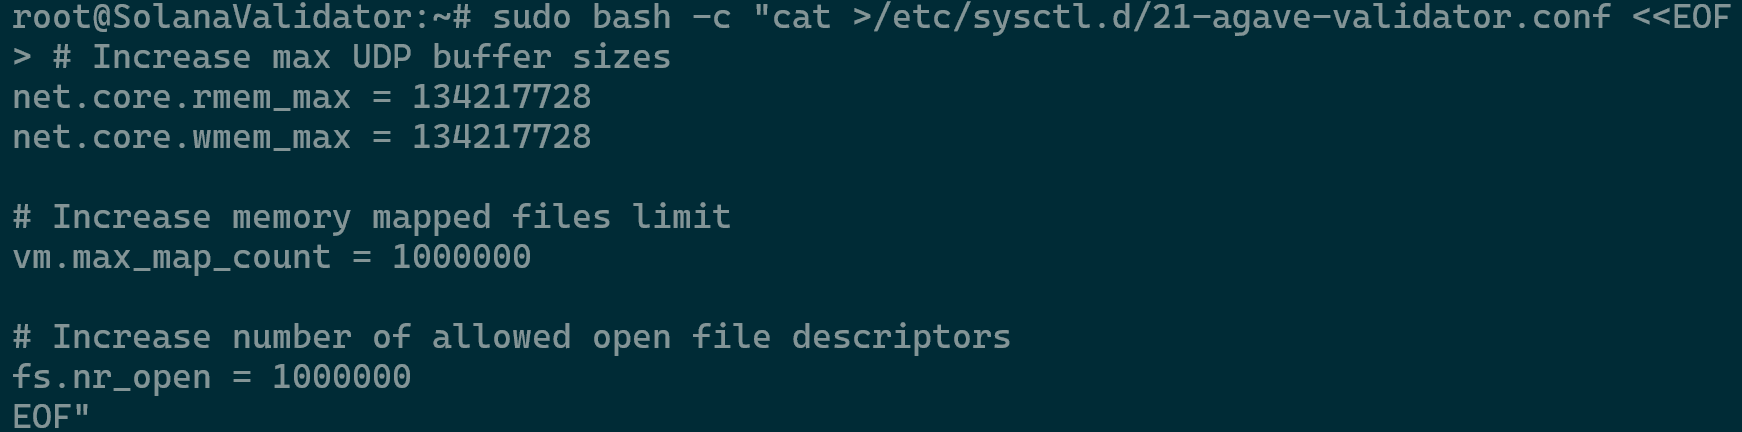
Linux System Tuning
Your system requires tuning to function correctly. Without applying the settings below, your validator may fail to start. In this section, you will optimize sysctl settings to enhance network and memory performance and increase systemd and session file limits to support more open files and connections for improved stability.
- Optimize sysctl knobs by running the command
sudo bash -c "cat >/etc/sysctl.d/21-agave-validator.conf <<EOF - Proceed to enter the rest of the entries below and press enter.
# Increase max UDP buffer sizes
net.core.rmem_max = 134217728
net.core.wmem_max = 134217728

# Increase memory mapped files limit
vm.max_map_count = 1000000

# Increase number of allowed open file descriptors
fs.nr_open = 1000000
EOF"
Optimizing Validator Configuration - Check the changes by running the command
sudo sysctl -p /etc/sysctl.d/21-agave-validator.conf
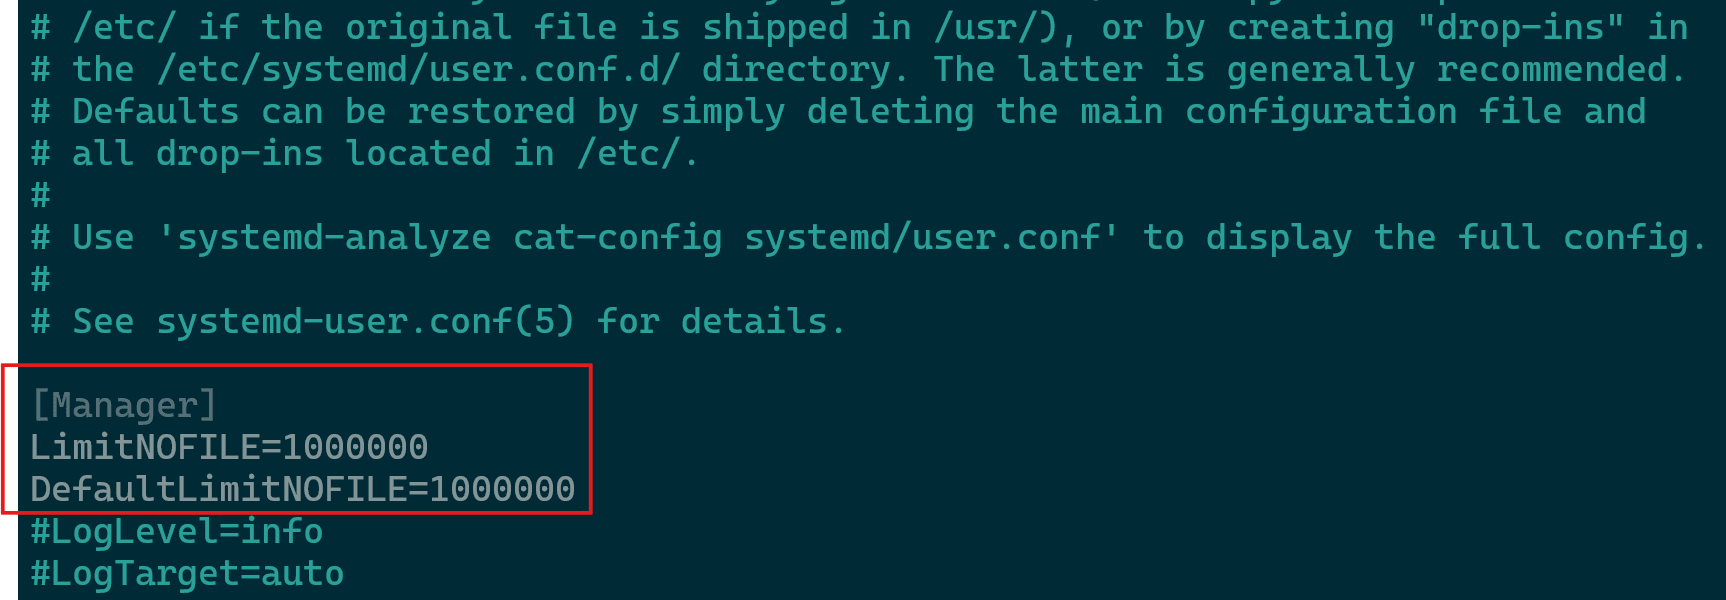
Verification of Validator Configuration - Proceed to increase systemd file limits by opening your custom service file and adding “LimitNOFILE=1000000″ and “DefaultLimitNOFILE=1000000″, without the quotation marks, to the [Service] section of your systemd service file.
- If you do not have a dedicated service file, proceed to edit /etc/systemd/system.conf and /etc/systemd/user.conf for a global change on the server.
- Edit the system.conf file with the command
sudo nano /etc/systemd/system.conf. The same (Steps 6-7) needs to be done for /etc/systemd/user.conf afterwards usingsudo nano /etc/systemd/user.conf. - Enter the value under the [Manager] section as per the image below and save the file.
Increasing Session File Limits - Increase your session file limits by running the commands below and press enter at the end.
sudo bash -c "cat >/etc/security/limits.d/90-solana-nofiles.conf <<EOF
# Increase process file descriptor count limit
* - nofile 1000000
EOF"
- Reboot the server.
Copying the Key Pairs
The key pairs that were created earlier in the article on the workstation will now be required to get copied to the validator server. This activity can be done as per the steps below.
- On your personal computer, not on the validator, securely copy your validator-keypair.json file and your vote-account-keypair.json file to the validator server as below.
scp validator-keypair.json sol@<server.hostname>:
scp vote-account-keypair.json sol@<server.hostname>:
 Copying Key Pairs
The vote-account-keypair.json does not have any function other than identifying the vote account to potential delegators. Only the public key of the vote account is important once the account is created.
- Modify the permissions and ownership on the keys using the following commands.
sudo chown -R sol:sol /home/sol/bin
sudo chown sol:sol /home/sol/validator-keypair.json
sudo chown sol:sol /home/sol/vote-account-keypair.json
chmod 600 /home/sol/validator-keypair.json
chmod 600 /home/sol/vote-account-keypair.json
Install The Solana CLI on Remote Machine
Your remote machine will need the Solana CLI installed to run the Agave validator software. For simplicity, install the cli with user sol. Refer again to Solana’s Install Tool or build from source. It is best for operators to build from source rather than using the pre-built binaries.
- Change the user to sol using the command
su - sol - Proceed within your terminal with the command
sh -c "$(curl -sSfL https://release.anza.xyz/v2.2.14/install)"- You can replace v2.2.14 with the release tag matching the software version of your desired release, or use one of the three symbolic channel names: stable, beta, or edge.
- Ensure to run the following when prompted and to log out and back in to your shell session
export PATH="/root/.local/share/solana/install/active_release/bin:$PATH" - Run the command
nano /home/sol/.bashrc. - Add at the bottom the following
export PATH="/home/sol/.local/share/solana/install/active_release/bin:$PATH". - After saving the file run the command
source ~/.bashrc. - Completion of installation can be done by checking the Solana version with
solana --version
 Installation Verified
Create A Validator Startup Script
A validator startup script is essential for automating the launch and management of your Solana validator. It ensures the validator starts reliably with the correct configuration and keypairs, even after reboots or crashes. By using a script, you reduce manual errors, streamline maintenance, and help keep your node consistently online—critical for maintaining stake and uptime performance.
Refer to agave-validator --help for more information on what each flag is doing in this script. Also refer to the section on best practices for operating a validator.
This startup script is specifically intended for testnet. For more startup script examples intended for other clusters, refer to the clusters section..
- In your sol home directory (e.g.
/home/sol/), create a folder calledbin. Inside that folder create a file calledvalidator.shand make it executable.mkdir -p /home/sol/bin touch /home/sol/bin/validator.sh chmod +x /home/sol/bin/validator.sh
- Open the validator.sh file for editing using
nano /home/sol/bin/validator.sh -
Copy and paste the following contents into validator.sh then save the file.
|
|
Verifying Your Validator Is Working & Inspecting the Logs
- Test that your validator.sh file is running properly by executing the validator.sh script with the command in your validator command line
/home/sol/bin/validator.sh.
Validator Running - The script should execute the agave-validator process. In a new terminal window, login to your server, then verify that the process is running using the command
ps aux | grep agave-validator.
Validator Process - As a quick check, ensure your validator is generating expected log output (The logs will be quite verbose). Open a new terminal window, SSH into your validator machine, switch to the sol user using
su - sol, and tail the logs usingtail -f /home/sol/agave-validator.log(Orcatinstead oftail -fto view the whole file).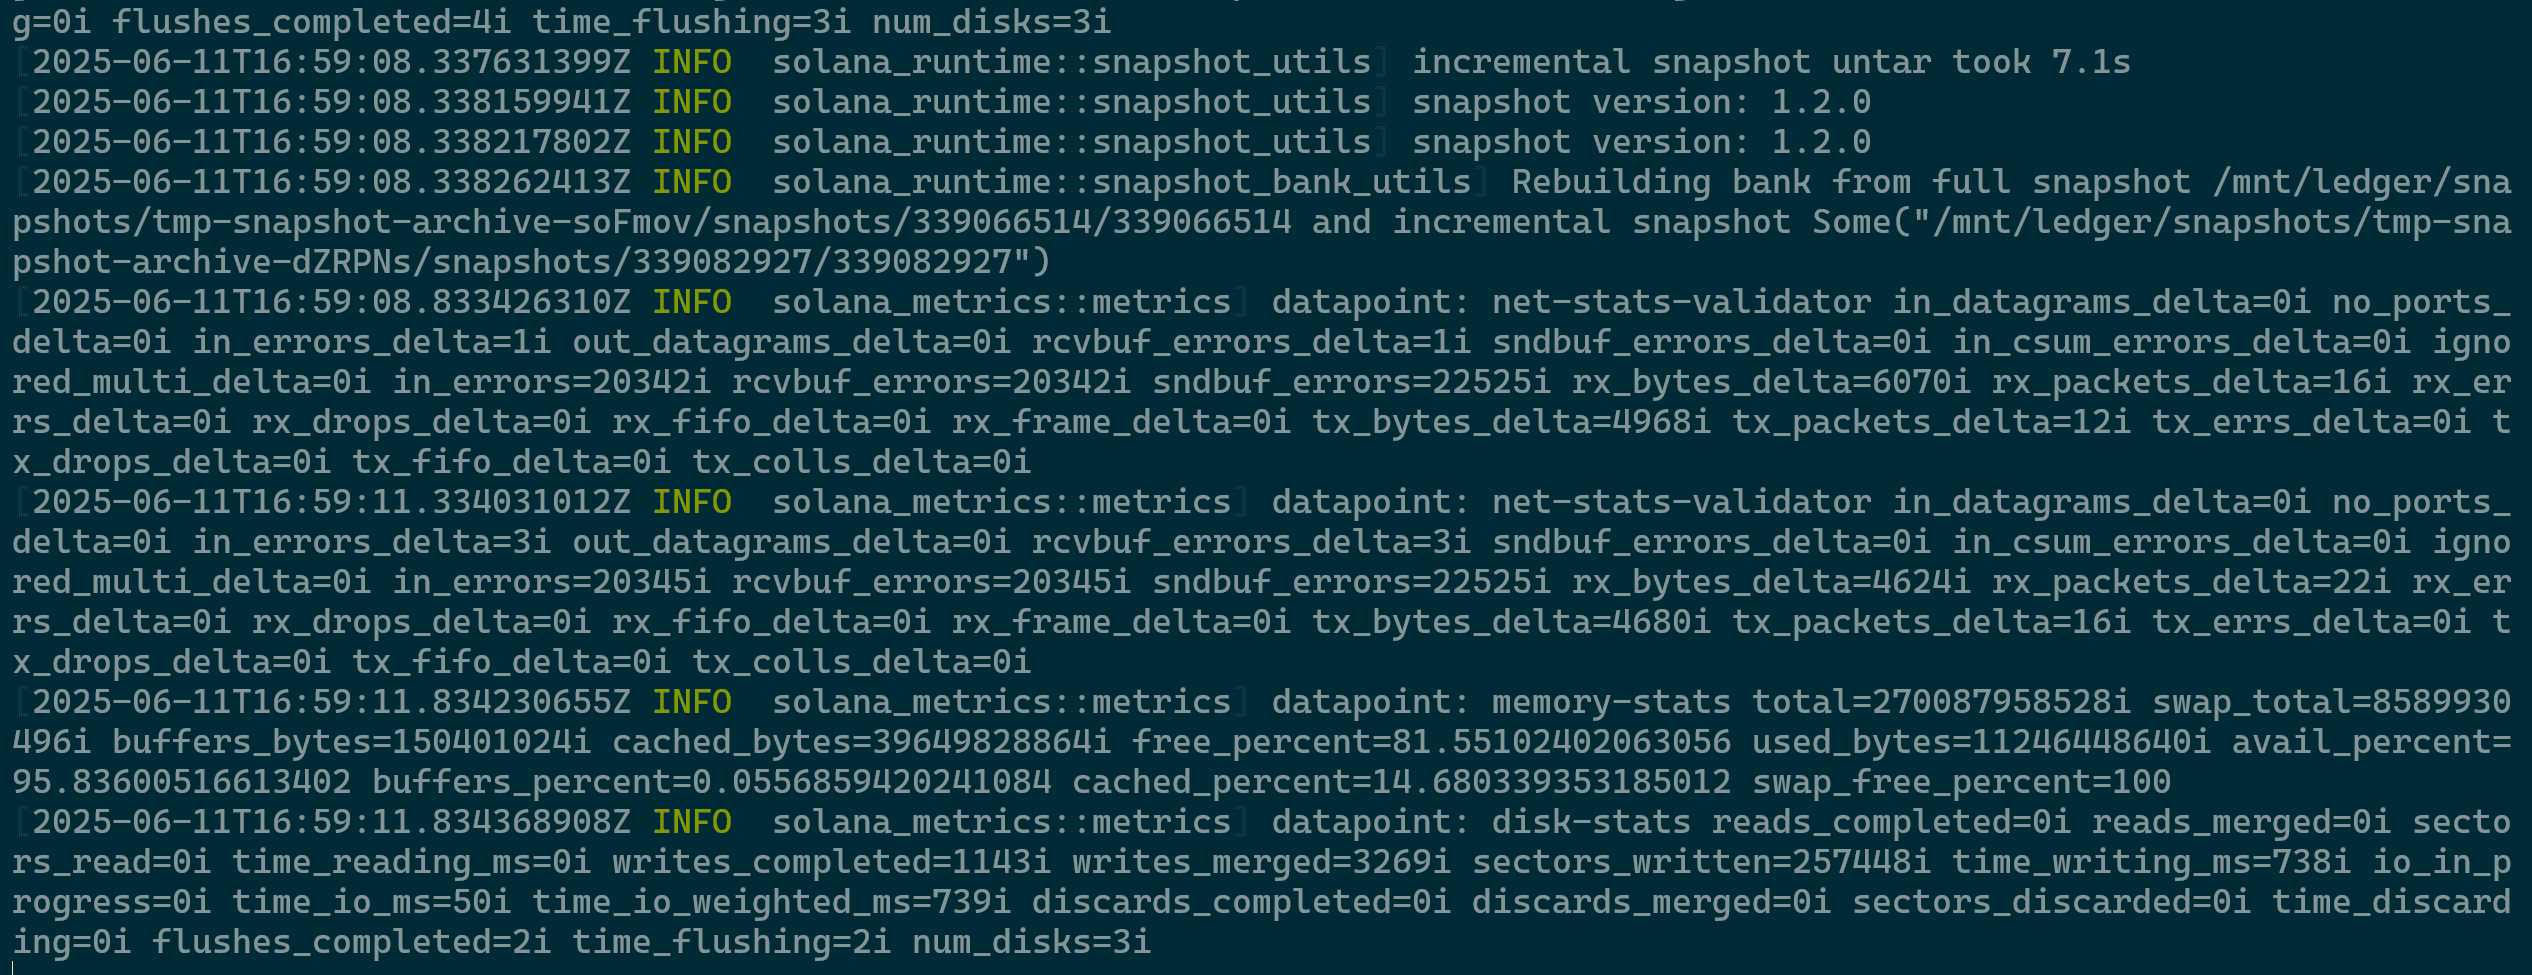
Validator Log Output -
The tail command will continuously display new log entries as they are written to the file. While your validator is running, you should see a steady stream of log output. Watch closely for any lines containing _ERROR_. Assuming you do not see any error messages, exit out of the command.
Gossip Protocol
Gossip is the protocol Solana validators use to communicate with each other within the cluster. To confirm that your validator is running correctly, ensure it has successfully registered with the gossip network. For more details, see the Gossip Service documentation.
-
In a new terminal window, connect to your validator via SSH. Identify your validator’s pubkey using
solana-keygen pubkey /home/sol/validator-keypair.json. -
The solana gossip command displays all validators currently registered with the gossip network. To verify that your newly set up validator has joined, you can search for its public key in the output using grep with
solana gossip | grep <pubkey>. -
After running the command, you should see a single line that looks like the image below.
-
If you do not see any output after grep-ing the output of gossip, your validator may be having startup problems. If that is the case, start debugging by looking through the validator log output.
-

Solana Validator Check
Once you’ve confirmed that your validator is in gossip, the next step is to stake some SOL to it. After the stake becomes active (which occurs at the start of the next epoch), you can check if your validator is ready to participate in voting on the network. Use the solana validators command to list all validators, and as before, you can filter the output with grep to focus on your specific validator as below.
solana validators | grep <pubkey></code>
The solana catchup command is a helpful tool to monitor how fast your validator is processing blocks. The Solana network can handle a high volume of transactions per second, and since your validator is new, it needs to request a recent ledger snapshot from another validator (specified as a --known-validator in your startup script). By the time you receive the snapshot, your validator might already be behind the network, as many transactions may have already been processed and finalized. To participate in consensus, your validator needs to catch up by requesting the missing, more recent transactions.
The solana catchup command will show you how far behind your validator is and how quickly it’s catching up to the network.
solana catchup <pubkey>

If you encounter a message about trying to connect, it’s possible that your validator hasn’t joined the network yet. Double-check the logs and use the solana gossip and solana validators commands to confirm that your validator is running correctly.
Once you’ve confirmed that your validator starts without issues, the next step is to set up a system service to automatically run the validator.sh script. To proceed, stop the currently running validator by pressing CTRL+C in the terminal window where it’s active.
Create a System Service
Follow these instructions for running the validator as a system service instead of running the script in a shell or sending it to the background.
Be sure to set up log rotation to manage disk space and keep logs organized. After configuring the system service, you can start your validator using the new service.
sudo systemctl enable --now solVerify that your validator is running correctly by tailing the logs and using the previously mentioned commands solana gossip and solana validators to confirm it’s participating in the network along with tailing any logs.
tail -f /home/sol/agave-validator*.log
Sources & Further Troubleshooting
You can find further information on the process in the official documentation which was used as reference for the installation process in this article along with various troubleshooting details if any issues come up during the process.
–Written by Pascal Suissa
