NOTE: If you want Hivelocity to set up your backup you must purchase our R1Soft Continuous Data Protection service. Otherwise, even with Managed Services, Hivelocity does not setup, or take responsibility for your backups.
To setup backups in WHM/cPanel, we first suggest you use a 2nd drive to place all your backups on. Placing backups on the same drive as the OS and WHM/cPanel installation may cause issues; if your main drive fails, all your backups may not be available. Your main drive may also become full if you place your backups on the same drive as your OS/WHM without specifying a backup partition prior to OS installation.
If you have a 2nd drive, and it has not been partitioned or formatted to use as a backup drive, you can do the following. This is assuming your 2nd drive is being seen as /dev/sdb in your server. Please review and confirm that /dev/sdb is the correct drive.
Login as root thru SSH, and issue the following command:
fdisk -l
this will show all drives connected to your server. You want to find the drive that is your secondary, you may need to confirm with Hivelocity through a trouble ticket what the drive is. Please open a ticket through your myVelocity account management portal, if you need help in doing so.
If /dev/sdb is your 2nd drive that you want to use for backups, and it has no data, you can partition it and format it like so:
root@mace [~]# fdisk -l
Disk /dev/sdb: 37.6 GB, 37580963840 bytes
255 heads, 63 sectors/track, 4568 cylinders
Units = cylinders of 16065 * 512 = 8225280 bytes
Sector size (logical/physical): 512 bytes / 512 bytes
I/O size (minimum/optimal): 512 bytes / 512 bytes
Disk identifier: 0x00000000
Disk /dev/sda: 34.4 GB, 34359738368 bytes
255 heads, 63 sectors/track, 4177 cylinders
Units = cylinders of 16065 * 512 = 8225280 bytes
Sector size (logical/physical): 512 bytes / 512 bytes
I/O size (minimum/optimal): 512 bytes / 512 bytes
Disk identifier: 0x000b537e
Device Boot Start End Blocks Id System
/dev/sda1 1 535 4292608 82 Linux swap / Solaris
Partition 1 does not end on cylinder boundary.
/dev/sda2 * 535 4178 29260800 83 Linux
The above shows the new /dev/sdb device, and it has no partitions, and is 37.6GBs in size. To partition it as one largest drive, do the following:
root@mace [~]# fdisk /dev/sdb
Device contains neither a valid DOS partition table, nor Sun, SGI or OSF disklabel
Building a new DOS disklabel with disk identifier 0x5bcc210b.
Changes will remain in memory only, until you decide to write them.
After that, of course, the previous content won’t be recoverable.
Warning: invalid flag 0x0000 of partition table 4 will be corrected by w(rite)
WARNING: DOS-compatible mode is deprecated. It’s strongly recommended to
switch off the mode (command ‘c’) and change display units to
sectors (command ‘u’).
Command (m for help): p
Disk /dev/sdb: 37.6 GB, 37580963840 bytes
255 heads, 63 sectors/track, 4568 cylinders
Units = cylinders of 16065 * 512 = 8225280 bytes
Sector size (logical/physical): 512 bytes / 512 bytes
I/O size (minimum/optimal): 512 bytes / 512 bytes
Disk identifier: 0x5bcc210b
Device Boot Start End Blocks Id System
Command (m for help): n
Command action
e extended
p primary partition (1-4)
p
Partition number (1-4): 1
First cylinder (1-4568, default 1):
Using default value 1
Last cylinder, +cylinders or +size{K,M,G} (1-4568, default 4568):
Using default value 4568
Command (m for help): w
The partition table has been altered!
Calling ioctl() to re-read partition table.
Syncing disks.
You can now see that the /dev/sdb1 device is partitioned, and ready to be formatted:
root@mace [~]# fdisk -l /dev/sdb
Disk /dev/sdb: 37.6 GB, 37580963840 bytes
255 heads, 63 sectors/track, 4568 cylinders
Units = cylinders of 16065 * 512 = 8225280 bytes
Sector size (logical/physical): 512 bytes / 512 bytes
I/O size (minimum/optimal): 512 bytes / 512 bytes
Disk identifier: 0x5bcc210b
Device Boot Start End Blocks Id System
/dev/sdb1 1 4568 36692428+ 83 Linux
To format the drive, do the following:
root@mace [~]# mkfs.ext3 /dev/sdb1
mke2fs 1.41.12 (17-May-2010)
Filesystem label=
OS type: Linux
Block size=4096 (log=2)
Fragment size=4096 (log=2)
Stride=0 blocks, Stripe width=0 blocks
2293760 inodes, 9173107 blocks
458655 blocks (5.00%) reserved for the super user
First data block=0
Maximum filesystem blocks=4294967296
280 block groups
32768 blocks per group, 32768 fragments per group
8192 inodes per group
Superblock backups stored on blocks:
32768, 98304, 163840, 229376, 294912, 819200, 884736, 1605632, 2654208,
4096000, 7962624
Writing inode tables: done
Creating journal (32768 blocks): done
Writing superblocks and filesystem accounting information: done
This filesystem will be automatically checked every 26 mounts or
180 days, whichever comes first. Use tune2fs -c or -i to override.
After the drive is formatted, you can now mount it at /backups, so all your backups are placed there when WHM runs the backups. To have it mounted at boot, you will need to add it to your /etc/fstab like so:
Create the /backups directory:
root@mace [~]# cd
root@mace [/]# mkdir /backups
root@mace [/]# ls -ls /backups
total 8
4 drwxr-xr-x 2 root root 4096 May 28 16:36 ./
4 dr-xr-xr-x. 24 root root 4096 May 28 16:36 ../
Now add it to /etc/fstab so its mounted on boot:
Run the command:
root@mace [/]# nano /etc/fstab
Now add the line at the bottom, as shown, and /dev/sdb1 will be mounted on /backups:
#
# /etc/fstab
# Created by anaconda on Sun Mar 17 18:34:03 2013
#
# Accessible filesystems, by reference, are maintained under ‘/dev/disk’
# See man pages fstab(5), findfs(8), mount(8) and/or blkid(8) for more info
#
UUID=4a72a087-51a4-477b-9bdb-172f8f4d2906 / ext4 usrjquota=quota.user,jqfmt=vfsv0 1 1
UUID=5f1f3804-efc5-4542-9d99-f0a6b5075067 swap swap defaults 0 0
tmpfs /dev/shm tmpfs noexec,nosuid 0 0
devpts /dev/pts devpts gid=5,mode=620 0 0
sysfs /sys sysfs defaults 0 0
proc /proc proc defaults 0 0
/usr/tmpDSK /tmp ext3 defaults,noauto 0 0
/dev/sdb1 /backups ext3 defaults 0 0
Save the file, and then issue the following command to mount the new /dev/sdb1 on /backups without having to reboot:
root@mace [/]# mount -a
root@mace [/]# df -h
Filesystem Size Used Avail Use% Mounted on
/dev/sda2 28G 20G 6.4G 76% /
tmpfs 3.9G 0 3.9G 0% /dev/shm
/usr/tmpDSK 485M 11M 449M 3% /tmp
/dev/sdb1 35G 177M 33G 1% /backups
and you can now see its mounted as /backups.
To configure WHM for backups, you need to login as root to:
https://MAIN.IP.OF.SERVER:2087
and go to:
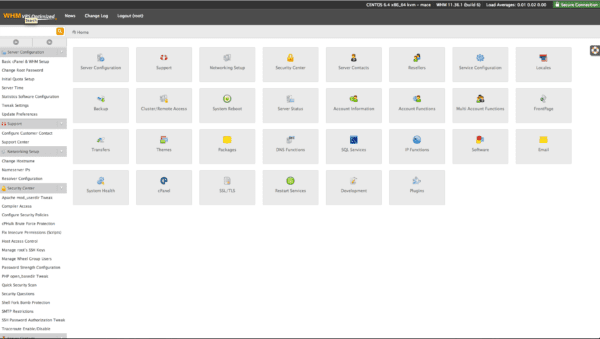
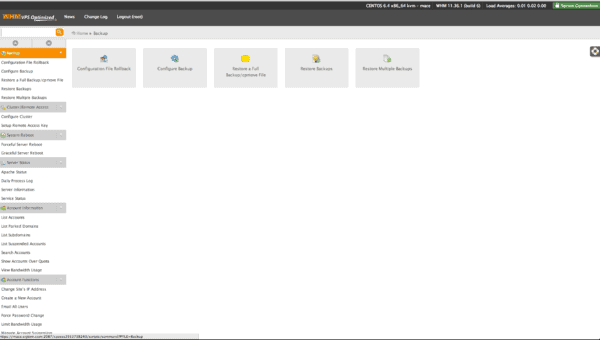
Home »Backup »Configure Backup as shown in the screenshots below:
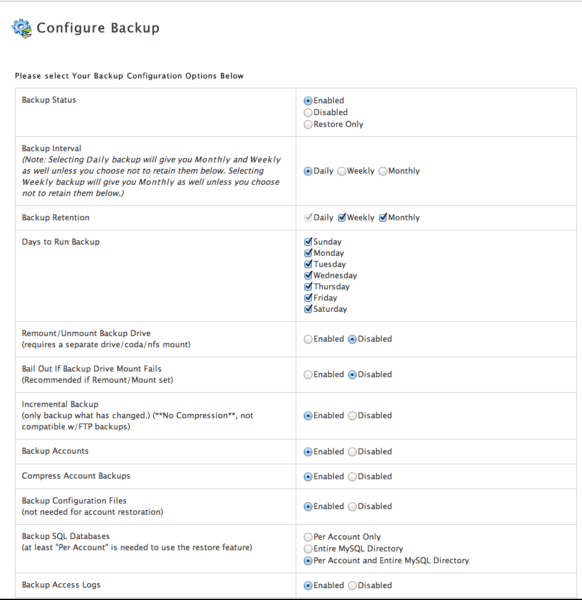
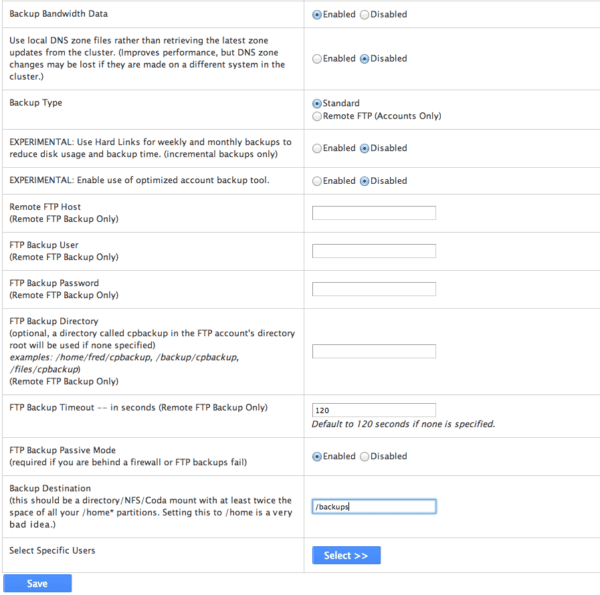
Now you will be on the screen to configure backups as shown below. To configure it backup all data, including account info, MySQL Databases, and WHM/cPanel configuration files, on a daily, weekly, and monthly basis choose the options shown in the screenshots below.
From the above, it will backup incrementally, all account info, DBs on a per account basis, and the whole MySQL directory, the config files for WHM/cPanel, all access logs, it will compress the backups and run the incrementally, thereby only backing up the info that has changed since the last backup. Make sure the 2nd to last option, Backup Destination is set to the correct directory, in this case /backups.
Click save at the bottom, and now your backups are setup. If you want to force them to run the first time, you can login to SSH and run:
/scripts/cpbackup --force
and you will be emailed after every successful backup.
We recommend that you download the backups on a weekly basis, so you have backups on your server, and at your home/office location, making sure you always have a copy of your backups.
If you would like to look into our R1Soft/Idera backups, we can get that setup and configure for you. Please open a new ticket for more info on that if you would like it.


