Partitions are segments of a storage device that have been logically separated from the rest of the device. Partitions allow users to manage data more efficiently and work with different file systems on the same device. To create partitions in Linux, users need to follow four steps: attach the disk to the system, create partitions on the disk, create a file system on each partition, and mount the file systems. There are different tools and commands that can help users perform these steps, such as fdisk, gdisk, parted, lsblk, mkfs, and mount.
Once you’ve identified the disk using the command lsblk, created the partition table and partition on the disk using parted, followed by creating a filesystem using mkfs, we can then begin to mount the new partition.
First, view the current partitions in the system to determine which you would need to mount. To view such data, use the lsblk command, as shown below.

Now we’ve found our partition, /dev/sdc1 with a 10GB size. Next we need to create a directory to mount the partition to.
Let’s call the new directory “backup_files” and create it using the command below.
mkdir /backup_files
Note that you can set the path elsewhere if needed such as /videos/backup/2023.

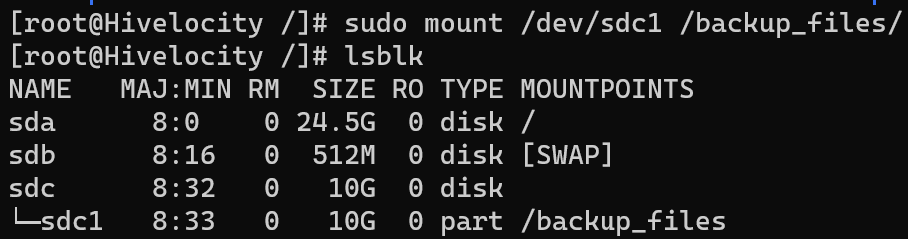
Now we will mount the partition to the directory with the following command:
sudo mount /dev/sdc1 /backup_files
Note that the /dev/sdc1 is listed first as the source followed by a single space and then the destination directory.
One last necessary step is to add an entry in the /etc/fstab file so that once we reboot the system, the mount point will persist and mount itself automatically.
Grab the UUID of the partition using the blkid command as shown in the screenshot below.
*Note: that UUID stands for Universally Unique Identifier. It is a 128-bit number that is used to identify a disk or a partition in Linux. UUIDs are generated randomly and are guaranteed to be unique. UUIDs can be used in fstab or grub.conf files to mount disks or boot partitions by their identifiers instead of their device names.

Copy the UUID as we will need to use it in the next section.
Edit the /etc/fstab file with your editor of choice and add the following line with the UUID from the previous step.
UUID=1a2d6ebf-66c7-4f1b-8b24-9ca137c7a221 /backup_files ext4 defaults 0 2
The items that will change above are the following,
- UUID value.
- /backup_files to the directory that you’ve created.
- Ext4 to the type of filesystem you’ve made
The “0 2” section at the end is explained below as well.
- The section where 0 is located is the backup operation where since it is an outdated system it should always be set to 0.
- The section where 2 is located is the file system check order. Other than the root being 1, everything else needs to be assigned as 2.
Save the file. Now upon any reboot, the partition will mount itself automatically.